macOS has had (since 10.14) a built-in Split View mode that lets you use your full screen to display two apps side by side, each in a quasi "full screen" mode. Personally, I never use this feature—why limit yourself to just two windows?—but I know many people do.
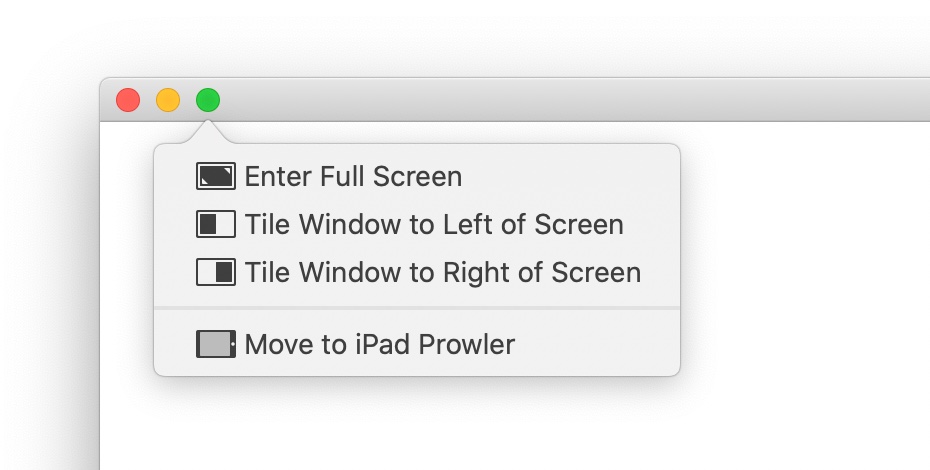
In macOS Catalina, you activate Split View via a green button hover, which then shows this pop-up menu:
The activation method is somewhat different in 10.14, but the end result is the same—a window taking up half your display. Except when it doesn't…
As you can see, the full screen menu item works, but the two Split View entries do nothing at all—no error message, but nothing happens other than the menu vanishes.
Shocking even myself, I'm now the owner of a Touch Bar equipped MacBook Pro—I purchased the entry-level 16" model last weekend. Why? I'll save the detailed explanation for an upcoming look at the machine and its performance, but the main goal was to replace two laptops with one.
But just because I now have a Touch Bar-equipped Mac doesn't mean I suddenly like the Touch Bar. In fact, my feelings about it haven't changed since I wrote about it two years ago:
The Touch Bar, despite its name, is actually an Eye Bar: It forces your eyes off the screen, down to the Touch Bar, back up to the screen, repeat ad infinitum.
After some hours working with my new MBP, this is definitely a problem—and it's a problem even when I'm not using the Touch Bar, which is pretty much all the time: I've found that the changing images and colors on the Touch Bar grab my eye every time I switch apps…
The camera was focused on the Touch Bar, but when I'm looking at the screen, I see all that activity just below the screen, and it's really distracting. Thankfully, there's an easy fix, and one I'd not heard of prior to buying this machine…
What follows is a lengthy dive into a semi-recent massive performance improvement in openssl speeds in macOS. As it's long, here's a tl;dr version:
From 10.14.4 to 10.14.5, a change in macOS improved openssl speed benchmark results anywhere from 15x to 30x.
In real world use, encryption of a large sample file (570MB) using a very long password happened nearly twice as quickly as it did before the update.
The version number for openssl (which is really LibreSSL) is the same (2.6.5) in both 10.14.4 and 10.14.5. I also confirmed that the packages, as loaded on the Apple Open Source site, are identical.
The four libraries that openssl links to have the same version numbers in 10.14.4 and 10.14.5.
The binaries for openssl and the four linked libraries all use much less disk space in 10.14.5 than they did in 10.14.4. I can't explain this, except that openssl itself is no longer a universal binary.
I believe the performance boost is due to macOS enabling Intel's AES-NI, which allow hardware acceleration of some key cryptography tasks. But I can't figure out how this change was made, given the above data.
The Apple Open Source site may hold the answers, but that work is beyond my skill level.
Keep reading if you'd like to see how I came to the above summary…
I received an email from a user this morning, asking if Name Mangler was compatible with Catalina, as he'd seen a report telling him it was 32-bit. This was an odd thing to read, because Name Mangler 3 has been 64-bit from the beginning, way back in 2013.
I asked what report he was looking at, and he told me it was from the Legacy Software tab in System Information. I decided to see what the report had to say about my machine, so I launched the app (Option-click the Apple icon in the menu bar), went to the Legacy Software tab, and saw this…
May 26 2020 Update: The 2020-003 Security Update for Mojave will reset the red flag (and deprecate the command used to ignore the update). However, these steps do still work, so you just have to repeat Miles' solution again. And after you do, do not open the Software Update panel, or the red badge will return. (But if it does, just run the commands yet again.)
May 9 2020 Update: Commenter Miles Wolbe has come up with a much better solution. Ignore everything in this tip, and just run this Terminal command:
If you're interested in why this works, Miles explains it in more detail. I've tested this method, and it works—no more agent required!
I have no plans to move my main iMac to macOS Catalina, at least for the forseeable future. There are two key apps I use—Fujitsu's ScanSnap scanner software and the Many Tricks' accounting app—that are both 32-bit. In addition, there are changes in Catalina relative to permissions that make it somewhat Vista like and slow down my interaction with the system. (My MacBook Air is my "production" Catalina Mac, and I have an older retina MacBook Pro that I use for Catalina betas.)
But Apple really wants people to update to Catalina, so they let you know about Catalina…constantly, it seems. In System Preferences > Software Update, you'll see this…
Say I’ve resized a window to the dimensions I want. Is there a way to figure out what these are so I can create a resize action in Moom?
Basically, the user wants to save a window size as a custom action, to make it easy to reapply that action to any window. (If it were just one window in one app, you could use Moom's Save Window Layout feature to save that layout for easy recall.)
There is a way to see this info in Moom, but it requires enabling our debug log and digging through a bunch of output. As an easier alternative, I was certain that AppleScript could do this; I fiddled a bit on my own, and did some web searching, which led me to this thorough post on StackExchange.
Using the very first bit of the first script there, I came up with this version:
Of course, me being me, I decided I'd spend a couple hours making it more useful, even though I probably won't use it all that often. So I modified it to work for whichever app is frontmost, and made it run from Keyboard Maestro. I then assigned it a gesture trigger with my mouse, so I can easily see any window's dimensions with a simple mouse movement.
While I have older hardware (a 2013 MacBook Pro) that I use for testing macOS betas—it's now running Catalina—it's often handy to have the latest macOS beta running in VMware Fusion on my iMac. With past OS releases, this has been a relatively easy process. With Catalina, however, attempting the install results in a black screen.
Thankfully, some enterprising Fusion users (Bogdam and intel008) have figured out a workaround. I tried it, and while it did work for me, I had to change the instructions just a bit (read on for the details).
We don't publish all of these, as we're not necessarily ready for them to be put to use by everyone (otherwise, they'd be visible prefs). But there are cases when a user has a specific need for a setting, or when troubleshooting, that these hidden prefs can be very useful. As such, I often have to send someone a defaults write command.
Read on to see how I use Excel's formatting features—plus the ever-valuable Keyboard Maestro—to disguise some of this workbook's formula results, yet still easily copy them for sending to a user.
These images were automatically cropped from the master image (after I cropped that; more detail on what I did is coming in a follow-up post), via ImageMagick.
So this would be that post: How to auto-crop huge images using ImageMagick. If you're not familiar with it, ImageMagick is a set of command-line tools to manipulate images. There are a number of ways to install ImageMagick, but I used Homebrew (brew install imagemagick).
Updated for the fifth release of macOS Mojave (10.14), which came out on January 22, 2019
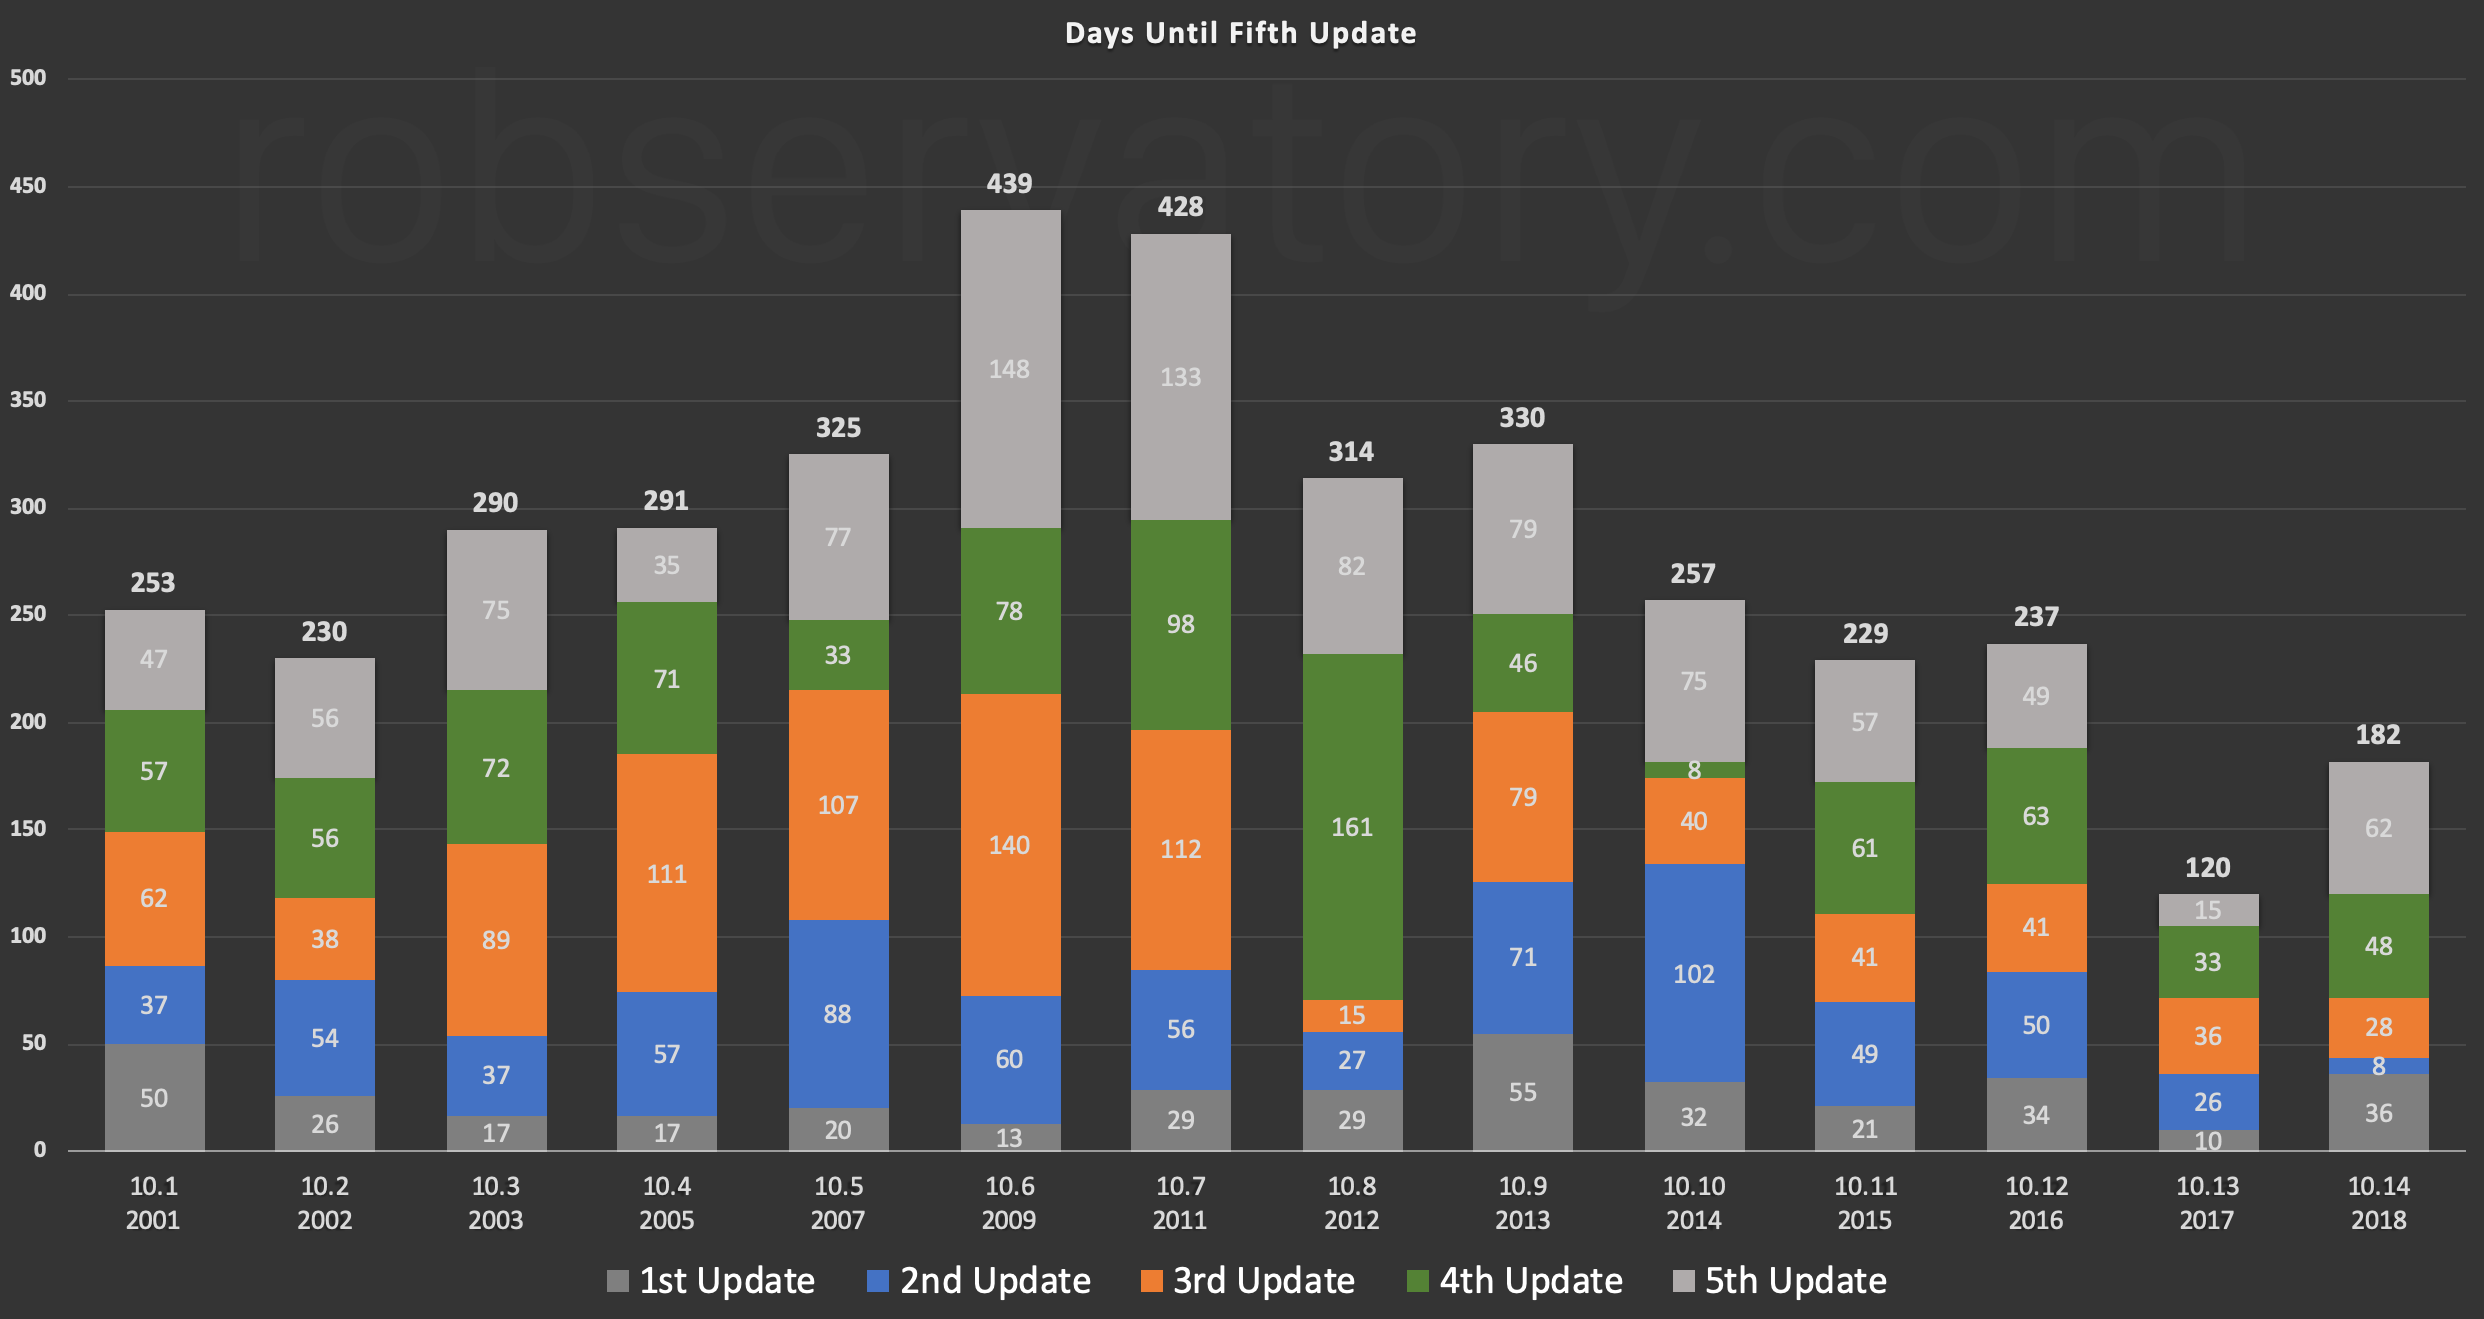
When the third release of macOS High Sierra came out, I charted the pace of its updates compared to all prior Mac OS X/macOS releases. I said I planned to keep that chart current, but decided that I'd use the fifth release (typically around six months from the OS release date) as the baseline.
Here's the latest update for Mojave's fifth update—a bit late, as that update (10.14.3) came out back in January. (Note that 10.0 is not shown, as it had only four releases.)
macOS 10.13 is clearly the outlier of the bunch, taking just 120 days to reach its fifth update, but macOS 10.14 is the only other release to hit its fifth update in under 200 days.
It certainly appears that Apple started pushing more updates more quickly when macOS 10.13 was released, but it's hard to say just why: Is it a new strategy to push updates more quickly, is it buggier macOS releases, or are they catching bugs due to better reporting, the public betas, etc.? I don't have a clue, but it's clear that "more and faster" is a good summary of the last two macOS versions' update releases.