Skip to content

os x

A quick-toggle solution for macOS’ translucency feature

Note: This was originally published in 2015; I've updated it with a minor change required for Mojave, and clarified a bit of the text.

macOS includes—and enables by default—translucency, which gives you 'wonderful' effects such as this in Calculator:

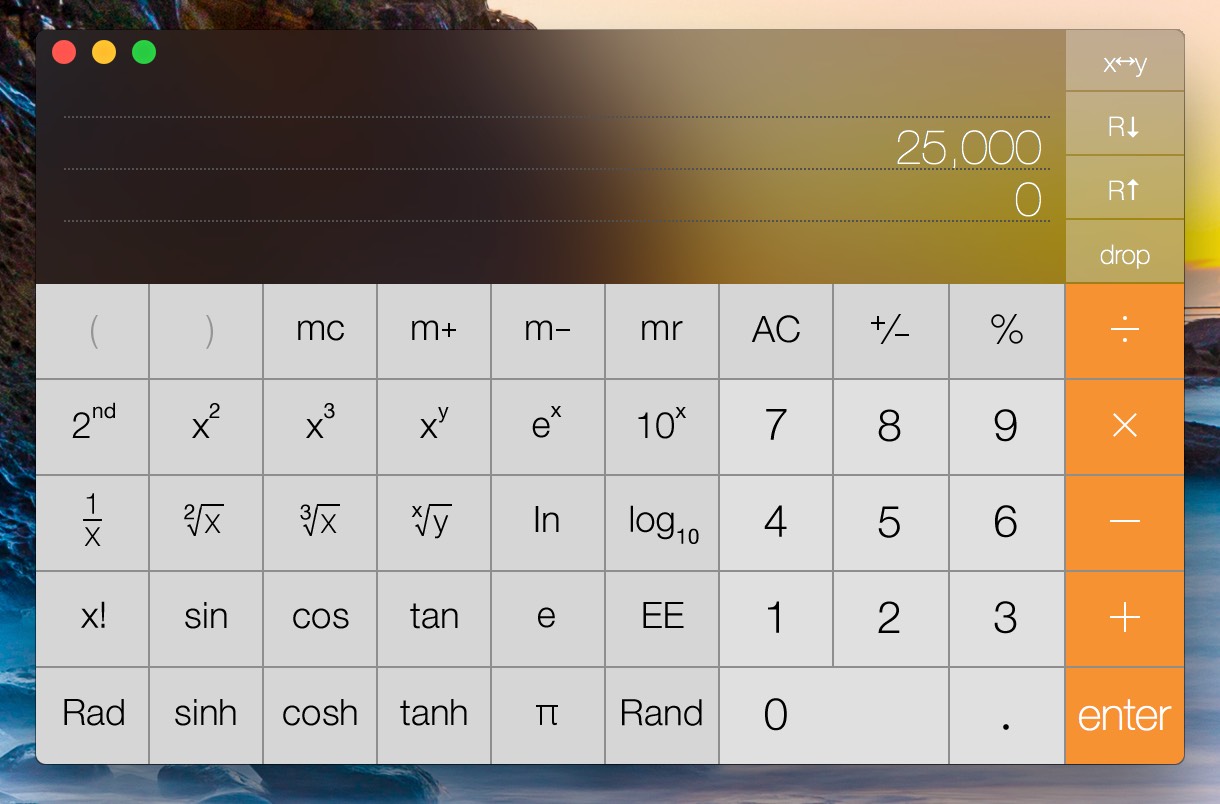
This is just one example; lots of other apps (Mail and Messages, to name two) contain panes that become grossly distorted by background color bleed-through. I'm not sure who at Apple (Marketing?) thinks this feature is good for productivity , but I find it completely distracting.

As a result, I turn off translucency on every Mac I own. You can do so yourself in System Preferences > Universal Access > Display. Just check the Reduce transparency* box, and you won't get any more bleed-through. (You'll also get a solid Dock, and perhaps the world's ugliest Command-Tab task switcher. Such is the cost of usability.)

* It's ridiculous that Apple calls this transparency, which is defined as "the condition of being transparent," and being transparent means being see-through, clear, invisible, etc. This is clearly translucency, or "allowing light, but not detailed images, to pass through." But I digress…

However, when writing for Many Tricks or Macworld, I often need to take screenshots. And because most users won't disable translucency, I prefer to take those screenshots with translucency enabled, so that they're closer to what most users might see. That means a trip through System Preferences to toggle the checkbox, which gets annoying after the second or third time you've done it.

There had to be an easier way—and after some missteps, I eventually found it.

[continue reading…]


Replace the departed free iTunes Radio with free iTunes radio

In case you missed the news, Apple has now officially ended the free streaming of iTunes Radio. To listen to these stations now, you have to subscribe to Apple Music, which isn't something I want to use. (If they offered a "use but don't integrate into library," I'd subscribe in a heartbeat…but they don't.)

There are any number of other radio services out there - Pandora, Spotify, etc. But I wanted something that existed in iTunes, as I didn't want to have to run another app, nor (shudder) use my browser as a radio station front end. Then I remembered that iTunes has a huge—as in tens of thousands—assortment of Internet Radio stations.

I hadn't looked at internet radio in a long time, as I'd been quite happy with my selection of iTunes Radio stations. But Apple's move inspired me to take another look, and so far, I like what I've found. If you'd like to explore the world of Internet Radio in iTunes, here are a few tips to ease the exploration.

[continue reading…]


Yosemite’s constant clattering clutters Console

For those who aren't familiar, Console (found in Applications > Utilities) is an application that shows you what's happening beneath the lovely skin of OS X. Open the application, and you'll see a combination of status and error messages from any number of sources.

If you've never looked at Console before, you might be surprised by just how much stuff gets written there. But with the release of Yosemite, things have really taken a turn for the worse—the amount of stuff written to Console is greater than I recall for prior OS X releases.

As a test, I set up a new Yosemite virtual machine, installed ScreenFlow (and nothing else), then launched and interacted with a number of Apple's apps for two minutes while recording the screen. The results are quite sobering; here's what two minutes of Console logging looks like, reduced to a 10-second movie:

As you can see, there are a lot of Console entries in just two minutes.

[continue reading…]


Yosemite: Dark Dock and App Switcher with light menu bar

High Sierra update: This trick no longer works in High Sierra. As far as I know, there is no workaround.

Here's my first (only?) Yosemite hint, courtesy of my Many Tricks partner, Peter Maurer. Peter wanted a light menu bar, but preferred the contrast given to application icons in the dark Dock—like this:

Here's how to achieve that effect.

  1. Open Terminal, then copy/paste this and press Return: defaults write NSGlobalDomain AppleInterfaceStyle Dark
  2. Paste or type killall Dock and press Return. The Dock will relaunch in its dark mode.
  3. Copy/paste this and press Return: defaults remove NSGlobalDomain AppleInterfaceStyle

The first step sets dark mode, step two restarts the Dock to switch it to dark mode, and step three turns off dark mode—but the Dock won't notice, and will remain in its dark state (until it's next restarted, which isn't often). Because the Command-Tab switcher is associated with the Dock, it will also be dark.

If you're going to script this, you'll want to insert a delay between the second and third steps, so that the Dock can finish launching before you disable dark mode. Neat trick!


Silently mute the mic input via AppleScript

Note: The scripts in this hint don't truly mute the mic input; they drop its volume to zero. That's because there's no way to mute an input source via AppleScript (while you can mute an output source). At zero level, the mic will still pick up sounds, but they're very quiet.

Thanks to John Welch, though, you can download an app that will mute the mic with a simple one-click HUD—he posted it in the first comment here, but that download link is broken. Instead, download it via this link, and you should be good to go.

While recording our weekly podcast, The Committed, I often want to mute the microphone input for one reason or another. (Yes, my microphone has a big Mute button on it, but pressing it results in an audible CLICK in the recording.)

There are any number of ways to do this quietly, including just sliding the level down in the Sound System Preferences panel (though it's hard to then get it back to exactly the right spot). There are also any number of App Store apps that will do this for you; some are free, some are paid. And doing it programmatically yourself is as easy as two one-line AppleScripts:

Save those separately, assign keyboard shortcuts (or more quietly, trackpad gestures) using your favorite third-party tool, and you're done.

But I wanted something more. I wanted one script to mute and unmute the volume. I also wanted a visual reminder when I was muted. After an afternoon of slogging around the internet, looking up obscure AppleScript command syntax, and diving into Sal Soghoian's AppleScript 1-2-3 book, I came up with something that seems to work. This short video shows one version of it in action:

Read on for the code and a how-to on putting it to use.

[continue reading…]


A look at the first eight years of macosxhints.com

I was cleaning out some old images from the site, and found over 150 apparently unused images. Whoops, that's what nine years of bad housekeeping will get you.

One of the leftovers, though, was kind of interesting. At some point in time, I graphed the number of hints published each day on macosxhints.com, from launch through 2008—a total of 12,051 hints.

Even if unlabeled, it'd be pretty easy to figure out where the major OS X releases occurred (except for 10.1, not sure what's up with that?). And you can see a general downward trend in hints per day, as the OS became more established (and more locked down) over time.

In any event, I thought it was an interesting chart, and figured I'd toss it into a quick post instead of just sending it to the dustbin.


Control is the key to avoiding needless dialog boxes

Over the weekend, I wrote myself a little AppleScript program that makes it much easier to create license files for our customers. (Given my lack of knowledge on AppleScript, I'm quite happy with the result.)

To make it easy to use on all my Macs, I stored the finished result in Dropbox. I tested it using my MacBook Pro, assigning it a global keyboard shortcut using Butler. It worked great; as soon as I typed the shortcut, I'd see my "Which program?" onscreen dialog, and all was good.

When I got back to my iMac, I used Butler to point to the same script on Drobpox, and tested it. I was very surprised to see that, instead of launching my app, OS X presented this dialog box:

Confused, I pulled out the MacBook Pro, and tested again…and again, it worked fine, launching without any confirmation dialog.

After many minutes of hair pulling, I figured out the problem: On the MacBook Pro, I had assigned the shortcut as Shift-Option-M; on the iMac, I decided that it'd be easier to type Shift-Control-M, so that's what I used (intending to change the MacBook Pro to the same shortcut). As soon as I removed the Control key from the shortcut, my application loaded without the confirmation dialog.

I've been unable to figure out why this happens, but if you're launching AppleScript apps via global shortcuts, avoid using the Control key in those shortcuts (unless you like needless confirmation dialogs, that is).


How to use Safari to track The Masters leaderboard

In general, I don't use Safari—mainly because I'm addicted to the add-ons I get with Chrome and Firefox. (Yes, I know Safari has extensions…but they're underpowered and feature limited compared to what you can get in the other browsers.) However, during Masters week, Safari has a key role in my following the tournament, thanks to one key feature: web clip, i.e. Open in Dashboard.

While The Masters has an excellent iPad app, I don't like having the iPad locked into one app for hours at a time. So, to follow the leaderboard, I turn to Safari's Open in Dashboard feature, along with a favorite old Mac OS X Hints hint that allows me to drag widgets out of the Dashboard. Using these two things together, I can view the full Masters leaderboard, floating in a window all its own.

Best of all, the interactivity of the leaderboard is preserved, so I can re-sort the list, expand a player's scores, and do all the other things I can do on the actual leaderboard page.

Note that you'll need some spare monitor space for this trick: the dragged Widget floats over every other window, so it will get in the way if you're using, for instance, an 11" MacBook Air.

If you'd like to do the same, here's how…
[continue reading…]