Skip to content

Excel

Avoid a text selection bug in Excel

I like Excel. I cover it often here, and I use it in projects where it probably would make more sense not do to so. Like my current task, which is developing a stats tracking package for a billiards training game (yea, obscure, I know).

While working on this workbook, I ran into a problem where I couldn't effectively select text in the formula bar: Whenever I tried, the selection would continually grow back to the left, regardless of what I did with the mouse. I also couldn't click on a location in the formula to place the cursor there; it would instantly start selecting text. It looks like this:

But this didn't always happen—in fact, it didn't happen very often at all. And I didn't seem to see the problem in new workbooks, only this one, and then sometimes seemingly randomly, in others. After way too much troubleshooting, I figured out the cause and the solution:

If you resize the pop-up menu at the left of the screen, that triggers the selection bug. Resizing after that, even back to where it was, won't help. You can either close and reopen the workbook, or drag the slider to remove the box. This video shows the entire process, from working to broken and back again:

I don't know how old this glitch is—it exists at least as far back as Excel 16.33 (16.46 is current). I'm trying to get someone at Microsoft's attention, but if you can help, please do—it's a very annoying bug.


Download and track Amazon purchases over time

Dec 18 2020 update: The Amazon export URL appears to be functional again, which is great news. However, the data is in a completely different format than what's provided by the Chrome extension, so it needs to be massaged to work with my spreadsheet. For now, if you want to use my workbooks, keep using the Chrome extension. I'll see about modifying the spreadsheet to work directly with Amazon's data.

Recently I was trying to enter our Amazon purchase details into Quicken—the transactions download automatically, but they're generically assigned to "Shopping." I was using Amazon's order history page to match transactions and assign categories, but it was slow and painful going given the layout of the orders page.

I thought there must be a simple way to download your Amazon purchase history—once downloaded, I could use a spreadsheet to search my transactions. As it turns out, there is a way, but it's far from simple. Nonetheless, after way too much work, I now have an Excel workbook that makes it very easy to find any of our historical transactions. I enter a year and amount on my Search sheet, and any matches appear immediately:

Getting from "this should be possible" to "it works!" was (as usual) more of a challenge than I anticipated, but it is now working as I wished.

[continue reading…]


How to securely hide worksheet(s) in an Excel workbook

Important note: Please see the comments—the method I discuss here is secure from casual users. However, the Excel files are just zipped XML files, so it's possible to unzip them and open them with a text editor. When I tested with my dummy salary worksheet, I could see individual salary values, but no actual text—so there wasn't any way to associate a salary with a person. Still, the following should be considered as only a semi-safe solution.

My wife wants to create a budget spreadsheet for the various departments in her company to use. Each department would have their own tab, showing their planned yearly budget by month for the coming year. A super-simplified and unrealistic input worksheet might look like this:

The green areas are the portions that the users would fill out—probably not the department heads, but just someone in the department. Which leads to the problem: There's a worksheet called Salary Info that's used to populate the Salaries line in the workbook. (In my silly example, I just divided the total salary into four equal quarters.)

The problem is that the Salary Info worksheet contains salary information for the entire organization, and this isn't information that should be shared with everyone.The Salary Info sheet might reveal, for instance, that a coworker is leaving in three months—the coworker has told management, but the employee isn't ready to tell the entire company just yet.

So how can you distribute the workbook to all the departments, with the salary info intact, but without revealing that data to everyone?

[continue reading…]


The 2020 edition of my Excel run tracking workbook

At the end of 2016, I first posted about my run tracking Excel workbook. That first version was crude, but functional, and I used it to track every mile of my "2,016 miles in 2016" running goal. I posted a minor revision for 2017, then made some major updates for 2018. When 2019 rolled around, I made a few more changes, which I released by way of a note added to the 2018 post.

Now that 2020 is here—I know, it's a bit past January, sorry!—I've made yet more changes, and have decided it's time to replace both of the previous posts with one new all-in-one post. Here you'll find a link to the latest version of the workbook, as well as full instructions on how to use it.

[continue reading…]


How to copy non-visible formula results from Excel

I use Excel for a ton of stuff, both personal and work. As an example, on the work side I use an Excel workbook to track our apps' hidden prefs—which are set using a long ugly Terminal command1Something like this: defaults write com.manytricks.Moom "PMWindowFadingDuration" -float 0.

These hidden prefs can be used to invoke features we're testing, or to revert a behavior we've changed at some point, etc. For example, Moom has hidden prefs to use the full screen grid without clicking in the big box and to disable the fade in/out of the keyboard controller.

We don't publish all of these, as we're not necessarily ready for them to be put to use by everyone (otherwise, they'd be visible prefs). But there are cases when a user has a specific need for a setting, or when troubleshooting, that these hidden prefs can be very useful. As such, I often have to send someone a defaults write command.

Read on to see how I use Excel's formatting features—plus the ever-valuable Keyboard Maestro—to disguise some of this workbook's formula results, yet still easily copy them for sending to a user.

[continue reading…]


An even more improved run-tracking Excel workbook

2020 update: Everything here is out of date now, and has been replaced with my post on the 2020 version of the worksheet. In there you'll find a download link and full instructions. I'm leaving this article up only because it may be linked to from other places.


2019 update: I've uploaded new files (in one zip archive this time) with a few changes and fixes. These files are also set up as "master" files: The idea is you duplicate one, rename it for the current year, then use it. When the next year rolls around, repeat the process. This way, you don't have to use the macro-enabled version to delete data at each new year. Download the new files.

About two years ago, I created a basic-but-functional run tracking workbook (created in Excel). It worked well, and helped me through my 2,016 mile year in 2016. I didn't run nearly as much in 2017 (on purpose), but 2018 is upon us, and I'm going to up my mileage this year—probably not to 2,018, though!

In preparing this year's version of the workbook, I addressed a few things that bugged me about the first one: It was ugly, changing years was difficult, and it was ugly. It was also really ugly. Did I mention it was ugly? Anyway, here's what I've changed with the new version:

  • Years are now easily handled; just input the year you wish to track, and the workbook does the rest, including leap years.
  • All run data can be deleted with one button click—and yes, there's a confirmation first. (Requires macro version of workbook.)
  • The pace calculator is no longer a separate worksheet; it's integrated into the Overall worksheet.
  • It's not nearly as ugly as it was before—layout is improved, gridlines are gone, tables are cleaned up, etc.

As noted, there are two versions of the workbook—one contains a macro that can erase the run data from each monthly worksheet, the other does not contain that macro. This is something you'll only do once a year, but it's much easier with the macro version.

[continue reading…]


An even easier way to use Excel’s Paste Special dialog

I recently explained how to use the keyboard in Excel's Paste Special dialog box, and this is a great timesaver on its own. But I use Paste Special a lot, especially with Formats, Formulas, and Values, so I made those three even easier to use via the keyboard…

Each one has its own direct keyboard shortcut, courtesy of Keyboard Maestro. Here's how I set it up; these instructions should work (with some changes, of course) for any app that can script keystrokes.

First, I created these macros in an Excel group, so they're only active when Excel is frontmost (no need to create global hot keys that you only use in one program). The actual macros are pretty trivial:

  1. Send Command-Control-V to bring up the Paste Special dialog
  2. Pause just long enough for the dialog to appear onscreen
  3. Send the chosen shortcut key—T, F, or V in my vase
  4. Send the Return key to execute the action

Then I just assigned each one to the same key used within the dialog, but with Command and Option to make it usable from anywhere within Excel.

[continue reading…]


Use the keyboard in Excel’s Paste Special dialog box

When I'm working in Excel, I spend a lot of time in the Paste Special dialog box—pasting formulas, pasting all but formats, pasting only formats, etc. You can call up the dialog with a keyboard shortcut (⌃⌘V), but it then looks like you're stuck using the mouse, because there aren't any keyboard shortcuts for the various actions. But really, there are…

(Note: This applies to the current version of Excel, i.e. the one in Office 365. Based on the comments, it apparently also works in Excel 2011 if you add the Command key.)

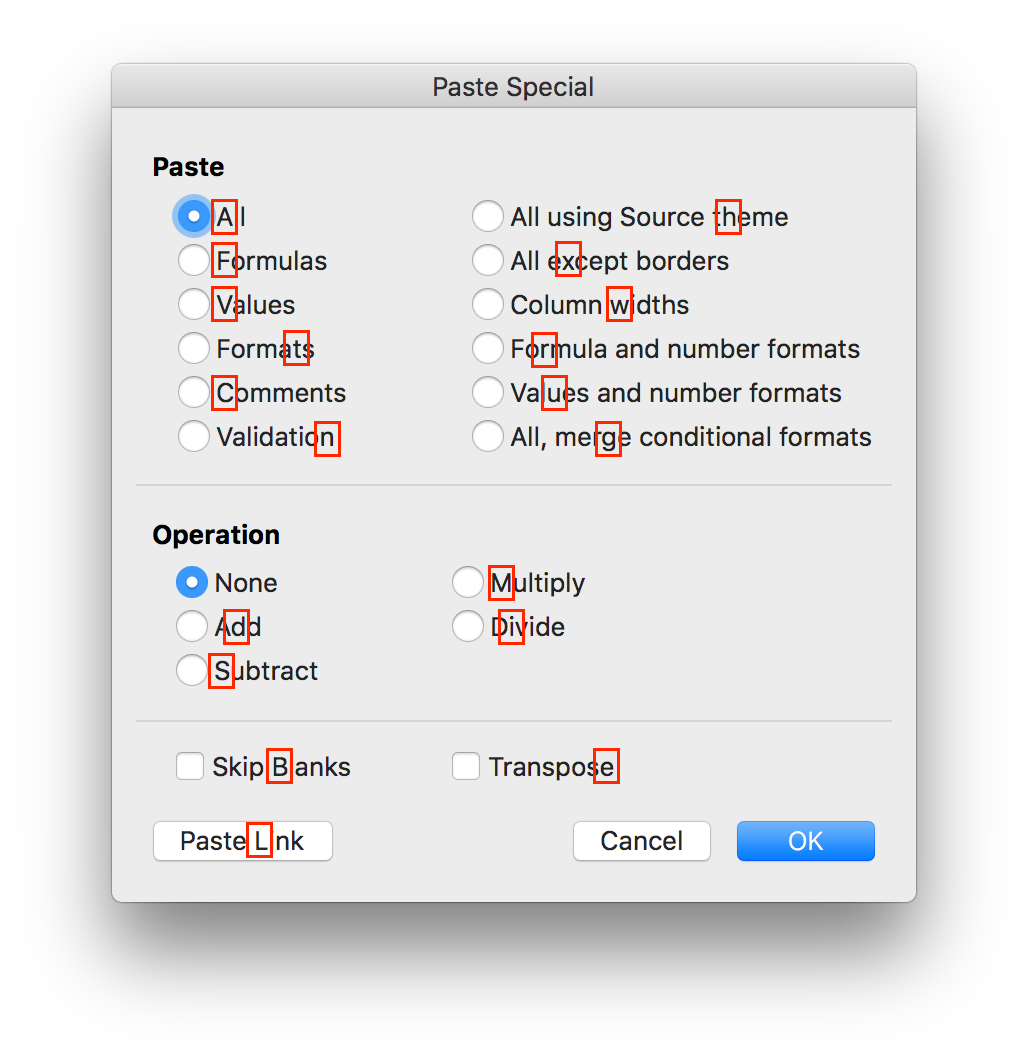
On Excel for Windows, one character in each option has an underline, indicating that option's keyboard shortcut. The good news is that these same shortcuts work on the Mac, even though they're not shown. (There is one apparent oversight: The O key should select Operation: None, but it doesn't seem to work on the Mac.)

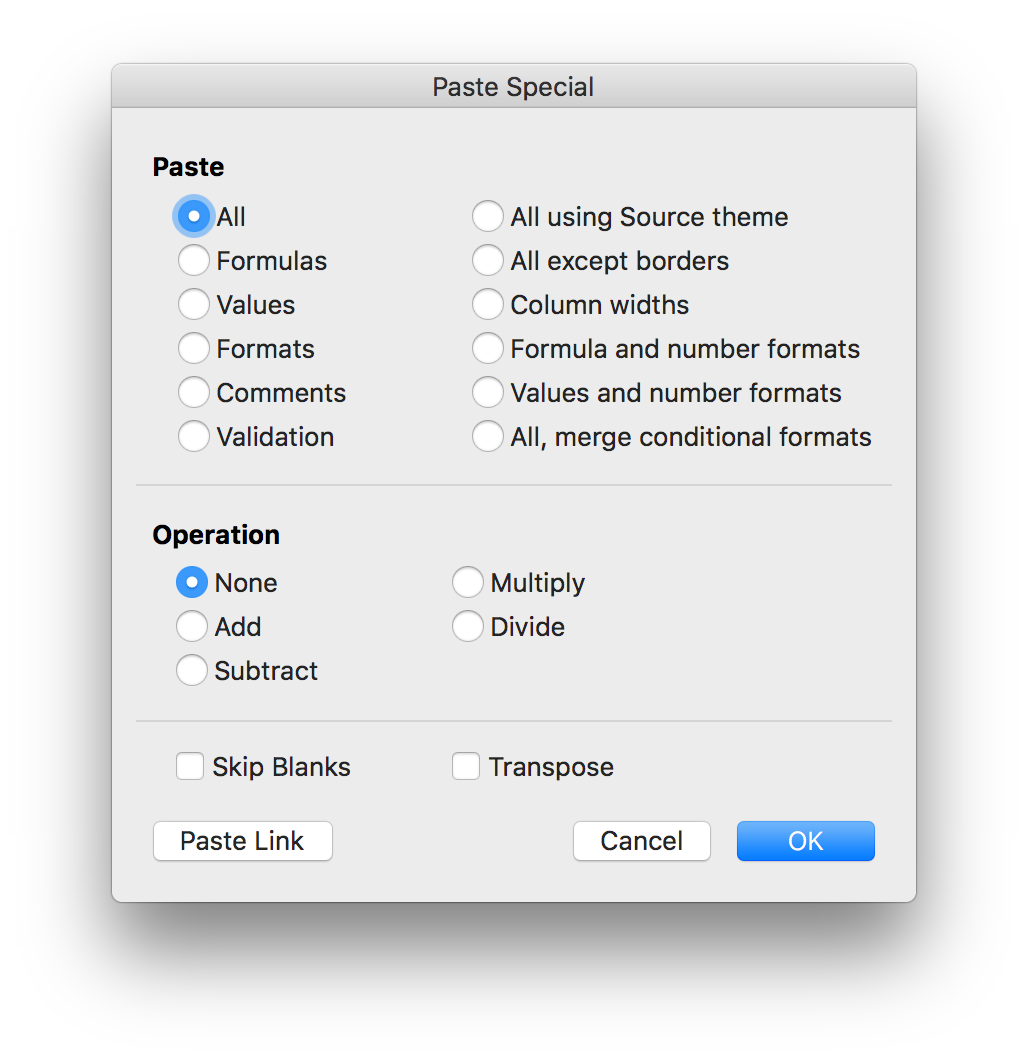
Here are all the shortcuts, graphically:

Press the highlighted key, and that action will be selected; press Return to execute the chosen command, and you can use the Paste Special dialog without ever touching the mouse. (Note that the Paste Link action executes immediately when chosen, so it's a one-key operation.)

Because graphics are horrid for web searching, the text version of each shortcut, in alphabetical order, is shown below.

[continue reading…]


Randomly merge lists in Excel

This morning, while working on a customer request, I had to create a list of words by randomly choosing words from two lists, and then mashing them together. This isn't something that I've ever done before, and I'm not sure how relevant it might be for others, but I'm documenting it here just in case someone is searching for such a solution.

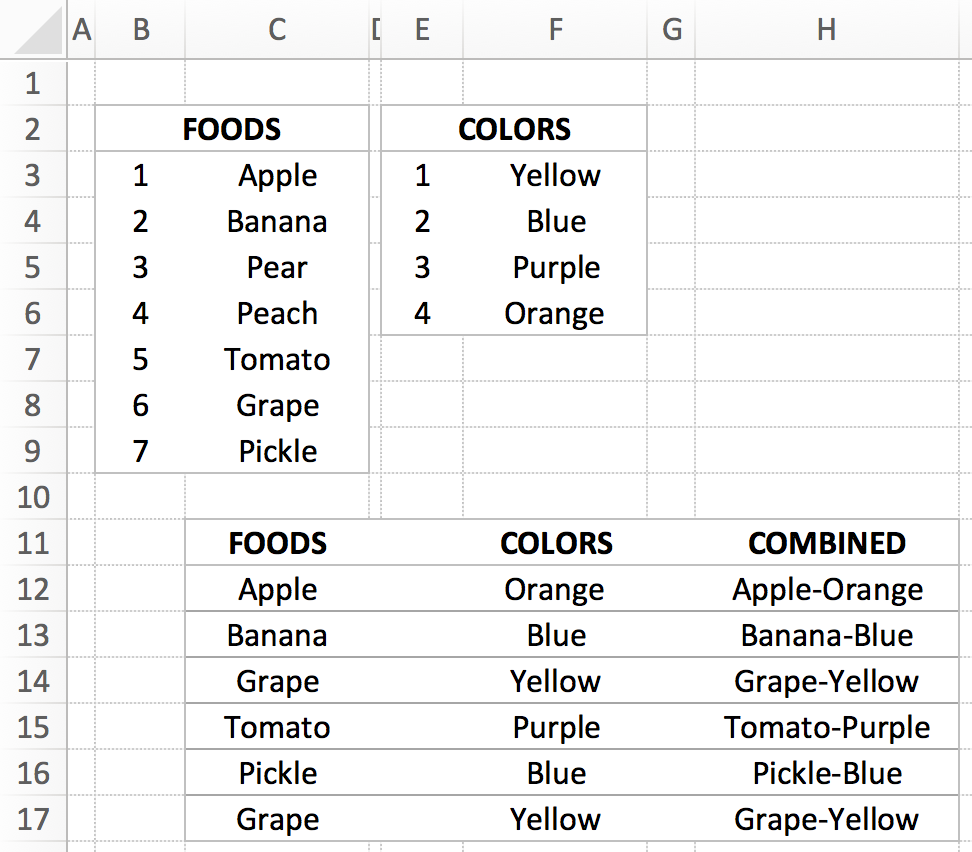
Here's how my little test spreadsheet looked when I was done with it:

I didn't realize it at the time, but this could be a "modern paint color" name generator…"Yes, I'd like two gallons of the Pickle-Purple, please." Anyway, the COMBINED column contains the final result, with the FOODS and COLORS columns showing randomly-selected entries from the two lists. Each time you recalculate the sheet, all the selections will change.

The key bit is the formula to grab a random entry from the list; here's what that looks like in cell C12 ("Apple"):

=VLOOKUP(RANDBETWEEN(B$3,B$9),B$3:C9,2)

It's just a basic VLOOKUP that uses RANDBETWEEN to grab a random row from the lookup table. Not rocket science, but nothing I'd tried before. (For this to work, your table entries need row numbers, obviously.) The COMBINED column is just a simple text formula, i.e. =C12&"-"&F12 to combine the two random values.

I also wasn't aware of the RANDBETWEEN function—it returns a whole number between the values you specify. That is so much easier than using RAND and then having to multiply and round off, etc.

Feel free to download the workbook if you'd like to take a look.


A spreadsheet to track full-year running miles

2020 update: Everything here is out of date now, and has been replaced with my post on the 2020 version of the worksheet. In there you'll find a download link and full instructions. I'm leaving this article up only because it may be linked to from other places.

 
Update: I've created a much nicer run tracking workbook. Please use that version, as this one is out of date and is no longer maintained. I'm leaving it here because some of the "how to" bits are still applicable to the new version (and it's linked from that post), but I've removed the download link.

To help with my 2,016 miles in 2016 running project, I created an Excel workbook to track my progress. A couple people have asked for the workbook, so here it is…with some caveats and instructions.

First off, this was written for Excel 365, though it should work fine in recent versions of Excel. There is no Numbers version, there is no Google Sheets version…this is it. Start by downloading the worksheet and opening it in Excel.

The first thing you'll notice is that this is a really ugly workbook. The only thing I spent any time "prettifying" at all was the actual vs. goal chart, as that's the thing I tended to look at most often. The second thing you'll notice, depending on when you open the workbook, is that it appears nothing is working. The formulas will not work properly until January 1st, 2017.

[continue reading…]