Skip to content

Macs

Remember, kids, RAID is not a backup!

Major update: The QNAP box failed tonight (Aug 3) after running flawlessly for three days straight. I went out to grab some dinner (I shouldn't leave, ever, apparently), and came back to the RAID offline with just a power light, no USB or drive lights.

I moved the drive from a USB hub on a long cable to directly into my Mac on a short cable. Same problem. I then pulled the drives from the array and dropped each into my drive dock, and they were both fine. (All my data was gone, though—thankfully I had literally cloned the drive just before I went out.)

Needless to say, the QNAP box is going back. I've ordered a different unit, with a different chipset in it, but it won't be here for about a week. In the interim, I've put my new drives in external enclosures, and I'll just use Carbon Copy Cloner to mirror them every 30 minutes or so. I've edited the post to reflect my experience.

I'll edit and repost this once the new box is here and (hopefully) working, though I might wait more than three days after it arrives, just to be sure!

On my iMac, I have a fair amount of data—somewhere around eight terabytes or so spread across 15TB of drive space. Until last week, I had it split between the internal SSD (work and personal files I access a lot), an external 6TB USB drive (archive stuff I want to keep but not regularly access), and an external 8TB RAID box (a whole bunch of music, movies, home videos, work videos, etc.)

Being paranoid, I also had relatively good—but not bulletproof, as I discovered–backup strategies for all of these things. And it's a good thing I did, as last week, my external RAID box died in spectacular fashion. While I was out of town, no less. And that's why they say, "RAID is not a backup!"1Many RAID levels duplicate your data, but if something happens to the RAID box itself, the data is toast.

So what happened, how'd I recover, and what's my new plan going forward?

[continue reading…]


My impressions of the M1 MacBook Pro

I recently received my Apple M1-powered 13" MacBook Pro, which is primarily going to be used for testing our apps on Apple silicon, and supporting customers using these machines. But that doesn't mean this is a work machine; it's a personal purchase as I'll use it for my own needs as well. (Thankfully, it only had a net cost of $33 after I sold my 16" MacBook Pro.)

By now, you've probably read a slew of stuff about both the MacBook Pro and its slightly-lighter MacBook Air cousin. Between unboxing videos, extensive benchmark suites, and multi-thousand-word reviews, there is no lack of coverage of these machines. (However, I will add that I did make a video of my MacBook Pro—with its 16GB of RAM—opening 75 apps in just over a minute. Not bad for an entry-level machine!)

I'm not going to try to replicate those reviews, because they do an excellent job of covering the new M1-powered Macs in a level of detail that I just don't have time to get into. Instead, here's what I'll be discussing…

  1. Why I chose the 13" MacBook Pro
  2. A few benchmark results of interest
  3. Rosetta and non-native apps
  4. Using iOS apps on macOS
  5. General discussion on performance
  6. The future of Apple silicon Macs

So why a MacBook Pro and not an Air?

[continue reading…]


16GB of RAM and 75 open apps…what could go wrong?

I ordered my 13" M1 MacBook Pro with 16GB of RAM, as I felt buying the most offered was the best bet for future proofing this "entry level" M1 chipped Mac. Later today I'll be posting a detailed writeup of my time so far with the new machine, but for now, here's a little over-the-top demo.

I selected everything in the Applications folder—excluding Time Machine, Siri, Launchpad and a few other similar non-apps—and opened them all at once. I did this with a timer running, while recording the screen, and here's the result…

As you can see at the end of the video, it took one minute and seventeen seconds to open all 75 apps—do the math, and you'll see that's about 1.5 seconds per app (it was notably quicker than that at first, and slower than that at the end). For 75 apps. On a machine with nowhere near enough RAM to fit them all in active memory. I was amazed at how rapidly it was able to complete this task.

These weren't even all native apps, it was a mix of Intel, Apple, and Electron (both native and non-native) apps.

I tried a similar test on my MacBook Air, but as it's an 8GB RAM machine, I limited it to opening 37 apps, which took it well over three minutes (about 5.5 seconds per app). I didn't bother to try on my iMac—it has 40GB of RAM, but it's also got a slower SSD, so I don't know that it would've matched the MacBook Pro's performance.

[continue reading…]


Bookmark both of Apple’s system status pages

I've long known about Apple's general System Status page, which provides a dashboard showing the state of most of Apple's consumer-focused services:

https://www.apple.com/support/systemstatus/

Until yesterday's "why can't I launch any apps?" outage, however, I'd never known that they also have the same type of status page for developer-focused services:

https://developer.apple.com/system-status/

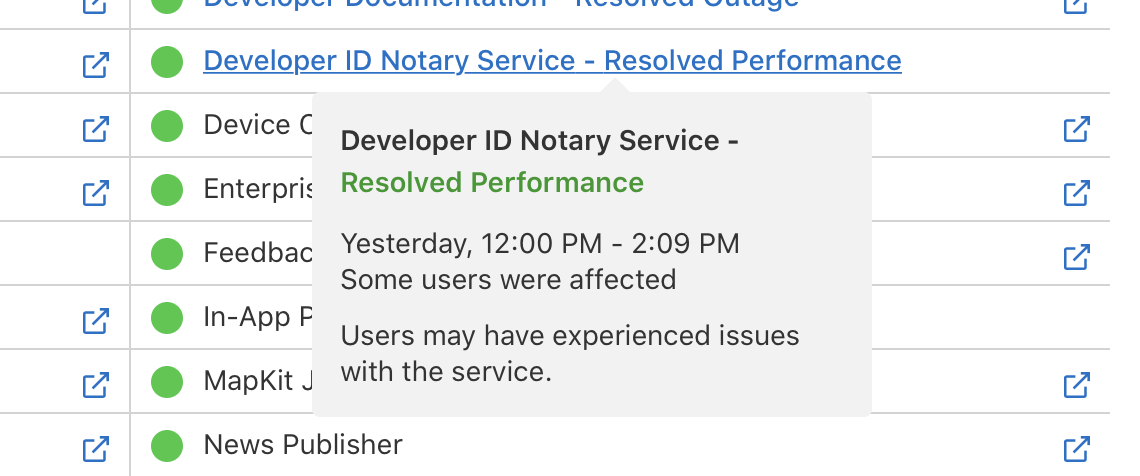
But this page is useful to more than just developers (and it doesn't require a login to view). Had I known about it earlier, yesterday it would've shown that they were having a problem with the Developer ID Notary Service, which is why apps wouldn't launch.

In typical Apple understatement fashion, they've posted the resolved status for that service today:

"Some users were affected" and "Users may have experienced issues with the service" certainly make it sound less painful than what it was, i.e. "A ton of users were unable to use their Macs" and "Mac users could not launch their apps for over two hours." Somehow Apple needs to come up with a better failure mode for the service, as the results yesterday were unacceptable.

Note: If it happens again, simply edit the /etc/hosts file as root, and add this as the last line:

0.0.0.0      ocsp.apple.com

That will prevent your Mac from trying to contact the validation server at all. Note: This seems to break the App Store app, but it let me keep working, which was more important at the time.


Give your iMac a lift

I have a 2019 27" iMac, which replaced a Late 2014 27" iMac. Both of these are/were placed directly on their stands on my desk. I've always felt that the screen was just a bit too low to be ideal, but I was too lazy to deal with solving it—especially as I knew it meant I'd also have to deal with the mess of cables on the desk behind the iMac.

Then last week, I saw MacRumor's review of the Twelve South Curve Riser iMac Stand, and thought it might solve my problem. But at over four inches (10cm) in height, I thought it would be too high for me—with the height of my desk and chair, I'd wind up looking up at the screen. And, at $80 for just a bent piece of metal, it seemed expensive for what it delivers.

However, MacRumors also linked to their review of the Satechi Type-C Stand for iMac (view on Amazon), which rises a more-reasonable 1.63" (4.1cm) from the desk. But what really intrigued me was that for $90—just $10 more than the Twelve South riser—the Type-C Stand includes two card reader ports (at up to 104MB/s), three USB-A ports (5GB/s), a USB-C port (5GB/s), and a headphone jack.

The ports on the front were the deal sealer for me: My Logitech keyboard and mouse both charge over USB-C, and I'd been using my MacBook Pro to do that as I only have a USB-C to USB-C cable. I also do a fair bit with memory cards—my drone uses microSD and my camera uses a regular SD card. I'd been using a regular card reader that requires the fiddly task of putting the microSD card into a SD-sized card holder; the Satechi stand has two separate slots, so that fiddly work is gone.

As for the brand, I have a Satechi Wireless Smart Keypad that's been working flawlessly for five years, so I felt pretty safe making the purchase decision. It arrived on Sunday, and after getting everything set up, I wish I would have done this years ago.

[continue reading…]


A performance-centric look at the 16″ MacBook Pro

Despite my hatred for the Touch Bar, I recently purchased a new 16" Touch Bar-equipped MacBook Pro (and promptly did my best to minimize the Touch Bar's annoyances). Why buy a machine with an interface I dislike? There are a number of reasons…

First and foremost, I've decided it's not really worth the effort to maintain two laptops—my old 2013 MacBook Pro is used for beta versions of macOS, so that I can test Many Tricks' apps, and my 2018 Air is my travel and "around the house" machine.

With the new APFS filesystem, though, creating additional volumes (basically equivalent to a partition in the old world) is really simple, and with ultra-fast solid state drives, rebooting is relatively quick.

So it's my intent to replace both machines with the new MacBook Pro. Yes, it'll be more of a pain when I travel (heavier and bigger), but I don't travel a ton, and even when I do, I do most of my work in hotel rooms, not in airplanes. And I'll appreciate the larger screen and improved performance, in exchange for lugging a bit more weight around.

What follows is a look at my new portable Mac, comparing its performance with both the 2013 MacBook Pro and the 2018 MacBook Air—similar to what I've done for that same MacBook Air and my 2019 iMac (Part One, Part Two, and Addendum).

[continue reading…]


De-distractionate the Touch Bar

Shocking even myself, I'm now the owner of a Touch Bar equipped MacBook Pro—I purchased the entry-level 16" model last weekend. Why? I'll save the detailed explanation for an upcoming look at the machine and its performance, but the main goal was to replace two laptops with one.

But just because I now have a Touch Bar-equipped Mac doesn't mean I suddenly like the Touch Bar. In fact, my feelings about it haven't changed since I wrote about it two years ago:

The Touch Bar, despite its name, is actually an Eye Bar: It forces your eyes off the screen, down to the Touch Bar, back up to the screen, repeat ad infinitum.

After some hours working with my new MBP, this is definitely a problem—and it's a problem even when I'm not using the Touch Bar, which is pretty much all the time: I've found that the changing images and colors on the Touch Bar grab my eye every time I switch apps…

The camera was focused on the Touch Bar, but when I'm looking at the screen, I see all that activity just below the screen, and it's really distracting. Thankfully, there's an easy fix, and one I'd not heard of prior to buying this machine…

[continue reading…]


It’s easy to win when you don’t fight fair

Long-time readers know that I am not a fan of the Touch Bar. I understand that many people like it, but for me, forcing my eyes to the keyboard is not a time saver, especially when the Touch Bar has also taken over the physical Escape key.

If asked, I imagine Apple would say that sales of Touch Bar equipped Macs have been strong, much stronger than their non-Touch Bar alternatives. And I have no doubt that that's true, because Apple has seriously handicapped the non-Touch Bar Macs.

Want a 15" non-Touch Bar MacBook Pro? Sorry, that machine no longer exists—and when it did exist, it was multiple generations older than the Touch Bar models available at the time.

So let's look at the 13" MacBook Pro, where you can still buy a non-Touch Bar model. I configured a non-Touch Bar machine with the fastest CPU available, 16GB of RAM, and a 512GB SSD. I then configured a Touch Bar model to match. Here's how certain features on the two models compare…

[continue reading…]


2019 iMac vs Late 2014 iMac—Ripping addendum

In Part 1 of my 2014 vs 2019 iMac comparison articles, I provided an overview and a number of comparison benchmark results. In Part 2, I looked at changes in gaming performance between the two machines.

But there was one more thing I wanted to do: Compare Blu-ray ripping speeds. At the time, though, I didn't have any new movies to rip, and I really didn't want to spend the time re-ripping an existing movie. Now, though, I do have a few new movies to rip, as I'm trying to finish our collection of all the films in the first three phases (now called the Infinity Saga) of the Marvel Cinematic Universe.

That meant buying the films I'd liked the least—The Incredible Hulk and the first two Thor movies. With that came the chance to compare the Blu-ray ripping speed of the two iMacs. I use the method described in my article Revisiting ripping Blu-ray discs, which is this:

  1. Use MakeMKV to create an MKV file on the hard drive that contains the video and audio tracks.
  2. Use Don Melton's Video Transcoding tools to create the final movie from the MKV file.

Using The Incredible Hulk, I timed how long it took to create the MKV file and how long it took to create the finished movie. Without further ado, the results (times are in hh:mm:ss format)…

[continue reading…]


2019 iMac vs Late 2014 iMac—Part Two

Update: After I posted this, Brad Oliver contacted me on Twitter about the frame rates for DiRT Rally—he commented that the fact that they were clustered around 60fps made him think I'd left vertical sync (Vsync) on…and he was right. I've updated that section with the modified results, as well as one additional comparison I forgot to include the first time.

Oh, and in case you don't know Brad…he was directly involved in porting DiRT Rally to the Mac for Feral, so he knows his stuff! Thanks Brad!

In part one of the comparison between my old and new iMacs, I provided a brief overview of the new machine, tech specs for both, and a number of benchmarks. (I also tested the video card against a Windows GeForce GTX 1080, and posted a slide-over image that demonstrates the wider color gamut on the new Mac.)

In today's second (and final) part, I'll take a look at video processing performance (via iMovie), how well the new iMac handles gaming, and then wrap up the whole series.

[continue reading…]