Skip to content

macosxhints

See exactly when an app launched

Update: I guess I should have searched here before I posted this—I wrote up another solution a few years ago, and that one includes a Keyboard Maestro implementation. Whoops! As this one's another method, though, I'll leave it up.

I was working on some stuff for our upcoming Usher 2 release, and needed to know how long Usher had been running. A quick web search found this post, where one of the comments had an answer that works well in macOS:

ps -p pid -o lstart=

Replace pid with the process ID (PID) from ps -ax for the app or process in question, and you're done. But it's possible to make it even easier to use by automating the task of getting the process ID. Here's what I came up with:

ps -p `ps ax | grep [U]sher$ | cut -c 1-5` -o lstart=

The bit between the backticks gets the matching process line from ps, then uses cut to keep just the first five columns, which contain the PID.1When the shell encounters backticks, it processes the commands within those backticks before processing the rest of the command—in this case, the backticked command returns the PID.

[continue reading…]


Using command-line Quick Look as a memory aid

I recently reviewed my new third-party mouse, the Logitech MX Master 2s ($70 at Amazon). I love all the customizable buttons on this mouse, and in particular, the ability to create gestures (which are simply a directional drag while holding down a button).

I've used two buttons to create a total of 10 gesture actions on my mouse:

I created the above image from the Logitech Options app, so I can refer to it if I forget which action I've assigned to which gesture. But it's a pain to find the folder on the disk and open it just to see the image. Then I remembered I had an unused button on my mouse1The upper button of the two near the side scroll wheel

Note: While the following is specific to my Logitech mouse in terms of implementation, read on if you're curious about how to access QuickLook previews from Terminal and/or via a simple AppleScript.

[continue reading…]


Create a savable list of 32-bit apps

Apple has announced that 32-bit apps have a limited future on the Mac: They'll be fully supported in this fall's High Sierra release; macOS' 2018 release ("Really High Sierra") will "aggressively warn" users about 32-bit apps, and I would assume, they won't work at all in the 2019 version of macOS ("That Was My Skull!").

But how do you know which apps on your Mac are 32-bit and which are 64-bit? MacObserver has an article that discusses the easy way, via the System Information app—just look in the Software > Applications section, and you'll be able to see a list of apps and a 64-bit Yes/No column. But seeing the list is all you can do—you can't easily save the list for future reference, for instance, nor can you copy/paste the info to another app.

So here's a geekier solution to generate a list of your 32-bit apps, saved into a text file for easy future reference. Open Terminal, and paste this command:

system_profiler SPApplicationsDataType | grep -B 6 -A 2 "(Intel): No" > ~/Desktop/non64bit.txt

This does the same thing as the System Information app, but it dumps the data in text form; the greater-than sign redirects the output to a text file named non64bit.txt, saved to your desktop. The grep is used to show only the 32-bit applications (the full line reads 64-Bit (Intel): No), and the -B and -A options are added to capture the lines before and after that line in the output.

This is probably not overly useful to most people, but I wanted a way to capture the list of apps, as I have over 290 32-bit apps on my machine, and it takes a while to run the System Information report each time.


Use macOS VMs in VMware Fusion in retina mode

I use VMware Fusion often—I have virtual machines that span Mac OS X 10.6 to macOS 10.12.4 beta. I use the more-recent of these for supporting our customers on older versions of the OS, and keep the really old versions just for nostalgia purposes. (I have a bunch of non-macOS virtual machines, too, but they're not relevant to this tidbit.)

In all the time I've been using Fusion on my retina Macs, though, I've never enabled this setting…

…well, I enabled it once, but turned it off, because the end result was too small to see: In Retina mode, every pixel is an actual pixel, not a doubled pixel. On my 27" iMac, that meant the macOS VM thought it was running at (for example) 2560x1600 instead of a retina resolution of 1280x800. VMware even warns you of this in their Knowledge Base:

Mac OS X running in a virtual machine is limited to an approximate resolution of 2560 x 1600, and treats the display as a standard DPI device. This makes the text and icons to appear small in the OS X interface.

However, today I stumbled across this solution from Patrick Bougie—and it's brilliant in its simplicity. Patrick's post has all the details; I'll reproduce them here in abbreviated form, just in case his page ever vanishes.

[continue reading…]


Control inline video—and more—in Safari

This is another oldie but goodie from Mac OS X Hints, explaining how to enable the Debug menu in Safari. To do that, quit Safari, open Terminal, paste the following line, and press Return:

defaults write com.apple.Safari IncludeInternalDebugMenu 1

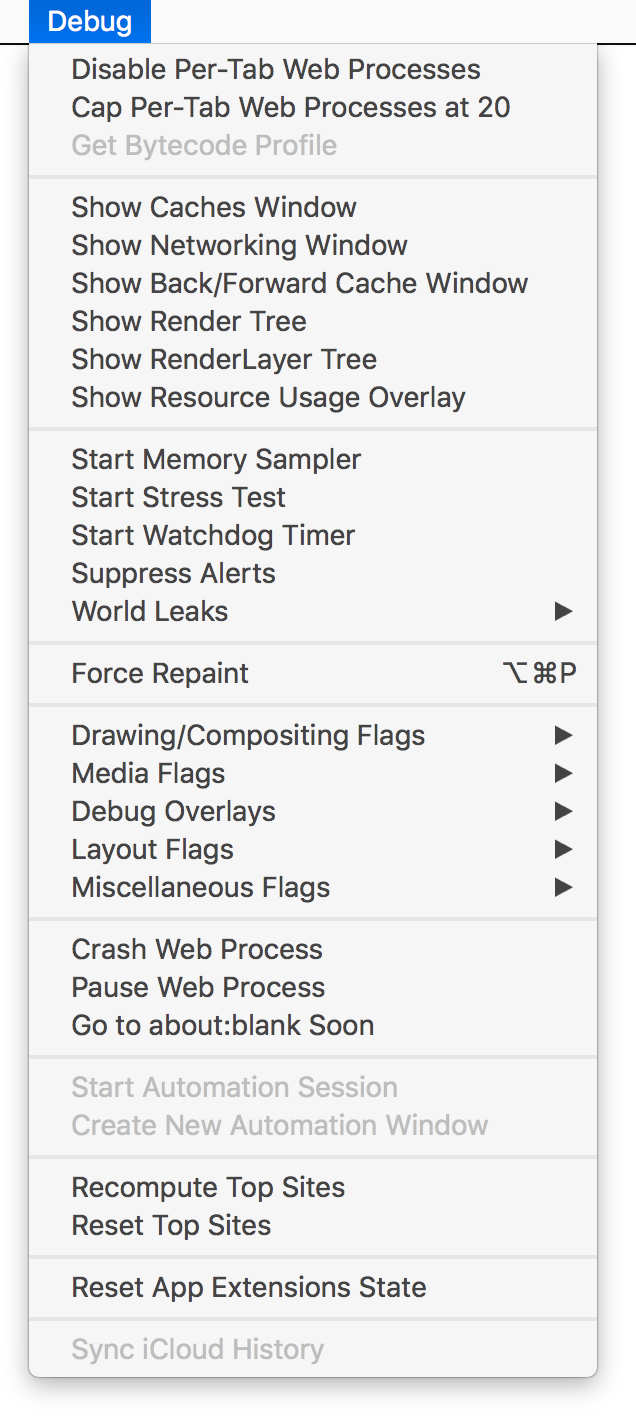
When you relaunch Safari, you'll have a (really long) Debug menu on the far right of Safari's menus. And just why might you want a Debug menu in Safari? Kirk McElhearn offers up one good reason:

Auto-play videos suck. They use bandwidth, and their annoying sounds get in the way when you’re listening to music and open a web page. …

But you can stop auto-play videos from playing on a Mac. If you use Chrome or Firefox, it’s pretty simple, and the plugins below work both on macOS and Windows; if you use Safari, it’s a bit more complex, but it’s not that hard.

In Safari, they key is the Debug menu, as Kirk points out. Go to Media Flags and select (activate) Disallow Inline Video, and that should be the end of auto-playing video. See Kirk's blog post for ways to do the same in Firefox and Chrome.

Beyond auto-play video, though, there's lots to geek out about in the Debug menu…

[continue reading…]


Yosemite: An alternative zoom-to-fit action

As you're probably aware, Apple changed the functionality of a green button click in Yosemite: it not longer "zooms to fit" (which could have different behaviors per app), but instead it enters Full Screen mode (if the app has one; otherwise, it does zoom to fit). If you want zoom-to-click, you can option-click the green button; there's no apparent way to toggle these two functionalities.

But today, I discovered a second zoom-to-fit shortcut: double-click the window's title bar. This is easier to do, as you don't have to hit the small green button target; just get the mouse anywhere in the title bar, and double-click.

Note that this won't work if you have "Double-click a window's title bar to minimize" enabled in the Dock System Preferences panel.


A look at the first eight years of macosxhints.com

I was cleaning out some old images from the site, and found over 150 apparently unused images. Whoops, that's what nine years of bad housekeeping will get you.

One of the leftovers, though, was kind of interesting. At some point in time, I graphed the number of hints published each day on macosxhints.com, from launch through 2008—a total of 12,051 hints.

Even if unlabeled, it'd be pretty easy to figure out where the major OS X releases occurred (except for 10.1, not sure what's up with that?). And you can see a general downward trend in hints per day, as the OS became more established (and more locked down) over time.

In any event, I thought it was an interesting chart, and figured I'd toss it into a quick post instead of just sending it to the dustbin.