Skip to content

macOS

The macOS’ version of the cp Unix command won’t create links

I ran into this while working on a Keyboard Maestro macro that creates hard links: The macOS version of cp won't create links, at least not in Sonoma. In Ventura, it works even though it throws the same error as it does in Sonoma.

Copying as hard links is part of the cp feature set, fully covered in its man pages. But it doesn't work in macOS. To confirm, try this:

When I ran into this, I searched and discovered that someone else had run into the same issue,1Apple Developer login required but that's the only mention I could find.

I have filed this bug as FB13255408 with Apple, and I'm hopeful they fix it soon. There is a workaround, obviously: Use ln instead. This works fine for individual hard links, but using cp to quickly copy an entire folder as hard links is a nicer implementation.

Replace the mini music player that Apple took away

Back in the early Mac OS X iTunes era, there was a wonderful small window available that had control buttons, volume control, a visual progress bar, and a text display showing the artist, song, and album—it could even display a graphic equalizer in lieu of the artist-album-song info:

It was perfect. Sadly, it was last seen in iTunes 10 in Mac OS X 10.7. And today's version, while offering a mini mode, isn't nearly as mini or as functional as it used to be; read on for some details…

tldr summary: Mario Guzman's Music MiniPlayer is a full-retro near-perfect replacement for the original mini player. It's free, and I love it. If you're not into retro UI, Silicio on the App Store is also free and quite good, though you can't freely resize the window.

[continue reading…]


My impressions of the M1 MacBook Pro

I recently received my Apple M1-powered 13" MacBook Pro, which is primarily going to be used for testing our apps on Apple silicon, and supporting customers using these machines. But that doesn't mean this is a work machine; it's a personal purchase as I'll use it for my own needs as well. (Thankfully, it only had a net cost of $33 after I sold my 16" MacBook Pro.)

By now, you've probably read a slew of stuff about both the MacBook Pro and its slightly-lighter MacBook Air cousin. Between unboxing videos, extensive benchmark suites, and multi-thousand-word reviews, there is no lack of coverage of these machines. (However, I will add that I did make a video of my MacBook Pro—with its 16GB of RAM—opening 75 apps in just over a minute. Not bad for an entry-level machine!)

I'm not going to try to replicate those reviews, because they do an excellent job of covering the new M1-powered Macs in a level of detail that I just don't have time to get into. Instead, here's what I'll be discussing…

  1. Why I chose the 13" MacBook Pro
  2. A few benchmark results of interest
  3. Rosetta and non-native apps
  4. Using iOS apps on macOS
  5. General discussion on performance
  6. The future of Apple silicon Macs

So why a MacBook Pro and not an Air?

[continue reading…]


Fix a “could not complete your purchase” App Store error

I've been having an odd issue with the Mac App Store app on my Mojave-running iMac: Sometimes the App Store app will fail to install an update for some app. When that happens, I see a dialog with this text as the title:

We could not complete your purchase.

Below that is a single word, "cancelled," and that's all. Searching the web, I came across this thread on stackexchange.

What finally worked for me was a combination of things listed there—none of these steps on their own seem to fix the problem, but all together do, at least until it occurs again.

  1. Quit the App Store app.
  2. Switch my DNS to another provider.
  3. In Terminal, paste this command and press Return:
    open "$TMPDIR/../C/com.apple.appstore/"
  4. Confirm that the Finder opened a window to the com.apple.appstore folder, then drag everything there to the trash.
  5. Back in Terminal, paste this line and press Return: killall -9 appstoreagent
  6. Relaunch the App Store app.

This method has worked for me each time I've had this issue. It's annoying that it keeps recurring, but at least the fix is relatively simple.


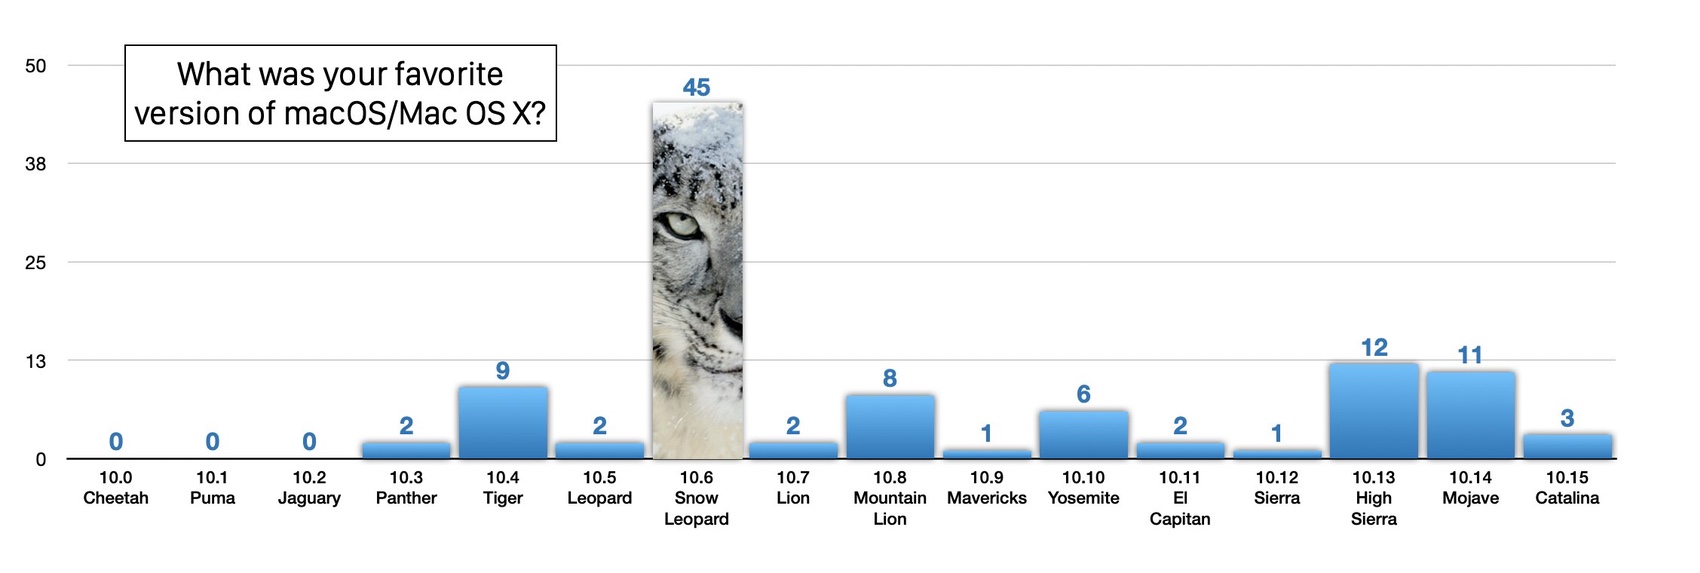
What’s your favorite version of macOS/Mac OS X?

Update: The poll is now closed, and the results weren't even close…

Snow Leopard wins in a landslide.


With the 2020 (Virtual) WWDC about a week away—and with it, more than likely, the reveal of Yet Another New macOS Version, I thought it might be interesting to run a little poll…

What is your personal all-time-favorite version of macOS/Mac OS X? Instead of trying to add a polling plug-in here, I quickly created one using surveyplanet. It's set to full anonymous mode, so no IP info is collected—it's just for fun…

If you need more details as to what came with each release, check out this Wikipedia article.

Personally, I'd have to say it was … nah, I'm not going to reveal my vote just yet! There's a small comment box on the poll, or you can add comments here if you have more thoughts on the question.


Living the bifurcated life in macOS Catalina

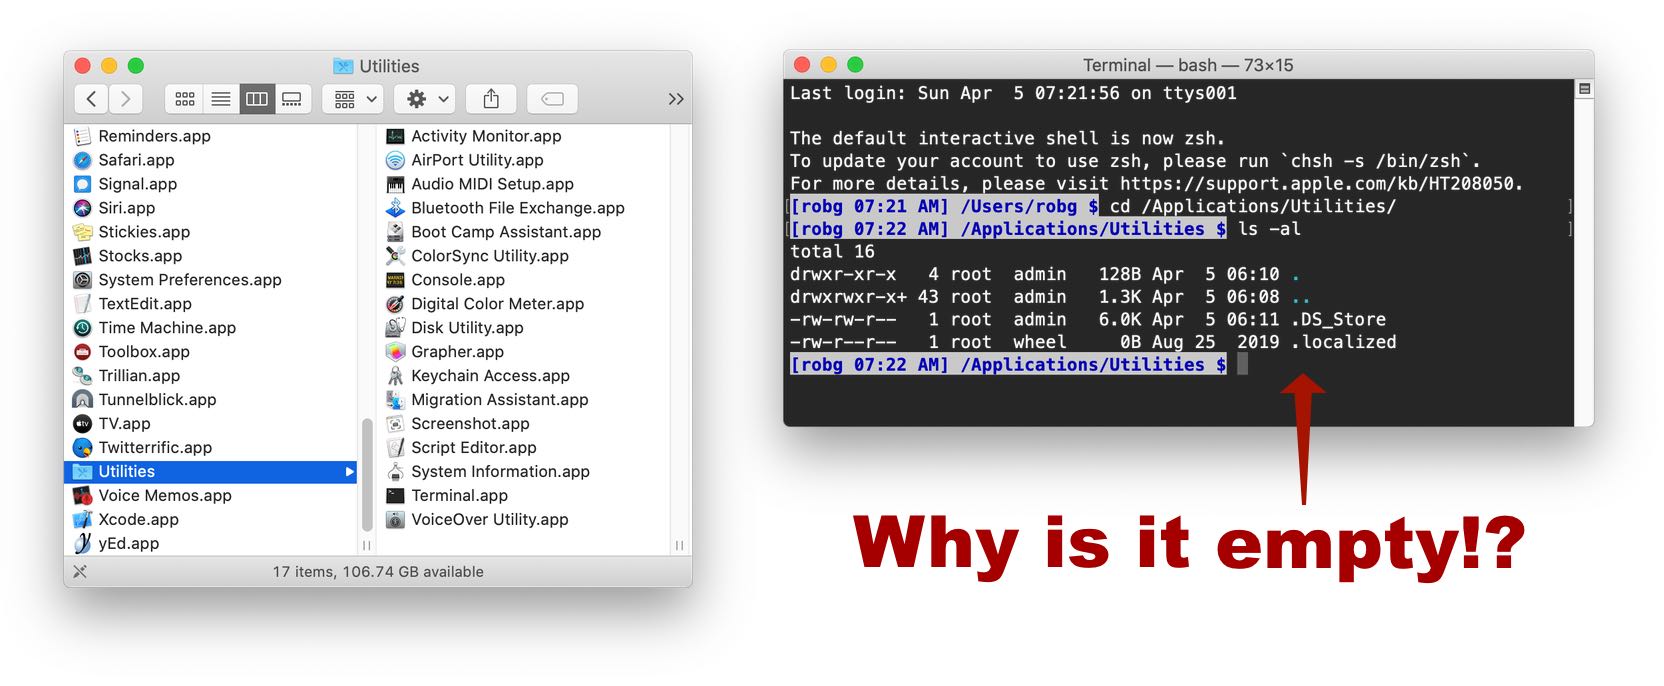
If you're a macOS Catalina user, and a user of Terminal for various tasks, you might be surprised at how some things work—or rather, don't work, in Catalina. As a first example, consider the Utilities folder…on the left is how it appears in Finder, and on the right, the contents of that same folder listed in Terminal:

While Finder shows a full Utilities folder, Terminal shows it as empty. Why? If you're somewhat familiar with the technical side of macOS Catalina, you probably know the answer: Apple has separated much of the OS and placed it on a read-only volume.

Apple's "About the read-only system volume in macOS Catalina" page explains things fairly well—basically, what you see as one Utilities folder in Finder is really two things: A read-only Utilities folder, and a user-writable Utilities folder. (If my machine had any user-installed apps in the Utilities folder, they would have shown up in the Terminal output above.)

[continue reading…]


Add metadata to ripped movies and TV shows

Somewhat regularly, I write about ripping DVDs and Blu-Rays. I tend to prefer physical media and sometimes—especially when buying an older TV series or classic movie—the disc won't include a digital copy. So I rip the disc—this way for Blu-Rays, or just via HandBrake for DVDs—to create my own digital copy.

Once ripped, the problem is that I have a video file that will play, but that has no useful information about what the video is—no metadata about the cast, production year, or (for TV series) season and episode. If I try to add the movie to the TV app (or iTunes, as on my iMac), it will require some hand editing to wind up in the right category, and it still won't have any show information.

Enter Subler, a free app to help you "tag" (add metadata to) movies and TV shows. There are probably other apps out there that do this, but Subler works quite well for me, especially for TV shows.

When I rip a TV series, I'll give the files a filename based on its title and (for TV series) season and episode, like Wings S01E01, or Sports Night S02E04. I then drag and drop the ripped file onto Subler's dock icon, and it opens a window, showing all the metadata associated with the file; here's how the window looked after I ripped the first episode of Sports Night:

[continue reading…]


How to fix Split View in macOS Mojave and Catalina

macOS has had (since 10.14) a built-in Split View mode that lets you use your full screen to display two apps side by side, each in a quasi "full screen" mode. Personally, I never use this feature—why limit yourself to just two windows?—but I know many people do.

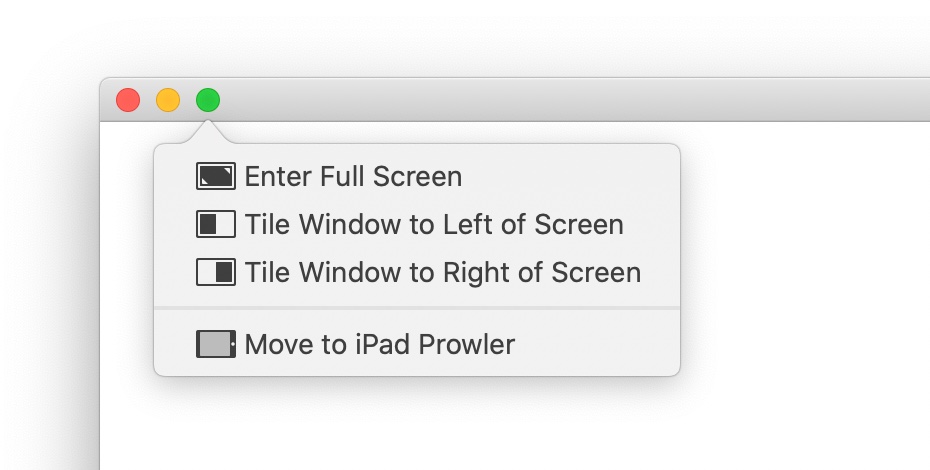
In macOS Catalina, you activate Split View via a green button hover, which then shows this pop-up menu:

The activation method is somewhat different in 10.14, but the end result is the same—a window taking up half your display. Except when it doesn't…

As you can see, the full screen menu item works, but the two Split View entries do nothing at all—no error message, but nothing happens other than the menu vanishes.

[continue reading…]


Digging into an unexpected encryption speed boost

What follows is a lengthy dive into a semi-recent massive performance improvement in openssl speeds in macOS. As it's long, here's a tl;dr version:

  • From 10.14.4 to 10.14.5, a change in macOS improved openssl speed benchmark results anywhere from 15x to 30x.
  • In real world use, encryption of a large sample file (570MB) using a very long password happened nearly twice as quickly as it did before the update.
  • The version number for openssl (which is really LibreSSL) is the same (2.6.5) in both 10.14.4 and 10.14.5. I also confirmed that the packages, as loaded on the Apple Open Source site, are identical.
  • The four libraries that openssl links to have the same version numbers in 10.14.4 and 10.14.5.
  • The binaries for openssl and the four linked libraries all use much less disk space in 10.14.5 than they did in 10.14.4. I can't explain this, except that openssl itself is no longer a universal binary.
  • I believe the performance boost is due to macOS enabling Intel's AES-NI, which allow hardware acceleration of some key cryptography tasks. But I can't figure out how this change was made, given the above data.
  • The Apple Open Source site may hold the answers, but that work is beyond my skill level.

Keep reading if you'd like to see how I came to the above summary…

[continue reading…]


Remove the macOS Catalina guilt trip from macOS Mojave

May 26 2020 Update: The 2020-003 Security Update for Mojave will reset the red flag (and deprecate the command used to ignore the update). However, these steps do still work, so you just have to repeat Miles' solution again. And after you do, do not open the Software Update panel, or the red badge will return. (But if it does, just run the commands yet again.)

May 9 2020 Update: Commenter Miles Wolbe has come up with a much better solution. Ignore everything in this tip, and just run this Terminal command:

sudo softwareupdate --ignore "macOS Catalina" && defaults delete com.apple.preferences.softwareupdate LatestMajorOSSeenByUserBundleIdentifier && softwareupdate --list

If you're interested in why this works, Miles explains it in more detail. I've tested this method, and it works—no more agent required!

I have no plans to move my main iMac to macOS Catalina, at least for the forseeable future. There are two key apps I use—Fujitsu's ScanSnap scanner software and the Many Tricks' accounting app—that are both 32-bit. In addition, there are changes in Catalina relative to permissions that make it somewhat Vista like and slow down my interaction with the system. (My MacBook Air is my "production" Catalina Mac, and I have an older retina MacBook Pro that I use for Catalina betas.)

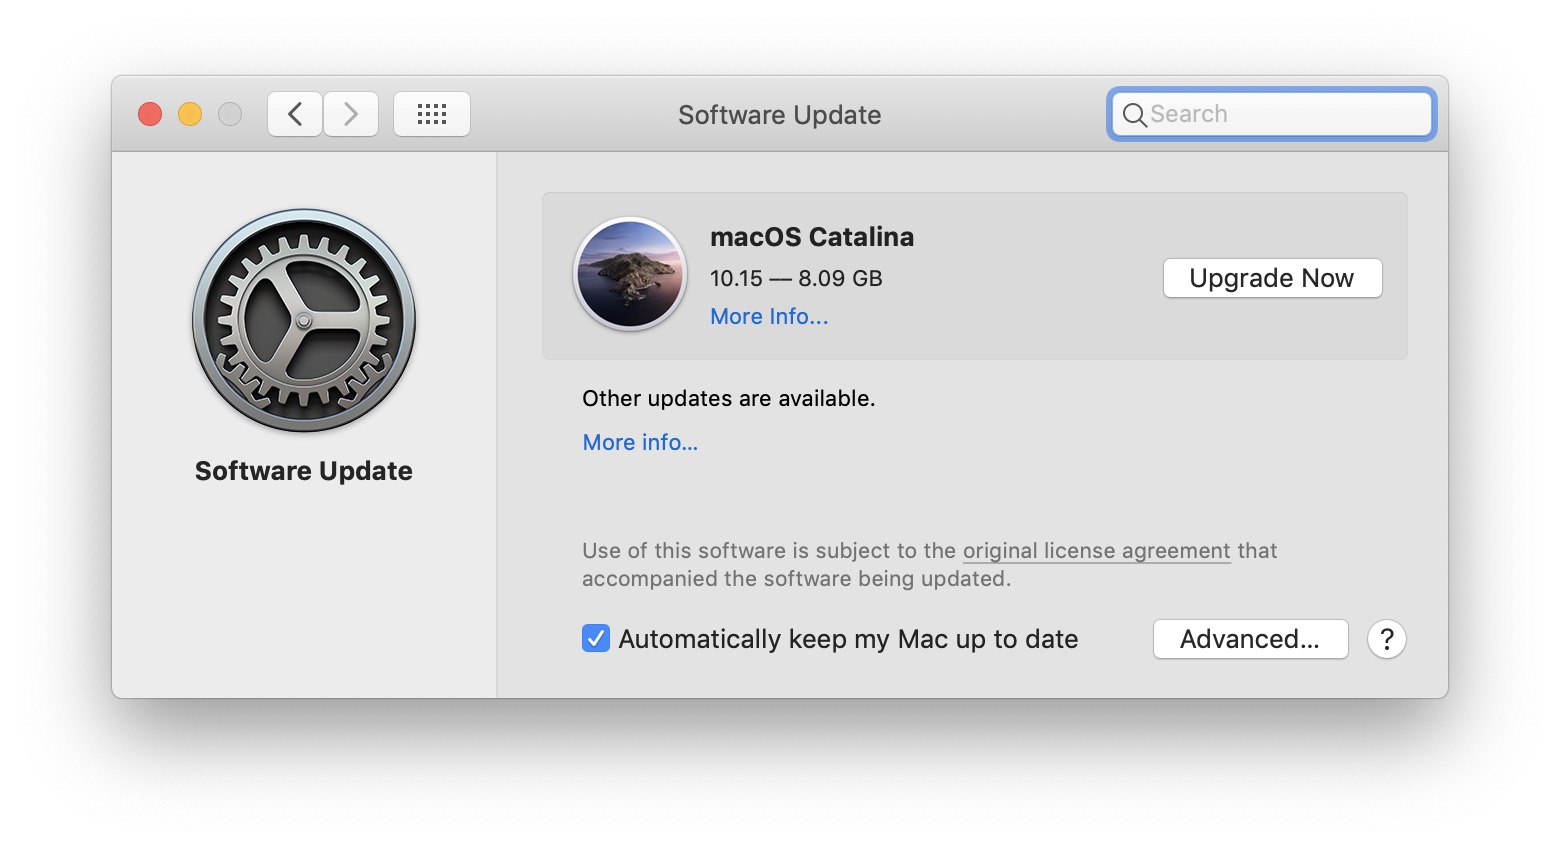
But Apple really wants people to update to Catalina, so they let you know about Catalina…constantly, it seems. In System Preferences > Software Update, you'll see this…

[continue reading…]