Skip to content

Cool Hardware

My thoughts on the new Apple Watch, Apple TV, and iPhones…

In their September 2017 keynote, Apple launched the Apple Watch Series 3, the Apple TV 4K HDR, and three new iPhones—the 8 and the 8 Plus, and the X.

Here are my quick thoughts on each, and my buying plans…

Apple Watch Series 3

This is a nice evolution of the watch. The LTE doesn't really interest me, as I'm sure it'll require another $5 or $10 a month to my wireless carrier, and I almost always want my phone with me. (If I swam regularly, I might feel differently about that.) The much-faster CPU would be a nice upgrade over my original-generation watch, but the Series 3 is nearly a full millimeter thicker than the original…and honestly, I think the first version was already borderline too thick.

Will I buy? At this time, the outlook is doubtful; my watch is working fine, and a faster CPU isn't worth the added thickness and $359 of my money.

Apple TV 4K HDR

Support for 4K is welcome, and long overdue. I'm not so sure about HDR; sometimes I find HDR images tend to look artificial, and I don't know if I'd find the same issue in moving images. A real added bonus was Apple's decision to provide the 4K version of movies you've purchased for free—this from a company that charged us to upgrade the quality of our music files a few years back.

I wish Apple wasn't so damn set on streaming everything, though—I would much prefer to store movies directly on the device, to make it more portable and not subject to the vagaries of wifi, device positioning, and network load. Those times are gone, though, so now the only choice is whether or not to spend $20 more for the 64GB version.

Will I buy? Yes, and I'll spend the extra $20 for the extra 32GB. I've been moving an Xbox One back and forth from the game TV to our 4K TV to watch 4K content, so this will be a simpler solution.

iPhone 8 and 8 Plus and iPhone X

Let me get this out of the way: I do not like the iPhone X. Well, that's not true. I think almost all of it is absolutely stunning, and I really want one. Unfortunately, that's "almost all," and there are two things that aren't perfect that will keep me from buying this phone…

The Notch. I absolutely, positively hate the cutout at the top of the phone for the sensors. In case you (somehow) missed it, this is the notch…

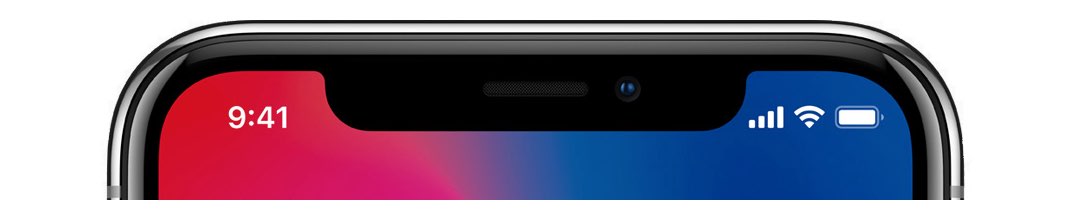
I would have much preferred if Apple just blacked out that entire region, giving up that marginally-usable pixel space for a cleaner appearance. I understand that videos can play cropped, so as to not be "notched," but it's the presence of the notch in other normal views that really gets to me. It's everywhere.

Many people won't notice, or won't care about the notch. I wish I could be one of those people, but I can't. During the keynote, all I could focus on whenever the phone appeared was the stupid notch. It simply grabs my eye, and I cannot unsee it when it's there. (Maybe a future software update will stop drawing the desktop up there, which would make it look much nicer to my eye.)

Face ID. Apple has told us facial recognition is more secure, and I have no reason to doubt them. They also told us it's fast, and it seemed to be in the demo. But secure and fast can't override the absolute convenience of Touch ID. I can use Touch ID as I remove my phone from my pocket (press plus press-click), and it's ready to go as soon as it's out of my pocket. I don't have to look at my phone unless I want to; if I have to look at my phone every time I want to unlock it, that's going to get annoying. Very quickly.

Apple Pay is even worse. Today's system is as near-magic as any tech I've ever used: Hold the phone near the register, rest finger on the home button, and you're done. With Face ID, it appears (based on the demo in the keynote), I'll have to both double-tap the side button and look at the phone to use Apple Pay. Ugh.

There are also some security considerations with Face ID, as pointed out by Ian Schray. The police cannot compel you to put your finger on your phone without a warrant…but can they compel you to simply look at your phone?

Other than these two no-go items, I really like everything else about the iPhone X. It's only marginally larger (.20 inches taller, .15 inches wider) than an iPhone 7, yet has a screen that's 30% larger and has more pixels than the gigantic Plus model phones. It also has the double cameras, which I would love to have on my next phone.

While you may not consider the notch and Face ID as deal breakers, they really are for me. I'll go look at one in person, of course, but I simply cannot unsee the notch, and I hate the idea of having to look at my phone to unlock it, and taking more steps (and time) for Apple Pay.

So that leaves me with the 8/8 Plus versus my current 7. I think the new CPU, faster Apple-developed GPU, better cameras and sensors, 240fps slow-mo 1080p video, wireless charging, and the glass design make the iPhone 8 a compelling upgrade. As noted, I'd love to have the dual cameras to work with, but I think the Plus-size phone is just too big for daily use, so I think that's out of the question. (I will visit the Apple Store again to see the 7 Plus before I decide for sure.)

Will I buy? As of now, yes, I plan on buying an iPhone 8, and hoping that…somehow…Touch ID survives for a long time to come, lest that iPhone 8 be my last new iPhone.


Kwikset’s smart lock may require another purchase

Just a heads-up for anyone thinking of installing the well-reviewed Kwikset SmartCode 916 Touchscreen Electronic Deadbolt (and probably other similar Kwikset locks): Check your current deadbolt installation to see if you actually need more than what's included in the box.

In the box is one deadbolt (the "A" in the image at right), which assumes your deadbolt screws into a chiseled cutout in the edge of the door. But if—like me—your deadbolt isn't screwed into the door but just inserted in place, you need "A2," a drive-in deadbolt. This part isn't in the $190 lock kit, nor is it sold (best as I could tell) at Home Depot or Lowes or Ace Hardware.

Check your door before you order your lock, so you can add on a drive-in deadbolt if your door is non-chiseled. Me, because I didn't know about this, I didn't check. So I made a 40-mile round trip to Home Depot for a chisel set, then spent an hour chiseling out the door so the included deadbolt would fit.

Mission accomplished, but I think it's pretty dang cheap of Kwikset to not include both deadbolt styles in a $190 lock kit! (Or perhaps even better, they should design a deadbolt with a removable screw-in plate, then one deadbolt would serve all customers.) So, yea, I had a frustrating Sunday morning!


Frankenmac 2017: The Beginnings

It's been almost exactly nine years (wow!) since I last ventured into the land of Hackintoshes, or homebuilt PCs that can run macOS.

Back then, I built and used one, then wrote about the machine for Macworld, and they even lab tested it, where it held its own against real Macs costing much more.

Fast forward to 2017, and I've decided to tackle the project again. Why? Oddly, because there is a new Mac Pro coming, but it's a ways away. I want something I can use in the interim, without spending a huge amount of money on. When the new Mac Pro ships—assuming it's not an enhanced trash can design—I plan on upgrading, and the homebuilt Mac will become a gaming PC.

As I'm not writing about the project for Macworld this time around, I'm going to document things here on the blog as I go along. In today's installment, I cover the first steps in the process: online resources and parts decisions.

[continue reading…]


The magic corner cabinet

As yesterday was a cabinet-related post, I thought I'd stick with a theme and share this one I saw in a friend's home a while back. It's the perfect solution for those useless corner cabinets where most people stick a lazy susan, thus giving up on a bunch of storage space.

If we ever move and I have a chance to specify the cabinet hardware, I'm making sure one of these things goes into the corner cabinet!

(Don't worry, this isn't turning into a home remodeling blog; tech tips and stories return tomorrow.)


The end of the banging of the cabinet doors

I really hate the bang when a cabinet door closes. Years ago, I'd looked into soft-close mechanisms and found them pricey and a bit fussy to install. But this weekend, we were at Home Depot when I stumbled across these Liberty soft-close dampers. On a lark, I bought the 10-pack to see how well they'd work. The short answer: very well.

Installation is a breeze; they go into the corner of the cabinet with one screw—and the screw hole is angled at 60 degrees, so the pre-drilling goes quickly and at the proper angle. Here's how one looks installed:

I think it took me about 20 minutes to install all 10, and I probably spent five of that on the first one, making sure I did it right. These are not metal pieces; the body is metallic-painted plastic. However they have decent reviews on Amazon, and were reasoinably priced. There are other brands, too, but I haven't used any of those. All I know is that I'm thrilled with how they work…

Ah, the blissful sounds of a non-slamming cabinet door!


Out with fluorescent garage lights, in with LEDs

I've converted most of our home to LED lighting—costs have plummeted in recent years, and when you combine LED lights' long lives with low energy costs, the payback period is incredibly short. Newer LEDs are also warmer in tone—we found some "soft light" 60W equivalent bulbs that are nicely warm (and warmer when dimmed). Through all of this, though, I had one area of the house I'd ignored: The garage.

Our garage has six (five overhead, one over a workbench) 48" long fluorescent hanging fixtures. I hate fluorescent bulbs, but the cost to replace them with LED-equivalent fixtures was high—about $300 to do all six. But the other day at Costco, I noticed they had two-pack FEIT 4' LED replacement bulbs—like these at Amazon—for only $18 (versus $28 at Amazon as I write this).

A "normal" 48" fluorescent tube light, as in this Sylania four-pack is around $6 or $7 per light. So while the LED bulbs are more expensive, a $3 difference isn't much at all given the lower engery usage and long life. (And the fluorescents in my garage go out quite often, even compared to indoor incandescents.) So I bought one box, as a test to use over the workbench.

Within a couple minutes of installing the LED tubes, I was headed back to Costco to buy five more boxes—the difference is that notable. Instant on, brighter and more-even light distribution, no flicker, and they should last nearly forever.

[continue reading…]


Hardware: Fujitsu ScanSnap iX500 document scanner

In mid-2015, I decided I wanted to get rid of the mass of paper we'd been accumulating for years. Much of it could be recycled, but there was still a substantial stack of important yet rarely looked at paper that we needed to keep. If anything was ripe for a digitization project, it was this stack of paper. But there were thousands of pages to scan, and that's not something you're going to want to do on your $99 all-in-one printer/scanner/coffee maker.

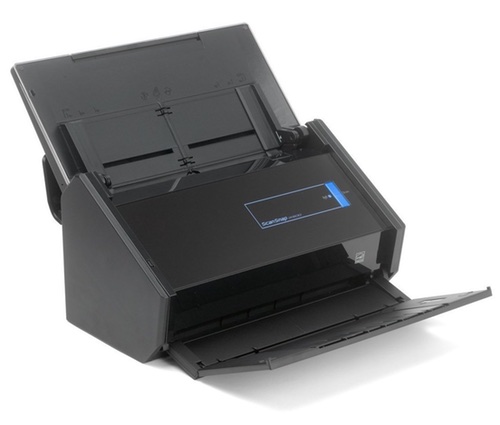
After talking with some people and reading some reviews, I bought a Fujitsu ScanSnap iX500 document scanner. This was not an inexpensive purchase—it lists for nearly $500, though typically sells for just over $400.

Note that there are two versions of this scanner: The PA03656-B005, which is what I have, and the newer PA03656-B305. The newer one is actually less expensive ($415 vs $490 as I write this), and apparently the sole difference is the bundled third-party software. I haven't seen the newer scanner's bundle, though, so I can't comment.

I've been using this scanner pretty much every day since October of 2015, and I can say it's one of the best pieces of hardware I've ever purchased. (The software is also very good, but the UI is far from lovely.) So far, I've scanned over 8,500 pages with this scanner, and I haven't had any issues with it at all. If you're interested in document scanning, read on for my thoughts on why this Fujitsu is an excellent tool for the task…

[continue reading…]


Revisiting ripping Blu-ray discs

A couple years back, I explained how I rip Blu-ray discs. A lot of time has passed, and I now use a slightly different procedure that results in much faster rips—with the caveat that the resulting file will be larger than the "slow" method, and is technically of slightly lower quality, though I can't visually distinguish the two.

The new method uses Don Melton's amazing video transcoding tools, a set of Unix programs that optimize video conversion in ways you cannot do (or easily do) in the Handbrake GUI. If you're new to Unix, but would still like to try these tools, I wrote a detailed set of instructions that should help get you up and running.

Using these Unix programs, you can rip a disc with various parameters, including one to optimize for speed (with good image quality) and another that tries to minimize the file size.

Here's a quick comparison of all three methods, as tested with the three-hour Hamlet Blu-ray. The 'Handbrake GUI' rip was done using, well, the Handbrake GUI as described in my original article. The second and third rows use Don's tools set to quick and veryquick modes, and the final row uses Don's tools set to optimize the file size.

MethodData CopiedConvert (hrs:mins)File Size
Handbrake GUI47.5GB3:526.8GB
transcode - quick40.1GB2:209.2GB
transcode - small40.1GB3:126.5GB

Tested on a late 2014 27" iMac with a 4GHz Core i7 and 24GB of RAM.

Using Don's tools in "quick" mode, you save time two ways: 7GB (15%) less data is copied to the hard drive, and the conversion process is over 90 minutes (38%) faster. The downside is that the final file size is 2.4GB (35%) larger. And that's what they call a tradeoff.

Using the "small" mode in Don's tools, you still save the 7GB (15%) of data copy, and still save 40 minutes (17%) over the original method. In addition, the file size is smaller than the Handbrake GUI version.

To summarize, regardless of whether you care more about file size or ripping speed, Don's tools provide an advantage over the Handbrake GUI: Either method is notably faster, and the small option generates smaller (or probably at worst, very similar) file sizes. (There's also a "big" option, if you don't mind somewhat larger files at a higher quality level.)

Keep reading to see some examples of the image quality of each method, and information on how to install and use Don's video transcoding tools.

[continue reading…]


Review: Canmore G-Porter GP-102+ data logger

I recently bought a new big-size camera, bucking the trend of simply using one's iPhone for photographs. That's not to say I don't use my iPhone; it is my main picture taking device. But I wanted a camera that could capture native retina iMac images (at least 5120x2880), and the iPhone can't do that.

After much looking and sweating over the costs, I chose a Nikon D5500, mainly because I already had a Nikon and didn't really want to replace all my lenses. While this is an excellent camera, it was a bit of a budget compromise—it didn't have all the features I really wanted. In particular, it lacks a built-in GPS to geocode all the pictures I take.

As a workaround, I decided to buy a GPS data logger, which is just a small GPS receiver that records GPS coordinates at some interval. Toss the logger in your pocket (make sure it's on and receiving the GPS signals first!), then go take pictures as you normally do. When you return, you can use an app like HoudahGeo to sync the recorded GPS track with the timestamps on each photo. (I'll have more to say about this whole sync process in a future post.) Presto, instant geocoded images!

[continue reading…]


A unique lava lamp time-lapse

We occasionally take our kids to a local place, Big Al's, which is one of those bowling/arcade places that give out tickets as rewards from the arcade games. Being good parents, we too sometimes play the games (you know, to spend time with the kids…yea, that's it). Over the years, we amassed quite a bunch of tickets, but weren't quite sure what to spend them on.

The last time we were there, I was smitten by a lava lamp, similar to this one, but ours has a black base and blue "lava." I don't know why (childhood flashback?), but I decided some of our points cache would go to this mesmerizing but otherwise useless device.

When I got it home, I was surprised at just how long it takes to warm up: It can take nearly an hour before any "lava" starts flowing, and about two hours before it really looks like a traditional lava lamp. During the first hour, though, the melting wax in the lamp makes some really cool abstract bits of art, as seen in the photo at right.

I thought this might make a neat time lapse, so I set out to record it with the iPhone. My first attempt failed, due to the iPhone's auto-adjusting time-lapse feature. Because the lamp takes so long to get going, the gap between frames winds up being quite long. Long enough that when stuff does start happening, the iPhone's time-lapse gaps are too wide to make for an interesting video.

I needed another solution, so I headed to the iOS App Store to see what was available…

[continue reading…]