Skip to content

macOS Apps

Articles about OS X applications.

Span one large image across multiple printed pages

I was looking for a way to print a large image across multiple pages, so I could make my own do-it-yourself poster-size printout. By way of background, I wanted to print a huge virtual fire, to cover a piece of insulation we put in front of a drafty fireplace in the winter. (We don't like to burn wood, so the fireplace goes unused, but staring at a piece of shiny foam insulation all winter isn't all that interesting.)

Conceptually, this seemed pretty easy: find a huge image, open it in some app that handles images, and print. What I found is that doesn't work, at least not in the apps I had at hand (Acorn and Preview). After some web searching, I stumbled across an odd but effective solution: use Excel.

Open a new blank Excel workbook, then select Insert > Photo > Picture From File, and select your massive image. Now when you hit Print, you'll see the output spans multiple pages. I used Page Setup to select a borderless US Letter size, and printed out 16 pages of a roaring fire.

After some cut-and-tape operation, the drafty fireplace's insulation became more visually appealing:

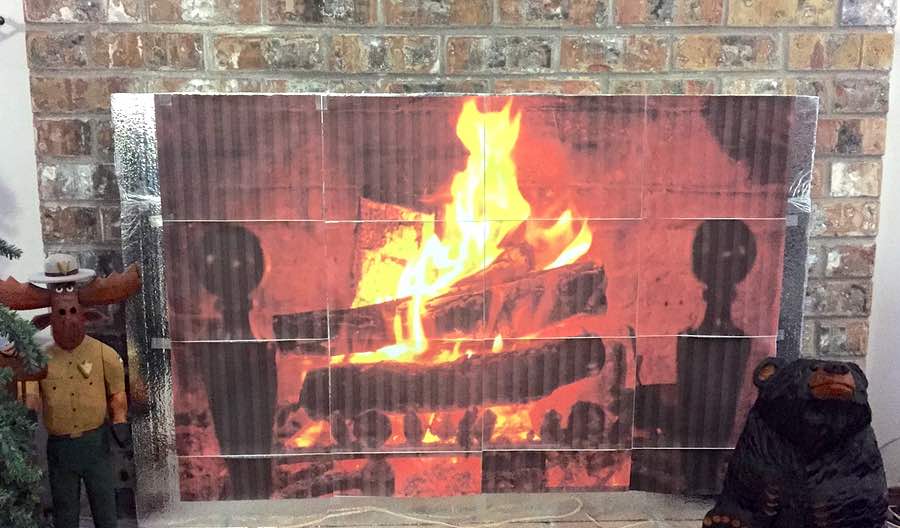
Note that this was a "proof of concept" operation, so I printed in draft mode (hence the vertical striping on the printout) and wasn't overly careful about lining up the pages. I had originally planned to print the final version on glossy photo paper, but instead opted to buy a 36x48 poster-size printout from an online vendor. (I haven't yet received the print, but when I do, I'll post about its quality. Until then, though, I don't want to link to the vendor, as I don't yet know what I've bought.)

I knew Excel could do a lot, but I never thought to try it for printing huge images across multiple pages.


Use your Marketing department to drive away prospects

I needed to install a demo version of Parallels Desktop for Mac to work on an issue some of our Many Tricks customers are having with Witch.

On Parallels' site, when I clicked the "Try It Free" button, I was greeted not with a download, but with a dreaded email harvester:

Unless I was willing to provide an email address, I was not going to get the demo. To Parallels' Marketing department, I'm sure this is viewed as a huge win: "Look, if we require an email address to get the demo, we'll build a massive mailing list of potential buyers!"

But to a prospective customer, what this harvester says is "we really don't care about your experience, we want to harvest your email address."

An email harvester is only as useful as what it harvests. And from me, and I suspect many others, it harvested a "I only use this for junk mail" email address. So while Marketing is collecting a huge list of email addresses, that list is littered with any number of useless addresses.

Contrast this approach with VMWare's Fusion demo download: Click one button, and the download begins. In the past, VMware also collected email addresses, but it seems they've realized that building a huge list of mainly worthless addresses is, well, worthless.

Unfortunately for Parallels, using the demo is even more annoying than downloading it, "thanks" (again) to the Marketing department.

[continue reading…]


Use two CD drives to import multiple CDs into iTunes

I happen to have two external drives connected to my iMac—one that reads and writes the usual mix of CDs, DVDs, etc., and another that includes Blu-Ray playback (but not writing). Today I discovered that you can use both drives at once (sort of) to speed up multiple CD rips. Here's how it works.

When you have two drives in iTunes, you'll see one CD icon in the iTunes 12 bozo bar—that's my name for the row of device controller buttons seen at right.
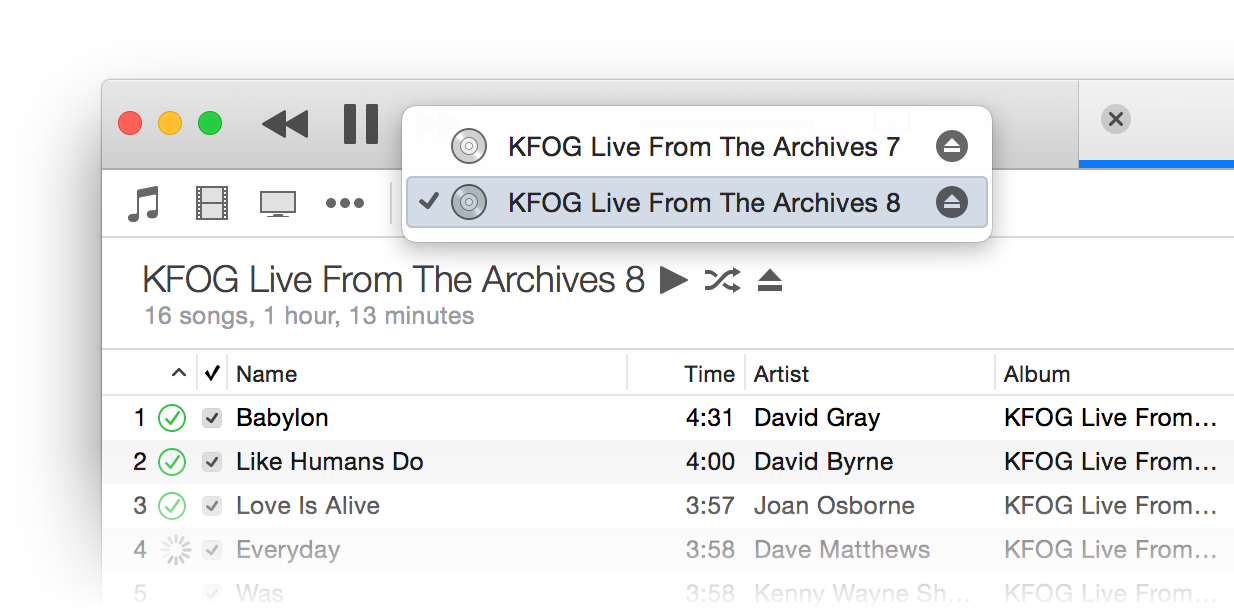
Click on the CD icon, though, and you'll see both inserted discs are available:

There really isn't a trick to using two drives at once in iTunes, other than saying "Yes" when this dialog appears onscreen:

iTunes won't actually rip both CDs at once, but it will queue the second CD up, and start ripping it automatically when the first one finishes. As soon as you see that changeover, click on the CD icon and switch to the just-imported CD.

Eject the just-imported CD, insert the next CD to rip, and say "Yes" again when iTunes asks if you'd like to import it. Repeat as necessary, until you're done. I imagine that if you had three CD drives, this would work just as well—I can't test that assumption, though.

While not fully automated batch ripping, this process does let you make relatively quick work of a stack of CDs—for those of you who (like me) still prefer such relics of a prior age.


Yosemite: Tweaking Safari’s URL bar settings

Safari in Yosemite is a familiar yet new beast. Among the interface changes, I really didn't like the way the URL bar behaved. In particular, these things bugged me:

  1. Not being able to see the full URL.
  2. The width of the URL entry box.
  3. The drop-down that appears when you click in the URL bar (when you have a page loaded).

Thankfully, the fixes for these three issues are easy, if not completely obvious.

Full URL not visible in URL bar

By default, Safari truncates URL to just the base "dot" address, regardless of where you are on a site. So if you're reading my hint about using a dark Dock, Safari's URL bar will display this:

https://robservatory.com

But you're really on this page:

https://robservatory.com/yosemite-dark-dock-and-app-switcher-with-light-menu-bar/

If you prefer knowing where you are in the site hierarchy at all times, the fix is simple. Open Safari's Preferences, go to Advanced, and add a checkmark next to "Show full website address."

The URL box will now show the full URL of the page you're viewing. Of course, that will lead to a second problem—the URL box isn't large enough to display much of the extended URL. Thankfully, that too is an easy fix.

[continue reading…]


A nasty little iTunes/iOS bug may be causing media sync issues

November 18th update: My sync issues returned, but due to a different cause this time. Details in this post.

After complaining to Tim Cook, and separately starting a (now closed) support ticket, it appears that my iOS/iTunes sync nightmare has finally come to an end!

I have not seen a progress bar that busy since the day I brought my iPhone 6 back home. Whatever I tried, iTunes simply would not sync everything in my library. In the end, the problem turned out to be as simple—but as deadly—as this:

In the current version of iTunes/iOS, there's a bug that only appears when you have duplicates of purchased songs. When encountered, a duplicate of a purchased song will (almost always) cause iTunes to silently stop syncing.

This is a known-to-Apple issue, and it will be fixed in a forthcoming update. I'm fairly certain it's an iTunes bug, but as Apple didn't clearly state which it was, I'm calling it iTunes/iOS. Either way, until it's fixed, it's a really bad bug.

Here's what happens: If you have duplicates of purchased songs, iTunes simply silently stops syncing when it hits one of those duplicates. From your perspective, it will look like everything is working—iTunes never throws an error, and it proceeds through all six (or seven or whatever) steps of the sync process, as seen in the status window of iTunes.

But behind the scenes, nothing is happening—at least, nothing relative to syncing your files. As seen by my troubles, this can be incredibly frustrating and hard to fix.

Continue reading to see how I was able to finally (with Apple's help) get my devices syncing again—the tricky part is finding all the duplicates, because they're not all obvious. Also note that if you are not having sync issues, I wouldn't worry about duplicates—no need to endanger what's already working well!

[continue reading…]


Dropbox shows iPhoto what simple really means

Note: Dropbox—sadly—removed this feature in July of 2017, so don't even bother reading any further.

Did you know that Dropbox lets you create photo albums? No? Me neither, until this morning, that is. And it turns out, it's incredibly easy to do:

  1. Copy or move a folder of images into your Dropbox folder. Choose any location within the Dropbox folder that you wish; I set up a Photos folder to hold slideshows.
  2. Open the Dropbox web site, and sign in to your account.
  3. Navigate to the folder you just uploaded, right click, and choose Create album.
  4. Click Share album, then copy the link or directly invite those you'd like to see the album.

That's it, your'e done. The only time-consuming portion of the process is uploading the images; creating and sharing the album takes almost no time at all. That's about as simple as it gets.

Now assume you want to do the same thing using iPhoto: create a web-based slideshow of images for anyone to see via a shared URL. Sure, you could use iCloud's Photo Stream, but that's not a web-based solution. Instead, you'll need to use File > Export in iPhoto, and either create a Web Page or a Slideshow. Slideshow is really misnamed, though, as what it really creates is a movie of your images. So Web Page it is.

[continue reading…]


One possible solution for ripping stubborn discs

While writing up this week's Watch It selection (The Stunt Man), I was rewatching the movie on my TV, and wanted to switch over to the computer. I own a many-years-old DVD version, so I popped it into my iMac, fired up HandBrake and set to ripping it. But I got nothing—HandBrake ripped a 4KB file, then claimed it was done. Not a good start.

A glance at HandBrake's activity window showed this error:

libdvdread: CHECK_VALUE failed in ifo_read -- error message

Searching on that error message pointed to an error in dvdnav, and some suggested ways of working around it, including installing a patched version. There were also other errors, and searching on those indicated something about the copy protection was causing a read error with the disc.

I also tried RipIt's built-in rip-and-compress, but it also failed. After mucking about with those two apps, and nearly every other video-related app I own, here's how I finally managed to rip my legally-purchased version of The Stunt Man:

  1. Used RipIt to copy the DVD to my hard drive. (No settings to worry about here at all.)
  2. Used MakeMKV to make an MKV from the ripped file. I pointed it at the folder from step one, and clicked the Make MVK button. The end result was a number of files, with the longest one being the movie itself.
  3. Used HandBrake to convert the longest MKV file to an m4v file. I just left the settings at the default (high quality), and the end result was a nice quality 1.9GB movie (down from a 7GB MKV file) that plays on all my devices.

I'm posting this here mainly so I remember what I did, but perhaps it'll help with your stubborn discs as well.


How I create digital versions of Blu-ray discs

As I recently wrote about, I'm weird in that I prefer to buy my movies on physical media, versus electronic only. But I also enjoy the benefits that come from having an electronic version of the movie. The recent Frozen Blu-ray release, for example, was perfect: In the box was a Blu-ray, a DVD, and an easy-to-use redemption code for the iTunes digital version.

Other studios, though, want to force me outside the Apple ecosystem, and into the hell that is Ultraviolet. More and more, in fact, this is the norm. Which means I need to make my own digital versions.

For DVDs, this isn't too troublesome (and well documented), but I'm only buying Blu-ray discs now, and that makes things a bit tougher. (Kirk McElhearn discussed Blu-ray viewing/ripping for Macworld last year. Kirk focused on playback; I'm ignoring playback, and expanding on the ripping tutorial.)

If you're interested in creating your own digital copies of your Blu-ray discs, read on to see how I do it.

[continue reading…]


How to: Simplify value pasting in Excel

I tweeted this over the weekend, but thought it might be worth a bit more explanation here. By default, when you copy and paste something in Excel, Excel defaults to pasting everything from the copied cell: the formula, shading, borders, font, style, etc.

Excel dialogSometimes this is OK, but often I just want the values from a cell or range—either because I'm using them in another table with different formatting, or to convert a formula into fixed values.

Out of the box, if you want to paste just the cell values in Excel, you have to select Edit > Paste Special, then navigate the world's busiest dialog box (as seen at right), click on the tiny Values radio button, then hit Return.

If you're doing a lot of value pasting, this is a royal pain. Thankfully, it's pretty easy to fix this design stupidity.

How you fix this depends—for the first step—on whether you're running Excel 2008 or Excel 2011.

[continue reading…]


My horrid Minecraft purchasing experience

Summary version: I bought the Mac version of Minecraft via credit card. This led to my card being put on a fraud hold, and the company that handled the charge asking me to provide personal and private information via email. Ergo, my recommendation: do not use a credit card to purchase Minecraft.

Updated on Sept 5: Skip to the end to see Skrill's response to my refusal to provide identity theft documents.

Detailed version: Recently, my daughter started playing Minecraft with a friend of hers. At first, the iOS version was all she wanted to use, and she played that for quite a while. But then her friend upgraded to the desktop version, and after some discussion with her and figuring out how she could help pay for it, we agreed to buy the Mac version.

So I went to the Minecraft site, and followed the steps to pay by credit card. When you do so, your payment is handled by a company named Skrill (previously Moneybookers). Googling on either of these will provide some interesting tidbits, such as default opting-in customers to casino partners and their blocking the WikiLeaks donation site. I only wish I had Googled before I purchased. In my defense, it's only noted in a small line at the bottom of the payment screen:

If I had gone my homework ahead of time, I would've switched to PayPal, but I didn't.
[continue reading…]