Skip to content

macOS Apps

Articles about OS X applications.

Randomly merge lists in Excel

This morning, while working on a customer request, I had to create a list of words by randomly choosing words from two lists, and then mashing them together. This isn't something that I've ever done before, and I'm not sure how relevant it might be for others, but I'm documenting it here just in case someone is searching for such a solution.

Here's how my little test spreadsheet looked when I was done with it:

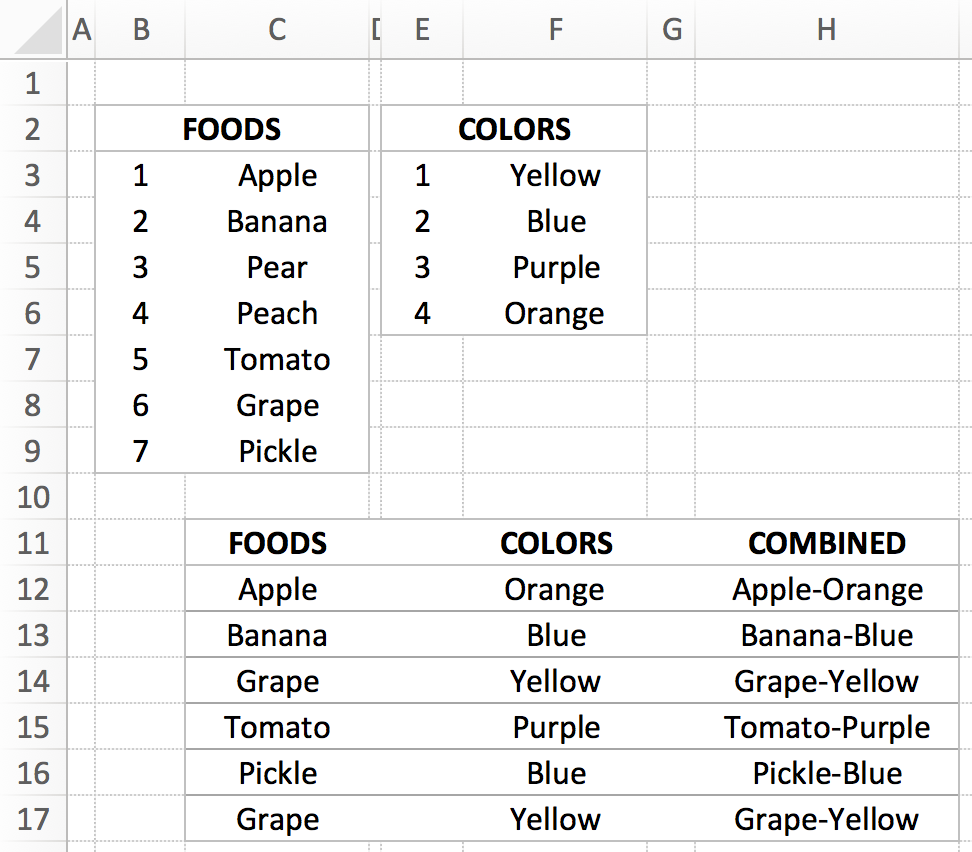
I didn't realize it at the time, but this could be a "modern paint color" name generator…"Yes, I'd like two gallons of the Pickle-Purple, please." Anyway, the COMBINED column contains the final result, with the FOODS and COLORS columns showing randomly-selected entries from the two lists. Each time you recalculate the sheet, all the selections will change.

The key bit is the formula to grab a random entry from the list; here's what that looks like in cell C12 ("Apple"):

=VLOOKUP(RANDBETWEEN(B$3,B$9),B$3:C9,2)

It's just a basic VLOOKUP that uses RANDBETWEEN to grab a random row from the lookup table. Not rocket science, but nothing I'd tried before. (For this to work, your table entries need row numbers, obviously.) The COMBINED column is just a simple text formula, i.e. =C12&"-"&F12 to combine the two random values.

I also wasn't aware of the RANDBETWEEN function—it returns a whole number between the values you specify. That is so much easier than using RAND and then having to multiply and round off, etc.

Feel free to download the workbook if you'd like to take a look.


Put Unix path to selected Finder item on clipboard

Thanks to the commenters for pointing out the much easier way to do this: Select an item in Finder, then press Command-Option-C. All done. Leaving the hint here as an example of a Rube Goldberg machine.

In two recent geeky tips, I showed how you can open a Terminal window in the directory of the selected Finder item, and how you can view Unix man pages in Preview. To finish the trifecta of geekiness, today's tip lets you quickly place the Unix-style path to the selected Finder item on the clipboard. (It's actually a simplified version of the 'open this in Terminal' tip.)

The AppleScript that accomplishes this is quite simple:

If you run that in Script Editor, you'll see that your clipboard contains the path to whatever you had selected in Finder. But running the AppleScript in ScriptEditor isn't a great timesaver. Instead, put it into whatever tool you have that can run AppleScripts via hot key or menu bar entry or whatever.

In my case, I put it into a super-simple Keyboard Maestro macro. I've set it up to show in the Keyboard Maestro menu bar when Finder is active:

There are countless tools that can run AppleScripts in various ways, including our own Butler, LaunchBar if you save the script first, etc.


View Unix man (help) pages in Preview

Today's tip goes well with yesterday's tip, which explained how to open any Finder item's folder in Terminal via Keyboard Maestro. Once in Terminal (and sometimes even when not in Terminal), I'll often want to check out the man page (help) for a given command.

You can do this directly in Terminal with man [name of command], of course, but then it opens on top of whatever you were working on, and you have to read it in Terminal. You could use another tab or window, but you'd still be reading in Terminal. There are times, too, when I'm writing about the Unix side of macOS, so I'm not even in Terminal, but still want to view a man page.

My solution to this problem is two different ways of doing the same thing: I open man pages as nicely-formatted PDFs in Preview. The method I use to get to that point depends on if I'm working in Terminal or not.

Update: I've modified the script and macro so that they properly handles two-argument man commands, such as man 3 printf.

In Terminal

Based on an old Mac OS X Hints tip, I created a very simple shell script:

The key to this little script is the -t option on the man command. From the (hehe) man man help file, here's what that does:

  -t     Use /usr/bin/groff -Tps -mandoc -c to format the manual page,
         passing the  output to stdout. The default  output format  of
         /usr/bin/groff -Tps -mandoc -c is  Postscript, refer  to  the
         manual  page  of /usr/bin/groff -Tps -mandoc -c for  ways  to 
         pick an alternate format.

In other words, the -t converts the help page into a PostScript file, which is something that Preview can easily open (which is just what the last line of the script does).

I named this script preman, because it uses Preview to open man pages. Once saved, I made it executable (chmod 755 preman), and I can then open any man page in Preview by typing, for instance, preman bash.

The output is nicely formatted, and by opening the man page in Preview, my Terminal session is uninterrupted. A quick adjustment with Moom, where I have a saved layout to position Preview and Terminal, and I can scan the man page while working in Terminal.

But what about when I'm not in Terminal? For that, I basically implement the same shell script, but with it set up to run within a Keyboard Maestro macro.

[continue reading…]


Open Terminal in selected Finder folder

Today's tip is just a re-implementation of a really old Mac OS X Hints AppleScript that lets you open a Terminal window with the working directory set to (i.e. cd'd into) the selected Finder folder.

This makes it really easy to jump into Terminal to do something from Finder, without having to do any mousing and minimal typing. What's new is that I've used Keyboard Maestro to turn the AppleScript into a macro that runs only in Finder, where it's available via hot key or menu bar trigger.

Here's the complete macro; download it now to look at and/or use as you wish. [Note: If you use iTerm2 instead of Terminal, you'll want to download this version instead. My good friend James, who runs Out of Control, did so. He tells me it works great.]

The name of the macro may look a bit odd—the 03) controls the sort order in the Keyboard Maestro menu bar item, and does not display when the menu is activated:

Keyboard Maestro also helpfully displays the assigned keyboard shortcut in the menu bar item, in case I've forgotten it.

[continue reading…]


Create an iTunes song info window using Keyboard Maestro

For those who aren't aware, Keyboard Maestro is a macro-creation tool, designed to help you automate routine tasks. But its powers let you do some really cool stuff, not all of which could be classified as automation. Such is the case with this project: Creating an iTunes song info pop-up window.

There are lots of apps out there—including Many Tricks own Butler—that can do this for you, and my Keyboard Maestro version is worse than most of those in many respects. However, I wanted to teach myself more about Keyboard Maestro, and this seemed like a good project with which to do so.

I use Buter's iTunes pop-up info window, which looks like this:

I wasn't really interested in the rating or volume controls (though they should be doable), but I wanted to see if I could get the album art and song info in a window via Keyboard Maestro. After some struggles, here's what I came up with in Keyboard Maestro:

My window is larger by design, so I can have somewhat more visible album art (aging eyes). And I can't decide on a background color or gradient, so it keeps changing—this was the look when I snapped the screenshot, but it's since changed again.

Read on if you'd like to know more about Keyboard Maestro, and how I used it to create this iTunes info window. (Note that this write-up assume some familiarity with Keyboard Maestro, though I try to explain each step in the process.)

[continue reading…]


A spreadsheet to track full-year running miles

2020 update: Everything here is out of date now, and has been replaced with my post on the 2020 version of the worksheet. In there you'll find a download link and full instructions. I'm leaving this article up only because it may be linked to from other places.

 
Update: I've created a much nicer run tracking workbook. Please use that version, as this one is out of date and is no longer maintained. I'm leaving it here because some of the "how to" bits are still applicable to the new version (and it's linked from that post), but I've removed the download link.

To help with my 2,016 miles in 2016 running project, I created an Excel workbook to track my progress. A couple people have asked for the workbook, so here it is…with some caveats and instructions.

First off, this was written for Excel 365, though it should work fine in recent versions of Excel. There is no Numbers version, there is no Google Sheets version…this is it. Start by downloading the worksheet and opening it in Excel.

The first thing you'll notice is that this is a really ugly workbook. The only thing I spent any time "prettifying" at all was the actual vs. goal chart, as that's the thing I tended to look at most often. The second thing you'll notice, depending on when you open the workbook, is that it appears nothing is working. The formulas will not work properly until January 1st, 2017.

[continue reading…]


Remap non-modifiable keyboard shortcuts in any app

Ever run into a program that has some pre-defined keyboard shortcuts you don't like? In most cases, they're associated with a menu item, which means you can use macOS' built-in keyboard shortcuts function to fix them. (In System Preferences > Keyboard > Shortcuts > App Shortcuts.)

But what if the shortcut isn't associated with any menu item? Such is the case in Excel 365, which replaced a couple easy-to-type shortcuts (⌃I and ⌃K for inserting and deleting rows and columns) with much harder to type versions: ⇧⌃= and ⌃-. If there's no corresponding entry in the app's menus, it seems impossible to remap the shortcuts—unless the app itself offers that feature, which Excel did in prior versions.

The good news is that it is possible to remap any keyboard shortcut in any app, as long as you're willing to add one more program to the mix: Some sort of macro app. My example uses Keyboard Maestro, but any app that can send a key sequence in response to another key sequence will do the trick.

[continue reading…]


Apple Mail: Classic or modern layout?

To me, the modern view in Apple's Mail app is basically useless: I keep my Mail window at 1,020 pixels in width, because really, there's no need for it to take up more space than that. But at that width, the modern view's message preview is so tiny as to be basically worthless:

Obviously, that's classic view on the left and modern view on the right. With the classic view, I can read each email as soon as I select it in the list; with modern, I have to double-click a message to open in a new window, which is a waste of time and screen space. Modern only gets truly usable if I'm willing to make the window roughly 1,500 pixels in width.

So which layout do you use? Vote in the Twitter poll for the next day (well, 23 hours and counting).


Revisiting ripping Blu-ray discs

A couple years back, I explained how I rip Blu-ray discs. A lot of time has passed, and I now use a slightly different procedure that results in much faster rips—with the caveat that the resulting file will be larger than the "slow" method, and is technically of slightly lower quality, though I can't visually distinguish the two.

The new method uses Don Melton's amazing video transcoding tools, a set of Unix programs that optimize video conversion in ways you cannot do (or easily do) in the Handbrake GUI. If you're new to Unix, but would still like to try these tools, I wrote a detailed set of instructions that should help get you up and running.

Using these Unix programs, you can rip a disc with various parameters, including one to optimize for speed (with good image quality) and another that tries to minimize the file size.

Here's a quick comparison of all three methods, as tested with the three-hour Hamlet Blu-ray. The 'Handbrake GUI' rip was done using, well, the Handbrake GUI as described in my original article. The second and third rows use Don's tools set to quick and veryquick modes, and the final row uses Don's tools set to optimize the file size.

MethodData CopiedConvert (hrs:mins)File Size
Handbrake GUI47.5GB3:526.8GB
transcode - quick40.1GB2:209.2GB
transcode - small40.1GB3:126.5GB

Tested on a late 2014 27" iMac with a 4GHz Core i7 and 24GB of RAM.

Using Don's tools in "quick" mode, you save time two ways: 7GB (15%) less data is copied to the hard drive, and the conversion process is over 90 minutes (38%) faster. The downside is that the final file size is 2.4GB (35%) larger. And that's what they call a tradeoff.

Using the "small" mode in Don's tools, you still save the 7GB (15%) of data copy, and still save 40 minutes (17%) over the original method. In addition, the file size is smaller than the Handbrake GUI version.

To summarize, regardless of whether you care more about file size or ripping speed, Don's tools provide an advantage over the Handbrake GUI: Either method is notably faster, and the small option generates smaller (or probably at worst, very similar) file sizes. (There's also a "big" option, if you don't mind somewhat larger files at a higher quality level.)

Keep reading to see some examples of the image quality of each method, and information on how to install and use Don's video transcoding tools.

[continue reading…]


Presenting the Apple TV (4th Generation) Password Tester

Earlier, I sent out this hopefully-humorous tweet about the difficulty involved in clicking one's passwords into the new Apple TV password input screen:

Presenting LIMNOPHILE, a 10-character yet easy-to-type Apple TV password.

The chart is just an Excel file, with absolutely no logic—I just colored the squares and counted to fill in the data. But then I got this reply…

So I thought "Why not?," and created an actual spreadsheet that will "click check" any all-letter password you feed it. Here's what it looks like in action:

Just replace RIDICULOUSLYLONGWORD with whatever you like, and see how it'll "click out" on your Apple TV. Obviously, this tool is totally tongue-in-cheek!. Any password built with this tool will be weak as heck. It's just for fun, so don't take it seriously.

Feel free to share and modify, but I'd appreciate a credit back if you do so.

Download Apple TV Password Tester (44KB)

Please note that this is an Excel file, and it relies on conditional formatting, so it may not work in Numbers.