Skip to content

General

Stuff that doesn’t fit in any other category

Mac OS X Hints turns 14

Fourteen years ago today, I launched Mac OS X Hints, with this simple post. The Mac OS X 10.0 Public Beta was only a couple months old, and many Mac users (myself included) were feeling lost in the land of Unix and Terminal. (Despite anything Apple said at the time, Terminal was very much a required aspect of using Mac OS X in those early days!)

Related post: RIP Mac OS X Hints, Nov 4 2000 - Nov 4 2014

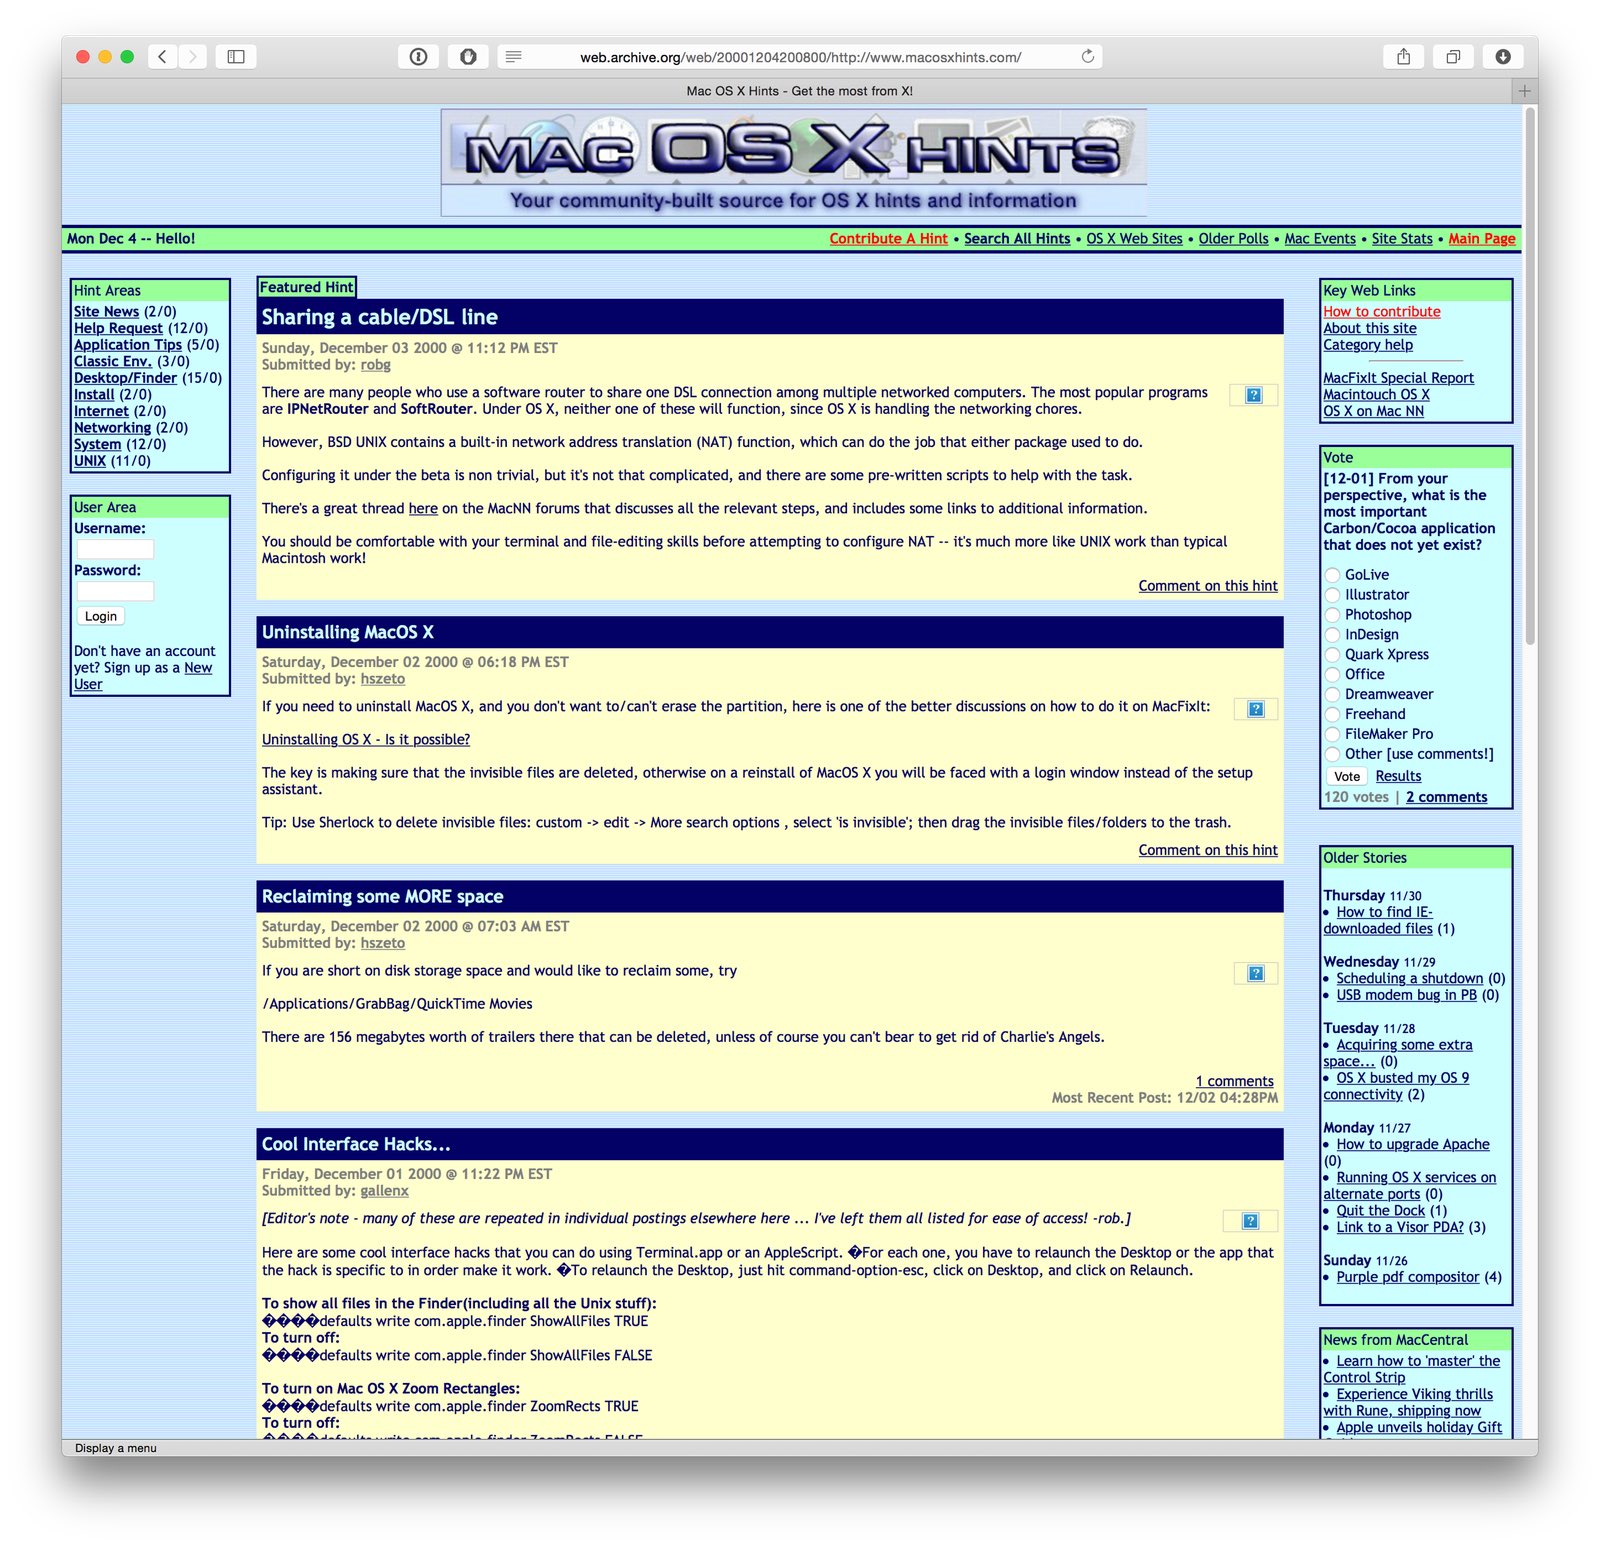
At the time of launch, I knew nothing about content management systems or PHP; I knew enough HTML to be dangerous, and very little about anything else—including design, as you can see from the image at right.

That image, courtesy of the Internet Archive's Wayback Machine, was taken one month after launch. Could it be any brighter and uglier? Probably not. While I did many things wrong during that launch, I did get a few things right…

  • The site was all about the community; it was my intent from day one that it would be a users helping users site, not a "me telling the world what to do" site.
  • The content management system I chose, Geeklog, has proven to be very long lived—fourteen years on, and it's still what powers the site. In all that time, we had (I believe) exactly one hacking incident. Not bad.
  • The site had a laser focus on hints; I'd do a pick of the week, but outside of that, it was all about the hints.

So despite my poor design and lack of PHP skills, the site flourished. So much so that Macworld purchased the site and hired me in June of 2005. I spent nearly five years with Macworld, before leaving in 2010 to join Many Tricks.

In looking back, never in my wildest dreams did I imagine the site would flourish to the point where it would actually change my career. But it did, and for that, I'm eternally thankful to everyone who helped make macosxhints.com what it was. So happy birthday, Mac OS X Hints!


Goodbye cron task, hello launchd agent

On April 29th, 2005, Apple launched Mac OS X 10.4, aka Tiger. With Tiger came launchd, a new Unix-side job scheduling tool. launchd was intended to replace cron, the long-established (and quite cryptic) tool for such tasks.

And now, a mere nine-plus years later, I decided it was time to give up cron and move to launchd myself. Mr. Bleeding Edge, that's me! (Note: Unless you enjoy the Unix side of OS X and currently use cron to schedule tasks, this article won't be of much interest to you.)

Why now, after so long as a holdout? Primarily because I kept running into issues with cron tasks that needed to do things as "authorized me," such as mounting an encrypted disk image, or even just mounting a network share. Or my Mac would be asleep for a scheduled cron task, and it therefore wouldn't run. (launchd will queue any missed tasks to execute when the Mac reawakens.) Finally, my cron file was getting huge and unwieldy, and making simple changes was fraught with danger of breaking something.

So I dedicated a portion of a recent weekend to figuring out launchd, and migrating my cron tasks to this brave no-longer-at-all-new world. If you're still hanging on to cron, read on to see what I've learned about launchd—maybe it'll inspire you to move, too (or not).

[continue reading…]


Wallpapers: iPhone 6

Once I had my iPhone 6 syncing, it was time to get to work on my home and lock screen wallpapers. I have made these for every iOS device I've owned—here's the full collection.

My home screen wallpapers feature a bar to highlight the paging dots, and are typically "low noise" to make it easy to see icons and text. The lock screen wallpapers have no such restriction, and include a little bit of everything.

These wallpapers are 750x1344 pixels in size, and are designed for use on the iPhone 6, as that's what I have. (If you use a Plus, and really like an image or two, let me know and I can make one for the larger phone.) Note that the images shown in the image sliders below (hover and click to cycle) are low-quality 180x320 JPEG representations of the actual photos; to get the high-quality images, download the entire bundle [24MB] and install only those you wish to use.

Home Screens (16)Lock Screens (52)

Note: Due to a quirk in iOS 8, you need to use these steps when installing one of my home screens, otherwise the nav bar (the bar that shows the page navigation buttons) won't be located in the right spot. Here's how, assuming you're in the "Choose a new wallpaper" section of iOS:

  1. Tap the desired home screen icon to see the full-size version.
  2. Disable Perspective Zoom. (It won't work right with the navigation highlight row I use.)
  3. Pinch and zoom out so the image is at it's 100% size.
  4. Now drag the image up and let it bounce—this is the critical step.

If you've done the above steps right, then you'll see quite a few pixels of the nav bar above the Perspective Zoom button (top image). If you haven't done it properly, then the nav bar will barely clear the button (bottom image).

Given the images are the same resolution as the screen, I have no idea why this happens…but it does, and this is the only way to make sure the nav bar winds up where you want it.

License: All photographs in these wallpapers are © Rob Griffiths, and are freely provided for personal use only. You may not include these wallpapers on other sites, nor in any commercial product, without my prior permission. (I hate having to put this here, but prior experience has shown it to be necessary.)


A visual guide to iPhone screen resolution over time

While I was working on some iPhone 6 lock and home screens, I paused for a few minutes to put together this visual guide to the iPhone's changing screen resolution over the years (click to zoom):

Both the inline and zoomed image above are smaller than 100% scale, of course. But if you'd prefer, you can check out the massive full-size version. Be forewarned, this is a 3628x2188 pixel photo, and it's 1.7MB in size.

For the curious, the original photo was taken at Great Sand Dunes National Park and Preserve, at roughly this spot, looking north-ish.

When viewed in this comparative manner, the iPhone Six Plus' resolution really stands out—there are a ton of pixels on that gorgeous screen!


Silently mute the mic input via AppleScript

Note: The scripts in this hint don't truly mute the mic input; they drop its volume to zero. That's because there's no way to mute an input source via AppleScript (while you can mute an output source). At zero level, the mic will still pick up sounds, but they're very quiet.

Thanks to John Welch, though, you can download an app that will mute the mic with a simple one-click HUD—he posted it in the first comment here, but that download link is broken. Instead, download it via this link, and you should be good to go.

While recording our weekly podcast, The Committed, I often want to mute the microphone input for one reason or another. (Yes, my microphone has a big Mute button on it, but pressing it results in an audible CLICK in the recording.)

There are any number of ways to do this quietly, including just sliding the level down in the Sound System Preferences panel (though it's hard to then get it back to exactly the right spot). There are also any number of App Store apps that will do this for you; some are free, some are paid. And doing it programmatically yourself is as easy as two one-line AppleScripts:

Save those separately, assign keyboard shortcuts (or more quietly, trackpad gestures) using your favorite third-party tool, and you're done.

But I wanted something more. I wanted one script to mute and unmute the volume. I also wanted a visual reminder when I was muted. After an afternoon of slogging around the internet, looking up obscure AppleScript command syntax, and diving into Sal Soghoian's AppleScript 1-2-3 book, I came up with something that seems to work. This short video shows one version of it in action:

Read on for the code and a how-to on putting it to use.

[continue reading…]


Behind OS X’s modern face lies an aging collection of Unix tools

Note: This article has been heavily modified, as I was a total knucklehead and completely forgot about GPL v3—thanks to Geordie Korper for pointing it out in the comments. Basically, the cause of the aging Unix tools in OS X is GPL v3. I've updated the following table to include the license information. In every case but one (nano), GPL v3 is the license on the non-updated apps. So that's that…I'll leave this up, though, in case anyone's curious about this stuff.

As I covered recently, the version of bash that ships with OS X is quite old, and as such, is vulnerable to the recently-revealed bash security hole.

At some point, Apple will release an OS X update containing a patched version of bash. (Update released.)

So while Apple has patched bash, this version of the shell is simply ancient. Just how old is it? bash 3.2.53(1) is roughly seven years behind the current version, 4.3.25. Seven years is like, well, forever, in Internet time!

With that bash age gap in mind, I took at look at a number of common Unix apps—in both Mavericks and Yosemite—to see which versions were in use. Then I checked the same apps in MacPorts, a tool that makes it simple to install many Unix apps.

(MacPorts doesn't necessarily have the absolute latest version of every Unix app, but they do stay relatively current. For instance, they already have a patched version of bash that fixes the above vulnerability.)

The results were interesting, to say the least—many of the core Unix utilities in OS X are years and multiple versions behind their open source, er, sources. You can thank GPL v3 for that, as noted above (and covered in more detail below). But that still leaves the big question:

Does it matter?

That is, should we care that these tools aren't keeping up with their latest and (presumably) greatest versions? Is it a problem, or merely a statement that what we have works well enough for the majority of users? (For those who don't want to bother reading, my general opinion is no, it doesn't matter.)

[continue reading…]


Cutting the land line (sort of)

Being old school—and just old in general—our family has always had a land line (i.e. Plain Old Telephone Service or POTS). We've also had the same POTS phone number for well over a decade, so it's the number that everyone uses to call us at home. Add in the fact that (at least until very recently) AT&T cell service at our home was marginal to poor, and there really wasn't much desire to cut our land line for all-cellular.

Until I looked at our bill, that is, and discovered that our POTS line was costing us over $30 a month. Even at that amount, we paid extra for caller ID, and still had to pay for long distance calls. So once AT&T upgraded the cell towers near our home, we started using our cell phones for all long distance calls. But still, our POTS number was well known to friends and family, so we didn't want to just kiss it goodbye. But that $30+ a month was basically a complete waste of money, so I started looking for other solutions.

Enter VOIP, or Voice Over IP. This technology has been around a long time, but I never really felt ready to make the move. Then I started looking into it, and found that I could save about 90% of the monthly cost of my POTS line, keep my phone number, and gain a number of useful features. That made the "go" decision quite easy to make; read on if you're curious about replacing a land line with a VOIP service.

[continue reading…]


Fixing a lawn mower, then and now…

On Sunday afternoon, I went to pull our mower from the garage to attack the jungle growing in our yard. Apparently while pulling a car into the garage at some point, I had managed to snag the mower's grass catcher between the car's wheel and a garage support post. The end result was a mangled piece of metal that more resembled avant-garde sculpture than it did a grass catcher. I borrowed the neighbor's mower for the day, which solved the problem in the short term. But long term, I was in need of a new frame and grass catching bag.

With the power of a time machine, here's how that task would have gone 30 years ago, and how it went on Sunday…

[continue reading…]


Ford delivers (via FedEx) excellent customer service

  • Auto

About a year ago, we were in the market for a new car. We wanted a roomy midsize car with good gas mileage, and lots of tech toys for me to play with. After much searching around, and too many test drives to count, we chose a new Ford Fusion Hybrid.

We don't drive so much that a hybrid makes economic sense, but I so despise Oregon's "can't pump your own gas" law that we went for the Fusion Hybrid's 47/47mpg rating (at the time we bought), and its expected 600ish mile range between fill-ups.

Our experience with the car has been nothing short of terrific—given I hadn't bought an American car in over 30 years, I've been very pleasantly surprised by the car's comfort, quietness, reliability and features. (More on our experiences with the car itself in a future post.)

Overall, our gas mileage has been great—we're usually around 40mpg in the city, and often over 47mpg on the highway. Our experience versus the EPA sticker didn't surprise us, as we've previously owned a hybrid (a Camry), and saw similar results. I also don't think I've ever hit the EPA numbers for any of my prior vehicles, hybrid or not. So while we weren't seeing 47/47, we weren't far off, and were quite happy with our mileage.

Which made the FedEx we received yesterday all that more surprising…

[continue reading…]


The (semi) hidden world of Dulles’ Z gates

I spent the last three-ish weeks on the east coast, visiting family along with various tourist sites. We flew in and out of Dulles International Airport, via a direct flight (oh wow, they still exist!) from/to Portland.

If you've never been through Dulles, it's an interesting airport—though a bit less interesting now than in the past.

In the past, you entered the main terminal, cleared security, and then boarded a bus (a two-headed elevating bus, similar to what's seen in the image at right, often with tails on top to help them be seen from the control tower) to one of the outlying buildings holding the actual gates.

Now most terminals are served by a train system, or via a walkway. But Concourse D is still accessed via the bus, and that's where we were set to fly out. It was just me and my kids for the flight home; my wife had returned a week earlier. We arrived at the main terminal about 90 minutes before departure. After clearing security, we were headed for the bus to Concourse D when I happened to check a departure sign…and discovered that our flight was delayed for 50 minutes. Ugh.

The Concourse D building at Dulles isn't one of the nicest places to wait, especially with kids (it can be noisy and hard to find space to relax). But I didn't really want to head back through security either. Standing there near the entrance to the shuttle busses, I spotted a sign for "Z gates," which I'd never heard of before. So we headed down that way, just to see if we could find somewhere quiet to pass the time before boarding the shuttle bus.

What we found was a wonderful, nearly deserted oasis of peace and quiet right in the heart of Dulles.

[continue reading…]