Skip to content

Technology

Entries related to techology in general…

The bizarre world of digital movie pricing

Recently DirecTV had a free HBO preview weekend; as we're not subscribers, I set our DVR up to record a number of movies. One of those films was X-Men: Days of Future Past. I'd never seen any of the X-Men movies, and I really liked this one. So I decided to watch the other six films in the series, renting them on iTunes and Amazon Instant Video.

I was able to rent all movies except The Wolverine, which is only available as a purchase on either Amazon Video ($12.99) or Apple TV ($14.99). So I had to buy one movie, and rented the other five. In total, I paid $34.94—about $5.82 each—to watch six movies, including buying The Wolverine. That's not outrageously expensive. (I paid an extra $2 to buy the iTunes version, as it's a better viewing experience than Amazon Instant Video.)

But (excluding The Wolverine), that's my cost to watch them just once. If I or anyone in my family wants to watch them in the future, we'll have to pay again. If I want to own the movies, to make them free to watch any time, I could either buy them digitally or on Blu-Ray.

To buy all six movies on iTunes, I'd pay a whopping $89.94, as each is priced at $14.99. (You'd think the first three films, all being at least nine years old, would be cheaper…but you'd think wrong.) Over on Amazon Instant Video, it'd still cost $77.94 to buy the six movies on digital, as they're $12.99 each.

Clearly, if digital is that expensive, then the Blu-Rays will be even more, right? After all, they have to be mastered, duplicated, boxed, sealed, and shipped to retailers. There are physical returns to worry about, and management of all the stuff in all of those steps…so these Blu-Rays are going to be incredibly costly, right? No, not right at all.

A quick trip to amazon.com leads to X-Men and The Wolverine Collection, which contains all six of the movies on Blu-Ray. And the cost for all six movies? Only $34.96, or exactly two cents more than I paid to to rent five and buy one in digital form!

(I found the exact same collection on walmart.com for the same price, too, so this isn't some Amazon-only special pricing. And even at the full list price of $69.99, this collection is still cheaper than the digital versions.)

Even if I wanted to buy all six movies separately, the total cost for all six would be $73.78—still cheaper than either iTunes or Amazon Instant Video! (Most of this cost savings is because the older movies are indeed cheaper than the newer movies. And the newer movies are, in some cases, more than their digital counterparts.)

In a nutshell, I should have simply bought the six-disc collection and been done with it. (It's also not too much work to rip them myself if there's not a bundled digital copy, so I can watch on Apple TV, iPad, etc.)

I'd have spent all of two pennies more than what I did, and I'd own the actual movies, free to use when I like and how I like. Sometimes I really hate Hollywood.


Improve the performance of your audio/video system

I take my audio and video very seriously; my audio/video room is built on a separate foundation from the rest of the house, the sub-floor is acoustically isolated from the foundation, and the walls and floor have been tuned for perfect response regardless of listening position. In short, I don't mess around with my audio/video stuff.

But I always think there's room for improvement, which is why I was so excited by the arrival of my long-backordered Chromatic Response Augmentation Panels, pictured at right.

These panels (a steal at only $229.95 per set of 25; I ordered an eight-pack) are simply incredible. How do they work, you may ask? You apply them to your audio and video cables, and the chemically-coated colors in the panels act on the electrons in the wiring, aligning them for fewer collisions and better flow rate.

Why should you want to reduce collisions and increase flow rate? After installation and 100 hours of continuous testing in my audio/video room, here's why: They're amazing! My audio playback was impressively better than before I installed the augmentation panels. The sound stage was broader yet more nuanced, stereo separation improved by 87%, and I noted a subtle but discernible reduction in noise below the 20Hz level. Incredible!

My 1977 master recording of Steve Fullerton and the Vienna Beach Orchestra performing Riccardo's monumental 1771 symphony "En Periodico De Nada Fulleste" sounds better than I've ever heard it before.

My video playback was similarly improved: The blacks were blacker, the color palette was stunning in its breadth, and interlacing was basically gone. Watching the director's cut of the seminal 1968 film "The Peacekeepers," I was drawn into the movie like never before. It was almost like I was right there, demonstrating with everyone. Intense!

They may look like Sticky notes, but these augmentation panels have demonstrable real-world benefits in both the audio and video realms. Frankly, I'm blown away by these little panels of color!

When installing the panels, make sure you follow the instructions precisely—each type of cable requires a different repeating color sequence. Why? Because the types of electrons vary depending on source and destination, and the panels must be ordered properly to reflect these differences. For instance, here's my RCA cable wrapped with the panels:

While RCA uses a YPGWB—Yellow Pink Green White Blue—repeating pattern (see note below), Toslink cables use BBWGPPY, HDMI cables are GGWBPYBG, speaker wire is GPWWBYYP, etc. It's all explained in the 200-page installation instructions, which can be easily followed by anyone with a dual degree in physics and chemistry.

(Note: Because of their country of origin, the augmentation panels' patterns go from right to left, not left to right. Make sure you get the directionality correct, or you'll lose all the benefits of the panels.)

Note, too, that the panels must end 1/2" from the end of the cable, so as to let the electrons slow a bit before reaching the termination point. Otherwise you'll risk blowing out your equipment due to the high-speed electron collisions.

Anyway, if you're the type that wants the best out of your audio/video system, I highly recommend the Chromatic Response Augmentation Panels; at only about $2,000 to do all my cable runs, it's an amazing bargain. I've heard that the factory is making the stuff as fast as they can, but quantities are currently quite limited—so order your CRAP now before it's all gone!


Stupid by design: Voice command uselessness

I drive a 2014 Subaru Legacy; for the most part, I'm happy with the car. But there are some design features that are just comically stupid. Here's one example…

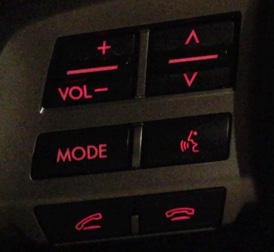
The image at right shows the steering wheel controls on the left side of my steering wheel. The up/down arrows icon is a toggle switch to quickly change the audio track being played (or the radio station preset); it works great, and I use it all the time.

The stupid comes in just below that, with the face/speaking icon button. This button activates voice command mode, which does many useful things, such as dialing the phone, setting a destination for the nav system, etc. But you can also—you guessed it—use it to change tracks. Here's how that works:

  1. Press face/speaking icon.
  2. Wait about one second for the car to say "voice command please."
  3. Say "next track" or "previous track."
  4. Listen to car say "track up" (or "track down"), then the track changes.

Now I ask…who is ever going to use this method of changing tracks? The very first thing you do to use it—pressing the face/speaking icon—requires touching the steering wheel. The same wheel where, roughly an inch above that button, is a toggle switch that will switch tracks in precisely one step!

Did they include the voice command track changing features because someone in Marketing said they had to? Did they think there are people who prefer a slower, more cumbersome process to simply tapping a toggle switch? Did they think there are people who need audible feedback about what they've asked the car to do? (Never mind that they get that feedback by hearing the new track after using the toggle button.) Do they think there are a group of people who will use steering wheel buttons but would never use steering wheel toggle switches?

I honestly have no idea why they included the voice command ability to change tracks, but it definitely strikes me as stupid by design…or am I overlooking some really-obvious use that I'm just not seeing?


Send your Retina iMac’s desktop to deep space

Last week, I used the just-released Hubble Space Telescope images of the Andromeda galaxy to create a couple of desktop images for my Retina iMac. I liked the results so much that I spent some time collecting other suitable images from the Hubble site, and then cropping and/or scaling them to create interesting high-res desktop images. (I used Acorn for all the edits; it had no troubles, even with TIF images as large as 20,323x16,259!)

The end result is a collection of 50+ Retina iMac-sized (5120x2880) desktop wallpapers, courtesy of the Hubble Space Telescope. Here's the full collection:

Tip: If you click on the caption below the image, you'll be taken to the source page on the Hubble telescope site where I found the image.

There are at least two versions of nearly every image—one or more where I cropped out an interesting area of the photo at 5120x2880, and one where I scaled down and then cropped as needed to get as much of the full image as possible.

There are three ways to get an image (or all the images):

Method One: One at a time

  1. Command-click on the image (anywhere other than on the navigation arrows) you'd like to download. This will create a new background tab (in Safari, Chrome, and Firefox, at least), loaded with that image's high-resolution page on my OneDrive.
  2. At the top of the page you'll see a Download icon and text; click there to save the file to your Mac.
  3. Repeat for each image you want, and then organize as you wish, and set them up as rotating desktop images.

Method Two: Another way to get one at a time

Open the full folder on OneDrive, and browse/download directly from there. Click on any image, then click the Download icon to download the selected image to your Mac.

Method Three: Gimme the full set!

If you want all 54 images, just download this zip file from OneDrive.

Images courtesy of NASA/ESA, and full image credits can be found on the linked image page for each image reproduced above.


Why I hate the CNN redesign, quantified

Yesterday I ranted on Twitter about CNN's redesign:

This led to an exchange with a CNN staffer, and a couple people saying "me too!" But it felt it a bit unfair to criticize without specific data. So this morning, I gathered the data, and can now quantify my distaste for the new design.

I compared the current CNN homepage to the latest available on the Internet Archive, calculating how the space was used for each version of the site. The results were eye opening in many ways.


tl;dr summary: The new CNN design displays half as many clickable stories in the same space, with an image that takes 20% of the available screen, and sucks down over 20% of my CPU just to display its home page. Read on for the gory details.

Note: This follow-up entry details my post-CNN news sources and reading methods.


Please leave feedback for CNN if you share my frustrations.
Thanks to Raymond for posting this address in the comments.

[continue reading…]


Seeking clarity in Retina iMac desktop images

I'll admit it: I'm a desktop image (nee wallpaper) addict. I love to use a wide variety of images, and change them often throughout the day, just to keep my work environment fresh. On my two external displays, I use iPhoto images—general photos on one, kid pictures on the other. But for the main iMac screen, I prefer to use photos taken by others—typically stunning landscapes and cityscapes from all over the world.

With the arrival of my 5K iMac, however, my existing collection was no longer sufficient. Yes, they were all 2560x1440 images, which matches the "apparent" resolution of the Retina iMac. But in order to make that image fill the Retina iMac's screen, it's first scaled up to 5120x2880, then displayed by OS X at 2560x1440. As a result, my desktop images aren't nearly as sharp looking as they were on my old 27" iMac's display.

As an example, here's a segment of two versions (2560x1440 and 5120x2880) of the Sydney Skyline, as screen-captured when set as my Retina iMac's desktop picture. As you move the divider bar right, you're revealing more of the 2560px version; move it left, and the 5120px version takes over.

After scrolling back and forth a bit, you might be thinking these pictures are identical, and I'm just seeing things. While I may be seeing things, the pictures are not identical. (Compare some closely-spaced lights and the crispness of vertical lines in each image to spot the differences.)

Read on for a closer look at the image, which really shows what you're losing by using a 2560x1440px desktop image on a Retina Mac…as well as a list of places I've found that have 5120x2880px images available.

[continue reading…]


Migrating away from FireWire hard drives

If there's one downside to my new Retina iMac, it's that it completely lacks FireWire ports. While my main data storage is a Thunderbolt RAID array, all my backups (Time Machine, offsite drive, boot drive clone, and extra paranoid backups) are done on FireWire drives.
My setup precludes using Apple's Thunderbolt to FireWire adapter. (Because I use two external non-Thunderbolt displays, they end any sort of chaining capabilities. With some rewiring and an expensive Thunderbolt dock, I can sort of work around that problem—but those docks are pricey.)

The money-is-no-object solution is, obviously, to replace all the FireWire drives with Thunderbolt drives. Given I drained the computing budget to purchase the Retina iMac, that's not going to happen any time soon. ($400 for a 4TB drive, and I'd need three of them plus a smaller drive for the boot clone.)

After some digging, I managed to convert from FireWire without buying new hard drives, and spent just over $100 in total. The solution? The more-than-fast-enough USB3 bus in the new iMac.

[continue reading…]


A very quick look at the Retina iMac’s graphics performance

While I'm still busy setting up my Retina iMac—given I always do this by hand, it's time consuming—I did take a few minutes to see how the graphics performance compares to that of my mid-2011 iMac.

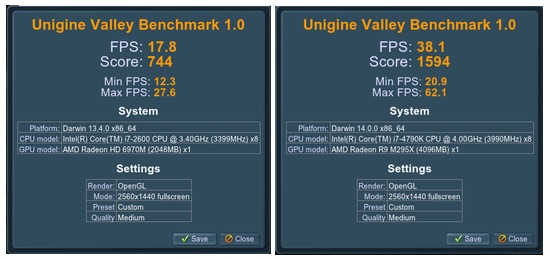
To test the Macs, I use a visual benchmark called Unigine Valley. This benchmark puts the graphics card through a real workout, and is fun to watch while running. Before the results, here's a quick comparison of my two iMacs:

2011 iMac2014 iMac
CPU3.4GHz Core i74.0GHz Core i7
RAM16GB24GB
GraphicsAMD HD 6970MAMD R9 M295X
VRAM2GB4GB

And here's how they did…

2011 iMac

2014 iMac

I'm no math whiz, but it looks like the new Retina iMac is over twice as fast in the graphics realm as my older machine. I knew it'd be faster, of course, but I wasn't expecting that kind of speed up. Wow.


Quick poll: How many iDevices do you own?

From fiscal 2002 (the iPod's launch year) through fiscal 2014, Apple sold 1,224,700,000 iPods, iPhones, and iPads. That's a lot of iDevices! In looking around our (four person) home, I count more than I would have expected. So that got me thinking, how many of these things do other people own?

Hence this simple poll. It doesn't matter if the device is in use or not in use, working or not working…I just think it might be interesting to see how many of these things each of us owns.

Voting is 100% anonymous; I'm not collecting or tracking IP addresses or any other identifiable information. So take a second and tell the world how many iDevices you own.


How I configured my 5K TV with bundled computer

After seeing the new iMac with Retina 5K display (I'm just going to call it a Retina iMac from here on out, or even riMac for short), I decided it was time to upgrade my aging but still oh-so-functional mid-2011 27" iMac.

For those contemplating the same upgrade, you may be mulling decisions on processor, RAM, storage, and graphics cards; here's the logic behind each of my choices in those areas, in case it helps you with your decision.

CPU

This was the simplest decision to make—I always buy the most powerful CPU I can afford. In the case where the choice is a Core i5 vs. Core i7, I will always go for the Core i7. That's because only the Core i7 supports hyper threading, which, as Apple writes, is "a technology that allows two threads to run simultaneously on each core. So a quad-core iMac has eight virtual cores, all of which are recognized by OS X. This enables the processor to deliver faster performance by spreading tasks more evenly across a greater number of cores."

In addition, by upgrading the CPU, I make the machine more usable many years down the road—whether for my own use, or when reselling to someone else.

[continue reading…]