Skip to content

Randomly merge lists in Excel

This morning, while working on a customer request, I had to create a list of words by randomly choosing words from two lists, and then mashing them together. This isn't something that I've ever done before, and I'm not sure how relevant it might be for others, but I'm documenting it here just in case someone is searching for such a solution.

Here's how my little test spreadsheet looked when I was done with it:
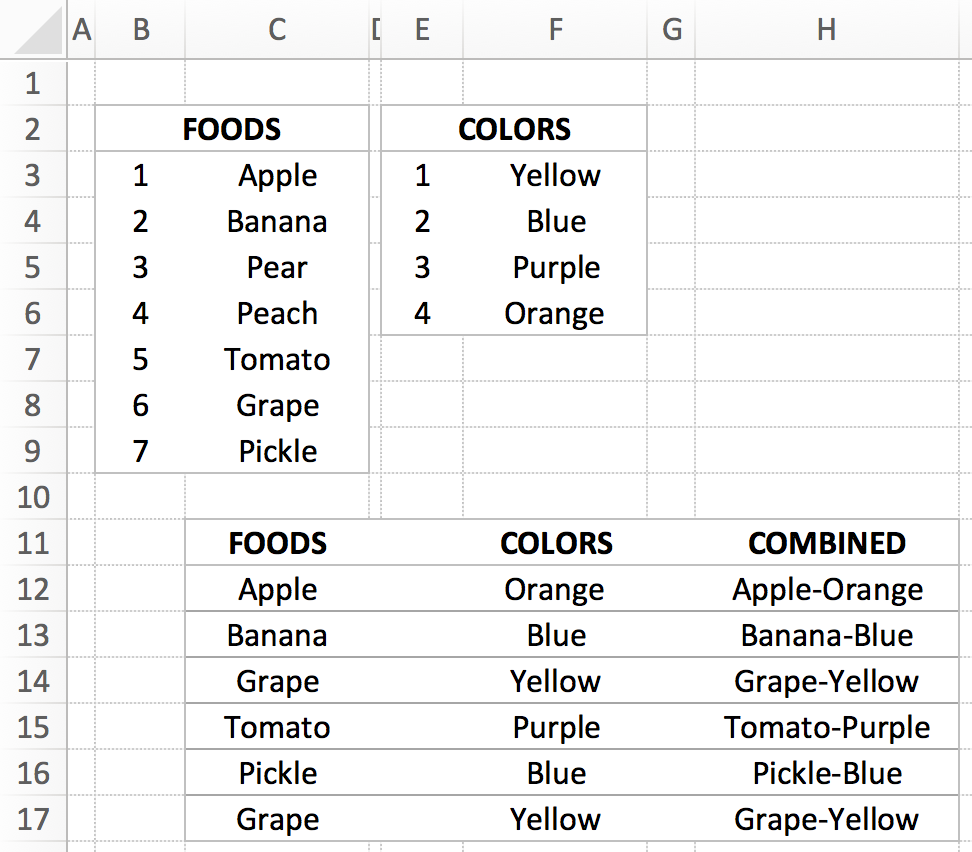
I didn't realize it at the time, but this could be a "modern paint color" name generator…"Yes, I'd like two gallons of the Pickle-Purple, please." Anyway, the COMBINED column contains the final result, with the FOODS and COLORS columns showing randomly-selected entries from the two lists. Each time you recalculate the sheet, all the selections will change.

The key bit is the formula to grab a random entry from the list; here's what that looks like in cell C12 ("Apple"):

=VLOOKUP(RANDBETWEEN(B$3,B$9),B$3:C9,2)

It's just a basic VLOOKUP that uses RANDBETWEEN to grab a random row from the lookup table. Not rocket science, but nothing I'd tried before. (For this to work, your table entries need row numbers, obviously.) The COMBINED column is just a simple text formula, i.e. =C12&"-"&F12 to combine the two random values.

I also wasn't aware of the RANDBETWEEN function—it returns a whole number between the values you specify. That is so much easier than using RAND and then having to multiply and round off, etc.

Feel free to download the workbook if you'd like to take a look.


Book: “As You Wish: Inconceivable Tales…” by Cary Elwes

Like 95% of the audience and 97% of the critics, I'm a big fan of The Princess Bride. The movie turns 30 this year (special anniversary super-duper Blu-ray extended mega cut, please?), and it stands up well to the test of time. If you haven't seen it yet, well, see it. It's not only full of quotable quotes ("Inconceivable!"), the story is enjoyable, the acting campy and perfect, and certain characters are just incredibly memorable. Well worth the time.

But this post isn't about the movie. It's about a book about the making of the movie, written by Cary Elwes, who starred as Westley, aka The Man in Black. And in the interest of thoroughness, the book's full title isn't As You Wish, it's As You Wish: Inconceivable Tales from the Making of The Princess Bride.

The book is well written (with some credit to Joe Layden, noted as the "with" on the cover), and details Carey's experiences with the film starting with the original casting call (actually a note under his hotel room door) up through the release and some detail on the inept marketing behind the movie. It's a great read, and very interesting on its own.

But what really made the book for me were all the quotes that Cary secured from others involved in the production. These are present throughout the book, and you seldom need read more than a page before encountering one.

They aren't shown inline, which would interrupt the story flow. Instead, they're presented as asides, like this one:

Each appears near relevant content, so they're applicable to what you're reading. But by separating them, you can read them when you like. These snippets have some real gems, such as the one above, which explains how The Princess Bride book came to be. Since finishing the book, I've gone back through it, just to read all these asides again; they really are wonderful.

If you're a fan of The Princess Bride, Cary's book is well worth your time.


iOS App: OSnap! Pro for time lapse and animation movies

A while back, I created a time lapse movie of a lava lamp warming up. I'd wanted to use my iPhone for this, as time lapse is a built-in feature, but the iPhone implements it in an odd way: The iPhone will vary the time intervals between pictures as your recording time increases. This keeps all time lapse movies to a similar duration (20 to 40 seconds), but it means you can't shoot a constant-rate time lapse movie.

I solved the problem for the lava lamp movie by using OSnap! Pro, a $3.99 iOS app (for both iPhone and iPad). I've wanted to write more about this app for a while (I'll be calling it OSnap from here on out), and a recent snowstorm in central Oregon gave me the perfect chance to test the app again before writing about it…

Ah, if only it went so quickly in reality! Making this movie was a breeze with OSnap! Pro; read on to see what makes OSnap so good (and to see a lame-but-short stop-motion animation movie, too).

[continue reading…]


WordPress plug-ins, take four

This is the fourth (one, two, three) in an occasional series of articles that explain which plug-ins I use here, in case others who run WordPress blogs might be interested…and it also helps me document why I use certain plug-ins, so it's a double-purpose post.

Since the last installment two years ago, I've retired Dashboard Commander and ELI's Related Posts Footer Links and Widget, and added seven new plug-ins. Here's what each of those does:

[continue reading…]


787 takeoffs and landings

This one's only for the aviation geeks, and it goes along with my writeup on the 787. I recorded the takeoffs and landings in both Calgary and London during my 787 trip; if you enjoy such things, here they are (in glorious 4K). Watch for the cameo by the retired Concorde, around the 6:15 mark.

I'm not sure when it will happen, but I'm definitely looking forward to my next flight on a 787!


From the passenger seat: Boeing’s 787 Dreamliner

The Many Tricks company is somewhat unique, as we're a two-person multi-national organization: I'm based in Portland, Oregon, and Peter Maurer, my business partner, lives in Germany. We've met in person a few times—a couple of times at WWDC in San Francisco, and once in Portland (just after we relaunched the company in 2010).

So this time, it was my turn to travel, and in April of 2016, I set out for Germany for a couple weeks. Being something of an aviation freak, though, I couldn't book just any flight to Germany: I wanted to fly on Boeing's newest jet, the 787.
I started with the Airport Spotting site's 787 routes page, which tries to list all 787 flights. I then searched for flights that would get me close to my destination, on my schedule, and meeting my budget.

With those key variables taken into account, and certain flights being sold out, there was literally only one choice that met my needs: An Air Canada flight out of Calgary to London. From there, I'd transfer to another airline for the trip to Basel, Switzerland. (Basel is the closest major airport to Freiburg, Germany, where Peter lives.)

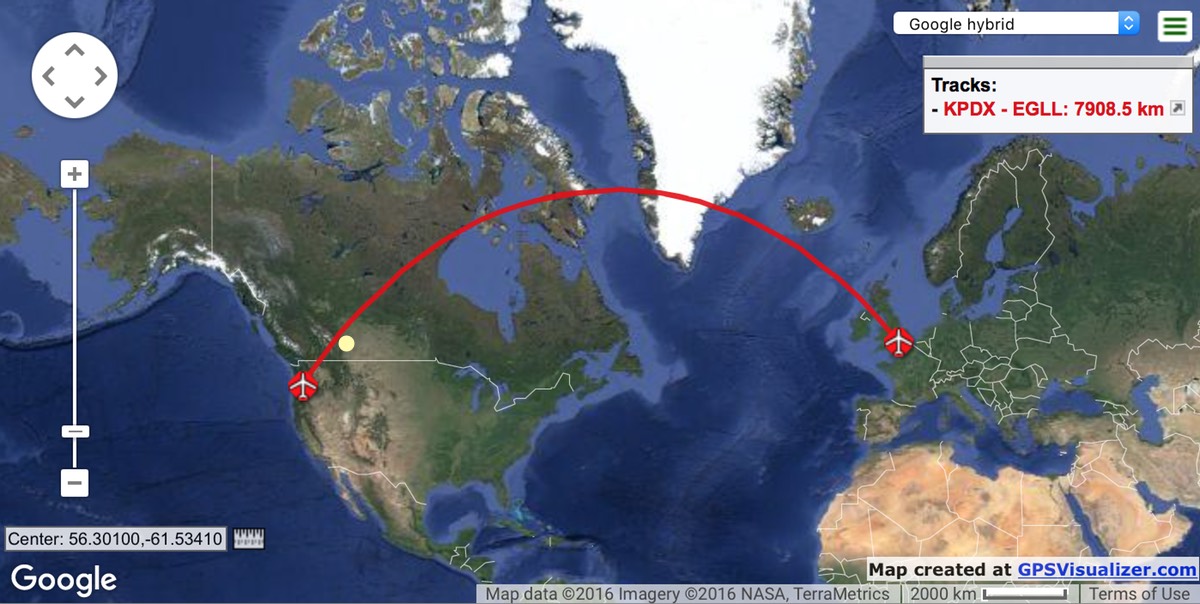
Calgary might appear somewhat out of the way for flying from Portland to London, but it's really not—it's pretty close to being right on the great circle route between the two cities:

And as it's not possible to fly direct from Portland to Europe (at least, not on a 787!), I'd be flying somewhere else first anyway, so why not Calgary?

Things were complicated a bit by the difficulty of getting to Calgary—I had to fly through Seattle first (welcome to the hub-and-spoke system). So my travel day was going to be Portland > Seattle > Calgary > London > Basel > Freiburg. Total travel time from my door to Peter's door would be about 22 hours, which makes for a very long travel day.

On the upside, however, I had this amazing scenery during the flight from Seattle to Calgary…

But this post isn't about the journey—my first with Air Canada, and I have to say I was quite impressed with the service and amenties—it's about the 17 hours (round trip) that I've now spent in the 787…

[continue reading…]


Hardware: Fujitsu ScanSnap iX500 document scanner

In mid-2015, I decided I wanted to get rid of the mass of paper we'd been accumulating for years. Much of it could be recycled, but there was still a substantial stack of important yet rarely looked at paper that we needed to keep. If anything was ripe for a digitization project, it was this stack of paper. But there were thousands of pages to scan, and that's not something you're going to want to do on your $99 all-in-one printer/scanner/coffee maker.

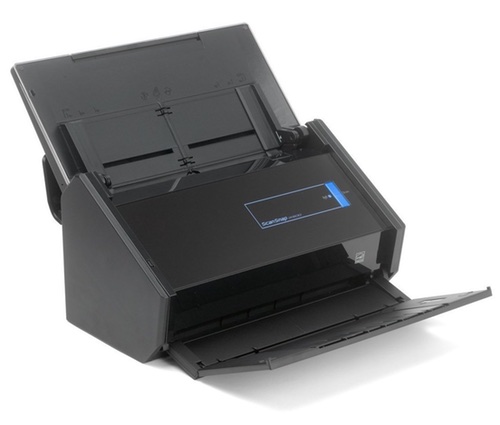
After talking with some people and reading some reviews, I bought a Fujitsu ScanSnap iX500 document scanner. This was not an inexpensive purchase—it lists for nearly $500, though typically sells for just over $400.
Note that there are two versions of this scanner: The PA03656-B005, which is what I have, and the newer PA03656-B305. The newer one is actually less expensive ($415 vs $490 as I write this), and apparently the sole difference is the bundled third-party software. I haven't seen the newer scanner's bundle, though, so I can't comment.

I've been using this scanner pretty much every day since October of 2015, and I can say it's one of the best pieces of hardware I've ever purchased. (The software is also very good, but the UI is far from lovely.) So far, I've scanned over 8,500 pages with this scanner, and I haven't had any issues with it at all. If you're interested in document scanning, read on for my thoughts on why this Fujitsu is an excellent tool for the task…

[continue reading…]


Put Unix path to selected Finder item on clipboard

Thanks to the commenters for pointing out the much easier way to do this: Select an item in Finder, then press Command-Option-C. All done. Leaving the hint here as an example of a Rube Goldberg machine.

In two recent geeky tips, I showed how you can open a Terminal window in the directory of the selected Finder item, and how you can view Unix man pages in Preview. To finish the trifecta of geekiness, today's tip lets you quickly place the Unix-style path to the selected Finder item on the clipboard. (It's actually a simplified version of the 'open this in Terminal' tip.)

The AppleScript that accomplishes this is quite simple:

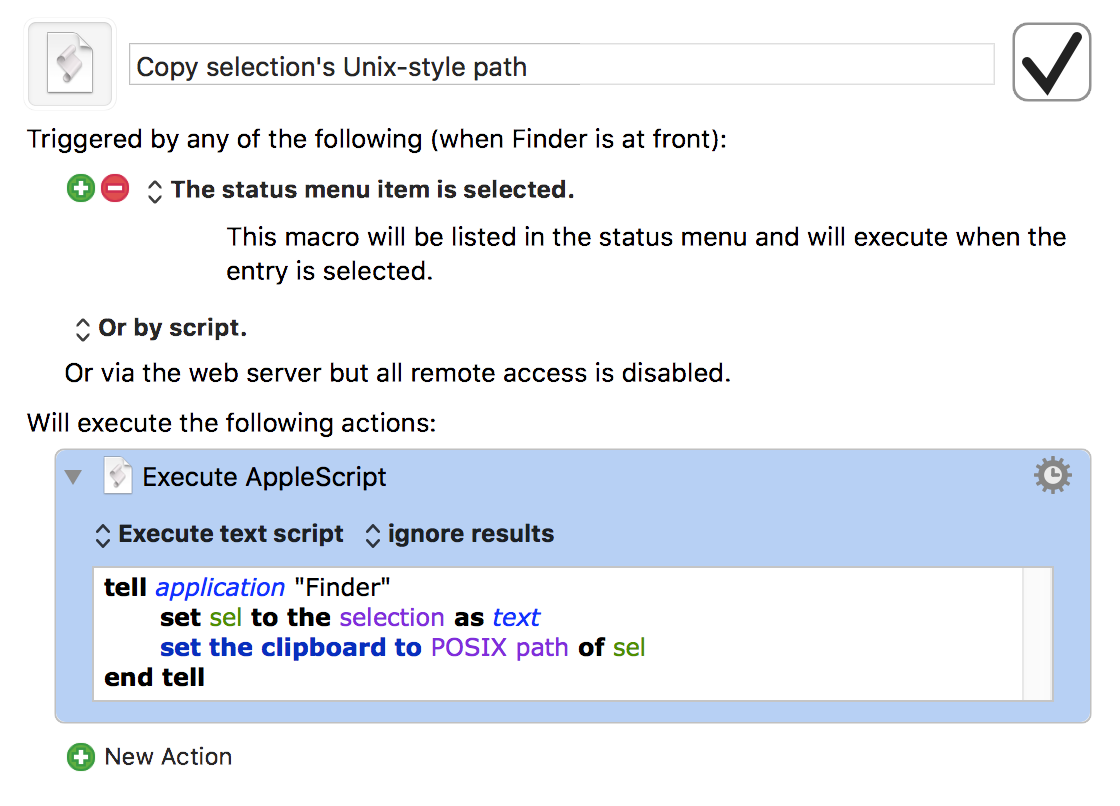
If you run that in Script Editor, you'll see that your clipboard contains the path to whatever you had selected in Finder. But running the AppleScript in ScriptEditor isn't a great timesaver. Instead, put it into whatever tool you have that can run AppleScripts via hot key or menu bar entry or whatever.

In my case, I put it into a super-simple Keyboard Maestro macro. I've set it up to show in the Keyboard Maestro menu bar when Finder is active:

There are countless tools that can run AppleScripts in various ways, including our own Butler, LaunchBar if you save the script first, etc.


Useful site: iTunes Artwork Finder finds more than artwork

Ever want to grab the cover art for some album? Or have you ever wanted the full-size icon from an iOS app? Or the cover image from a movie or TV show? A podcast's icon? Ben Dodson hosts an excellent web-based tool that lets you do all that and more: The iTunes Artwork Finder.

Usage is about as simple as it gets: Pick a category, enter your search term, set the geographical region, and click Get the artwork.

Note that this only works for things available from the iTunes Store in the specified region, so you can't use it to find cover art for that digitized copy of some obscure record you found at an underground music store in New York City back in 1973.

Also note that if you have your own web site, you can host your own artwork finder, as Ben has made the code available for all. I wouldn't recommend making it publicly available, though, unless you have bandwidth to spare—a single search for "Friends," for instance, returned about 25 high-resolution images.

Here's how I set it up on our family's web site; it's really easy to do, and it works great:

  1. Download the zipped archive from GitHub.
  2. Create a new folder on your server. I called mine getart.
  3. Upload the two files (php, js) from the archive into the folder.
  4. Add basic HTML tags (html, head, body) to the stub of HTML shown on the GitHub page, and save it as index.html in the same folder. If you like fancy and have time to spend, go ahead and pretty it up with CSS and layout. I just left it bare.

That's all there is to it; you can now look up artwork by loading http://yourdomain/getart (or whatever you called it) in your fave browser.


Useful site: iStockNow finds Apple products

During today's recording of our The Committed podcast, Ian mentioned a site he uses to check for sometimes hard-to-acquire Apple products. The site, iStockNow, is very nicely designed and makes it really simple to check availability not only at your local stores, but also globally.

Start by clicking the left-side filters section for the products you'd like to check on, then view the map on the right to see where they're in stock. For example, a search for the 15" MacBook Pro Touch Bar in Space Gray shows that it's available throughout North America, except in Mexico City:

But if you search for a 42mm Apple Watch in Stainless Steel in retail stores, you'll see that most of North America is a sea of red. Zoom in on the map, though, and there are some stores with stock:

When you find a store with inventory—the green pushpin—click on it to get the details of that store's inventory:

If you're looking for something particularly hard to find—cough AirPods cough—iStockNow may just help you secure your item. According to Ian, at least, that's exactly how he got his AirPods!