Skip to content

Quickly toggle visibility of invisible files in Finder

Update: If you're running macOS Sierra, ignore the rest of this tip because it's irrelevant! I had no idea Shift-Command-Period would show/hide hidden files directly in Finder in macOS Sierra. Thanks to NaOH for the great tip via the comments!

Basically, if you want to show invisible files in Finder in Sierra, pressing ⇧⌘-Period will toggle them between hidden and visible. Nice! If you're on an earlier version of macOS/OS X, however, you may find the macro version useful for easily showing and hiding hidden files in Finder.

[continue reading…]


Install a cloud driver server of your very own

For many years, Peter and I have managed our shared Many Tricks files via Dropbox. To support Dropbox, we purchased an upgraded plan for $99 a year, which came with 1TB of space. We then used the same login to share the Dropbox folder. We didn't need anywhere near 1TB (we have about 4GB of shared files), but felt it was right to support Dropbox.

While this worked well, and we had no issue paying for it, we had a few concerns—about space, third-party involvement, and something possibly unique to my usage scenario. You can read the details in the remainder of this post, but to make a long story short, I went looking for a replacement. And I found one in Nextcloud. Nextcloud has a commercial product, but it's open source, so you can also install it on your own server, and via many hosting companies that have it preinstalled.

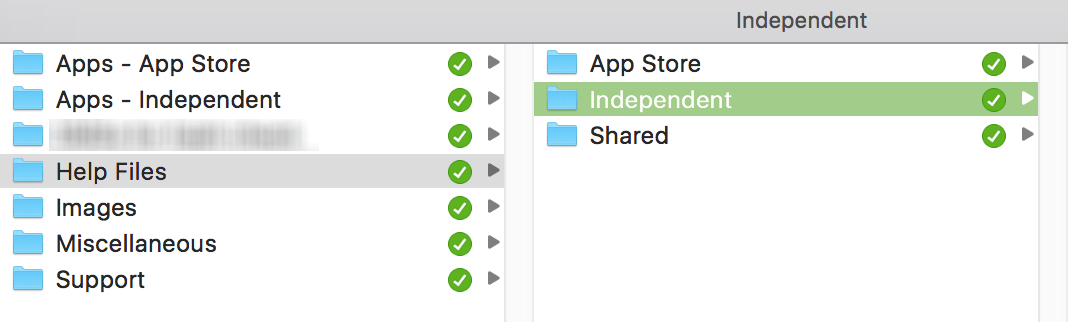
I was able to install it easily with our hosting provider; I had the basic install up and running in under 30 minutes. There are also native clients for Mac, as well as Windows, iOS, and Android. The Finder view with the Mac ap installed (it's an official Finder extension) is very similar to Dropbox or OneDrive or any other cloud client with a Mac app:

For us, Nextcloud has every feature we need for sharing our Many Tricks' files; read on for more detail on why we moved, install and admin, the Mac client, and some closing comments.

[continue reading…]


The magic corner cabinet

As yesterday was a cabinet-related post, I thought I'd stick with a theme and share this one I saw in a friend's home a while back. It's the perfect solution for those useless corner cabinets where most people stick a lazy susan, thus giving up on a bunch of storage space.

If we ever move and I have a chance to specify the cabinet hardware, I'm making sure one of these things goes into the corner cabinet!

(Don't worry, this isn't turning into a home remodeling blog; tech tips and stories return tomorrow.)


The end of the banging of the cabinet doors

I really hate the bang when a cabinet door closes. Years ago, I'd looked into soft-close mechanisms and found them pricey and a bit fussy to install. But this weekend, we were at Home Depot when I stumbled across these Liberty soft-close dampers. On a lark, I bought the 10-pack to see how well they'd work. The short answer: very well.

Installation is a breeze; they go into the corner of the cabinet with one screw—and the screw hole is angled at 60 degrees, so the pre-drilling goes quickly and at the proper angle. Here's how one looks installed:

I think it took me about 20 minutes to install all 10, and I probably spent five of that on the first one, making sure I did it right. These are not metal pieces; the body is metallic-painted plastic. However they have decent reviews on Amazon, and were reasoinably priced. There are other brands, too, but I haven't used any of those. All I know is that I'm thrilled with how they work…

Ah, the blissful sounds of a non-slamming cabinet door!


Be aware of this Applescript-with-droplet bug

Another post thanks to Many Tricks' Peter Maurer; this particular bug bit me last night—I spent 30 minutes trying to figure out why a compiled AppleScript with a droplet wasn't working. I never did get it, so I emailed Peter, and he pointed me to these tweets from a while back…

And yea, that was the problem: As soon as I added the +x to the compiled script, everything worked as expected. The exact syntax is:

chmod +x /path/to/compiled.app/Contents/MacOs/droplet

I'm documenting this here so that I can find it more easily the next time I save a compiled droplet AppleScript and forget about this not-so-little bug.


Mac OS X Hints and April Fool’s Day

When I ran Mac OS X Hints, I had a tradition of running April Fool's Day pranks. Here's a link to every one I ever published (including the intro of each) from 2003 through 2010 when I departed for Many Tricks. I've also found and included the images that went with each post, as these have vanished from the static version of the site that remains online.

2003: PR: macosxhints.com announces future direction

Beaverton, OR -- April 1, 2003 -- macosxhints.com today announced its new strategic direction to address the constant need for growth in the dynamic web site information portal business. In a highly anticipated move, the site announced that all future hints will eventually focus solely on the WindowsXP platform.

2004: Apple releases speed- and CPU-bumped G5s

Cupertino, CA -- April 1, 2004 -- Apple today announced its first-ever triple-CPU system, the PowerMac G5 Cubed. Featuring a total of three G5 processors, the G5 Cubed offers unmatched desktop processing power. "It's clearly the fastest thing we've ever made, and it's head and shoulders above anything the Wintel world has to offer," said Apple and Pixar CEO Steve Jobs.

2005: Install and run OS X on an iPod

After running this site for a few years, I've come to know many people in the Mac world. Many of these fine folks are slaving away on pet projects, most of which will never see the light of day. Yet still, they toil, hoping for success. My good friend Richard is one such person. He's been obsessed with running OS X on his iPod since the day he bought his first generation machine. Not just installing it and booting a Mac with the iPod, but honest-to-goodness using OS X on the iPod. I should preface and say that Richard is brilliant, stubborn, and amazingly resourceful ... three required qualities for this particular project!

[continue reading…]


On the increasing difficulty of launching some apps

A brief history of launching Mac OS X/macOS apps…

Mac OS X 10.7 and earlier: Launch whatever app you want, the OS doesn't care.

Mac OS X 10.7.5: Gatekeeper appears, but is a benign master, defaulting to allowing apps from anywhere. You can still install and run anything without any intervention from the OS.

Mac OS X 10.8 through 10.11: The benign master is slightly less benign, as the default setting changed (somewhere in that timeframe) to only allowing apps from the Mac App Store and registered developers. You could still disable Gatekeeper completely, though, as the "Anywhere" button was still present. If you didn't do that and tried to launch an app from outside the store or a non-registered developer, you had to click OK in one dialog box. Still not awful, but you were aware you were working outside the Gatekeeper's happy zone.

macOS Sierra (10.12): The benign master is now clearly just the master—the "Anywhere" button is gone. (Gatekeeper can still be disabled in Terminal, if you wish: sudo spctl --master-disable.)

And when you try to run an app from an unidentified developer, you really have to jump through some hoops…

[continue reading…]


Color and ‘human readable’ file sizes in Terminal

These are two very old tips, but I'd forgotten about them until recently, when I sent someone a screenshot and they said "Hey, how'd you do that?"

Do what, exactly? This…

The most-obvious thing in that shot is the colored filenames. But notice, too, the file sizes are in a human-readable form. Both of these changes are pretty simple, though you could spend hours playing with colors.

Human-readable output

To get human readable output—not just from ls but also in du, which shows disk space usage—just include an h with the ls command: ls -alh. Instead of raw bytes, the values are converted and marked with trailing B, K, M, etc.

Because I never use ls in its short form, I actually added a line to my .profile (which loads whenever you open a Terminal session) to make this automatic:

alias ls='ls -alh'

You could do the same thing with du, but I rarely use that command, so I didn't bother.

[continue reading…]


Create CSS gradients using an online tool

I recently needed a gradient background for a page I was making. My usual method of creating gradient backgrounds is to muck around in my image editor until I find some combination I like, then futz around in my text editor getting the syntax just right for CSS gradients across all the browsers.

But then I discovered the Ultimate CSS Gradient Generator from ColorZilla. This handy tool lets you create gradients directly in the browser, and it outputs all the required codes for full browser support. The UI is very much like any image editor's gradient tool:

Drag the slider thumbs, click them to change the colors, click along the gradient to add color stops, etc. This tools works like a charm, and saves me a bit of time and aggravation whenever I need to make a CSS gradient.


Browsers, caches and web page changes

Browsers cache data whenever you load a page. In general, this is a good thing—you'll save data transfer (very important on mobile), and increase speed on any connection if the browser can use data that it's already cached.

But there's one place I hate browser cache: When creating or editing web pages. I'll edit a file, save the changes, upload the new file, load the page…and nothing. So I edit again, repeat, still nothing. Only then do I remember the cache. Argh!

Thankfully, there are ways around (most) cache issues. I do most of my web development in Chrome and Safari; here are the simple tips I use to manage cache in those browsers when developing.

Safari

  • Enable the Developer menu (Prefs > Advanced > Show Develop menu in menu bar).

  • Once enabled, use the Developer menu to easily empty the cache via the Empty Caches menu item, which is bound to the keyboard via ⌘⌥E.

  • Also in the Developer menu, you can completely disable the cache with the Disable Caches menu item. This is what I do when developing—just remember to enable them again when you're done, or you'll find browsing quite slow.

  • To force a single page to completely reload, hold down the Option key and click on the reload icon in the URL bar.

[continue reading…]