A while back, I created a time lapse movie of a lava lamp warming up. I'd wanted to use my iPhone for this, as time lapse is a built-in feature, but the iPhone implements it in an odd way: The iPhone will vary the time intervals between pictures as your recording time increases. This keeps all time lapse movies to a similar duration (20 to 40 seconds), but it means you can't shoot a constant-rate time lapse movie.
I solved the problem for the lava lamp movie by using OSnap! Pro, a $3.99 iOS app (for both iPhone and iPad). I've wanted to write more about this app for a while (I'll be calling it OSnap from here on out), and a recent snowstorm in central Oregon gave me the perfect chance to test the app again before writing about it…
Ah, if only it went so quickly in reality! Making this movie was a breeze with OSnap! Pro; read on to see what makes OSnap so good (and to see a lame-but-short stop-motion animation movie, too).
This is the fourth (one, two, three) in an occasional series of articles that explain which plug-ins I use here, in case others who run WordPress blogs might be interested…and it also helps me document why I use certain plug-ins, so it's a double-purpose post.
Since the last installment two years ago, I've retired Dashboard Commander and ELI's Related Posts Footer Links and Widget, and added seven new plug-ins. Here's what each of those does:
Contextual Related Posts: This is what I used to replace ELI's Related Posts plug-in; I find it seems to find more-related posts than did the prior plug-in.
Featuring CountComments: This simple plug-in just displays a comment count for logged-in users.
iframe: I added this plug-in so that I could embed a Google Docs spreadsheet in my hybrid SUVs post.
WP Original Media Path: At some point, WordPress removed the original media path field from the media library screen; this plug-in just adds it back.
WP Post Styling: Instead of editing your CSS file every time you want to do some semi-custom formatting, this plug-in lets you create post-only styles you can apply as needed. In my case, I need it with the TwentyTwenty plug-in to handle the CSS they use to manage the image swapping.
This one's only for the aviation geeks, and it goes along with my writeup on the 787. I recorded the takeoffs and landings in both Calgary and London during my 787 trip; if you enjoy such things, here they are (in glorious 4K). Watch for the cameo by the retired Concorde, around the 6:15 mark.
I'm not sure when it will happen, but I'm definitely looking forward to my next flight on a 787!
The Many Tricks company is somewhat unique, as we're a two-person multi-national organization: I'm based in Portland, Oregon, and Peter Maurer, my business partner, lives in Germany. We've met in person a few times—a couple of times at WWDC in San Francisco, and once in Portland (just after we relaunched the company in 2010).
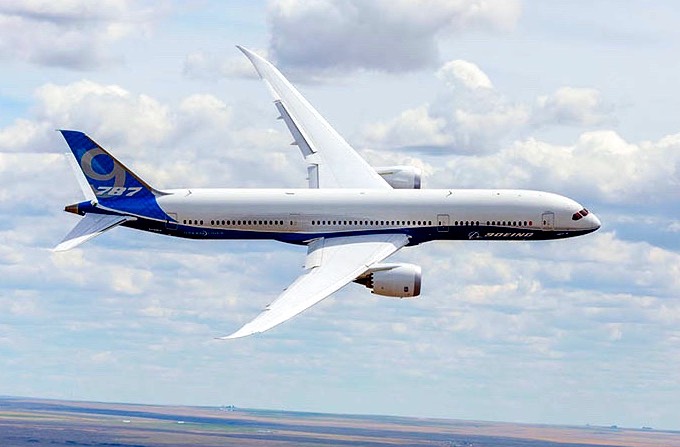
So this time, it was my turn to travel, and in April of 2016, I set out for Germany for a couple weeks. Being something of an aviation freak, though, I couldn't book just any flight to Germany: I wanted to fly on Boeing's newest jet, the 787.
I started with the Airport Spotting site's 787 routes page, which tries to list all 787 flights. I then searched for flights that would get me close to my destination, on my schedule, and meeting my budget.
With those key variables taken into account, and certain flights being sold out, there was literally only one choice that met my needs: An Air Canada flight out of Calgary to London. From there, I'd transfer to another airline for the trip to Basel, Switzerland. (Basel is the closest major airport to Freiburg, Germany, where Peter lives.)
Calgary might appear somewhat out of the way for flying from Portland to London, but it's really not—it's pretty close to being right on the great circle route between the two cities:
And as it's not possible to fly direct from Portland to Europe (at least, not on a 787!), I'd be flying somewhere else first anyway, so why not Calgary?
Things were complicated a bit by the difficulty of getting to Calgary—I had to fly through Seattle first (welcome to the hub-and-spoke system). So my travel day was going to be Portland > Seattle > Calgary > London > Basel > Freiburg. Total travel time from my door to Peter's door would be about 22 hours, which makes for a very long travel day.
On the upside, however, I had this amazing scenery during the flight from Seattle to Calgary…
But this post isn't about the journey—my first with Air Canada, and I have to say I was quite impressed with the service and amenties—it's about the 17 hours (round trip) that I've now spent in the 787…
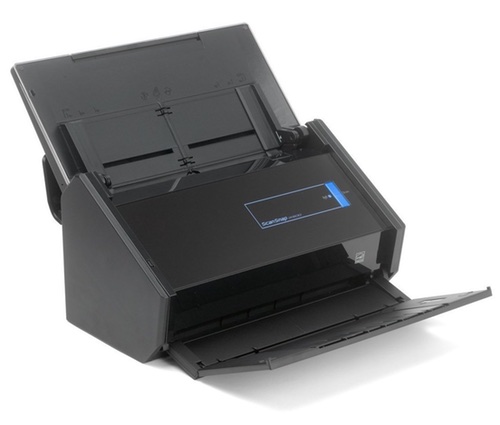
In mid-2015, I decided I wanted to get rid of the mass of paper we'd been accumulating for years. Much of it could be recycled, but there was still a substantial stack of important yet rarely looked at paper that we needed to keep. If anything was ripe for a digitization project, it was this stack of paper. But there were thousands of pages to scan, and that's not something you're going to want to do on your $99 all-in-one printer/scanner/coffee maker.
After talking with some people and reading some reviews, I bought a Fujitsu ScanSnap iX500 document scanner. This was not an inexpensive purchase—it lists for nearly $500, though typically sells for just over $400.
Note that there are two versions of this scanner: The PA03656-B005, which is what I have, and the newer PA03656-B305. The newer one is actually less expensive ($415 vs $490 as I write this), and apparently the sole difference is the bundled third-party software. I haven't seen the newer scanner's bundle, though, so I can't comment.
I've been using this scanner pretty much every day since October of 2015, and I can say it's one of the best pieces of hardware I've ever purchased. (The software is also very good, but the UI is far from lovely.) So far, I've scanned over 8,500 pages with this scanner, and I haven't had any issues with it at all. If you're interested in document scanning, read on for my thoughts on why this Fujitsu is an excellent tool for the task…
Thanks to the commenters for pointing out the much easier way to do this: Select an item in Finder, then press Command-Option-C. All done. Leaving the hint here as an example of a Rube Goldberg machine.
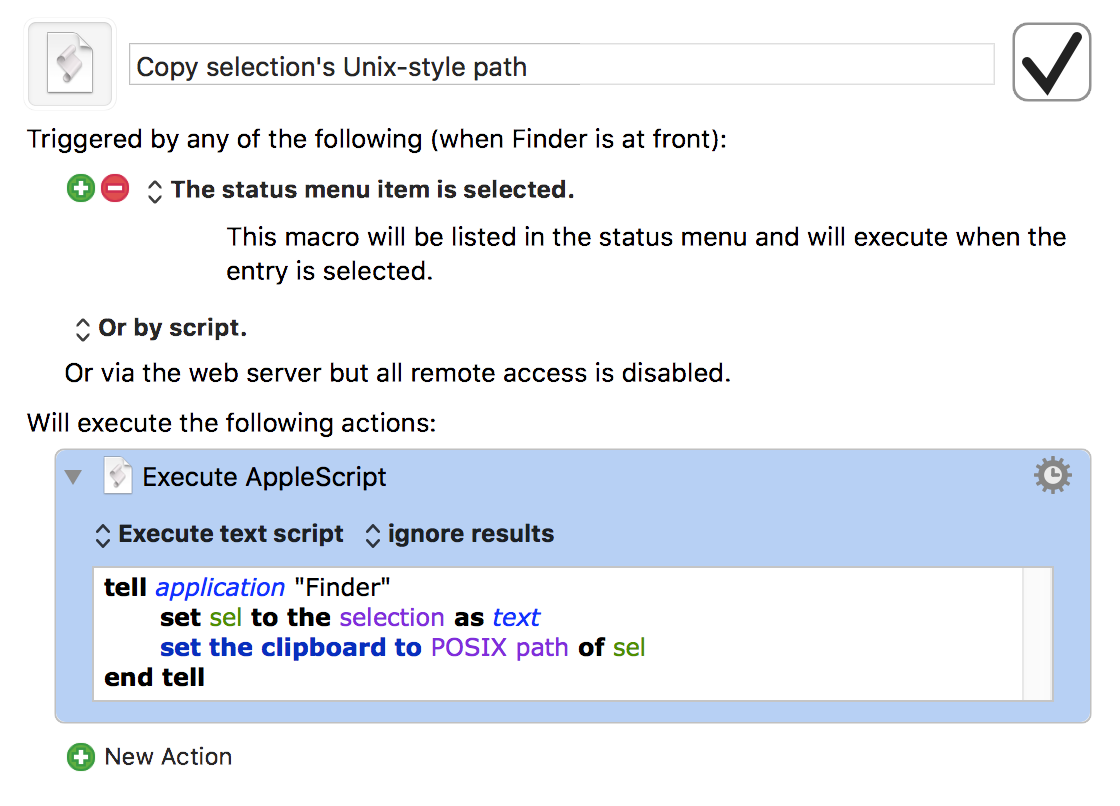
The AppleScript that accomplishes this is quite simple:
AppleScript
1
2
3
4
tellapplication"Finder"
setseltotheselectionastext
settheclipboardtoPOSIX pathofsel
endtell
If you run that in Script Editor, you'll see that your clipboard contains the path to whatever you had selected in Finder. But running the AppleScript in ScriptEditor isn't a great timesaver. Instead, put it into whatever tool you have that can run AppleScripts via hot key or menu bar entry or whatever.
In my case, I put it into a super-simple Keyboard Maestro macro. I've set it up to show in the Keyboard Maestro menu bar when Finder is active:
There are countless tools that can run AppleScripts in various ways, including our own Butler, LaunchBar if you save the script first, etc.
Ever want to grab the cover art for some album? Or have you ever wanted the full-size icon from an iOS app? Or the cover image from a movie or TV show? A podcast's icon? Ben Dodson hosts an excellent web-based tool that lets you do all that and more: The iTunes Artwork Finder.
Usage is about as simple as it gets: Pick a category, enter your search term, set the geographical region, and click Get the artwork.
Note that this only works for things available from the iTunes Store in the specified region, so you can't use it to find cover art for that digitized copy of some obscure record you found at an underground music store in New York City back in 1973.
Also note that if you have your own web site, you can host your own artwork finder, as Ben has made the code available for all. I wouldn't recommend making it publicly available, though, unless you have bandwidth to spare—a single search for "Friends," for instance, returned about 25 high-resolution images.
Here's how I set it up on our family's web site; it's really easy to do, and it works great:
Download the zipped archive from GitHub.
Create a new folder on your server. I called mine getart.
Upload the two files (php, js) from the archive into the folder.
Add basic HTML tags (html, head, body) to the stub of HTML shown on the GitHub page, and save it as index.html in the same folder. If you like fancy and have time to spend, go ahead and pretty it up with CSS and layout. I just left it bare.
That's all there is to it; you can now look up artwork by loading http://yourdomain/getart (or whatever you called it) in your fave browser.
During today's recording of our The Committed podcast, Ian mentioned a site he uses to check for sometimes hard-to-acquire Apple products. The site, iStockNow, is very nicely designed and makes it really simple to check availability not only at your local stores, but also globally.
Start by clicking the left-side filters section for the products you'd like to check on, then view the map on the right to see where they're in stock. For example, a search for the 15" MacBook Pro Touch Bar in Space Gray shows that it's available throughout North America, except in Mexico City:
But if you search for a 42mm Apple Watch in Stainless Steel in retail stores, you'll see that most of North America is a sea of red. Zoom in on the map, though, and there are some stores with stock:
When you find a store with inventory—the green pushpin—click on it to get the details of that store's inventory:
If you're looking for something particularly hard to find—cough AirPods cough—iStockNow may just help you secure your item. According to Ian, at least, that's exactly how he got his AirPods!
Today's tip goes well with yesterday's tip, which explained how to open any Finder item's folder in Terminal via Keyboard Maestro. Once in Terminal (and sometimes even when not in Terminal), I'll often want to check out the man page (help) for a given command.
You can do this directly in Terminal with man [name of command], of course, but then it opens on top of whatever you were working on, and you have to read it in Terminal. You could use another tab or window, but you'd still be reading in Terminal. There are times, too, when I'm writing about the Unix side of macOS, so I'm not even in Terminal, but still want to view a man page.
My solution to this problem is two different ways of doing the same thing: I open man pages as nicely-formatted PDFs in Preview. The method I use to get to that point depends on if I'm working in Terminal or not.
Update: I've modified the script and macro so that they properly handles two-argument man commands, such as man 3 printf.
In Terminal
Based on an old Mac OS X Hints tip, I created a very simple shell script:
Shell
1
2
3
4
#!/bin/sh
cmd=$@
man-t$cmd>"/tmp/$1.ps"
open"/tmp/$1.ps"
The key to this little script is the -t option on the man command. From the (hehe) man man help file, here's what that does:
  -t     Use /usr/bin/groff -Tps -mandoc -c to format the manual page,
         passing the  output to stdout. The default  output format  of
         /usr/bin/groff -Tps -mandoc -c is  Postscript, refer  to  the
         manual  page  of /usr/bin/groff -Tps -mandoc -c for  ways  to
         pick an alternate format.
In other words, the -t converts the help page into a PostScript file, which is something that Preview can easily open (which is just what the last line of the script does).
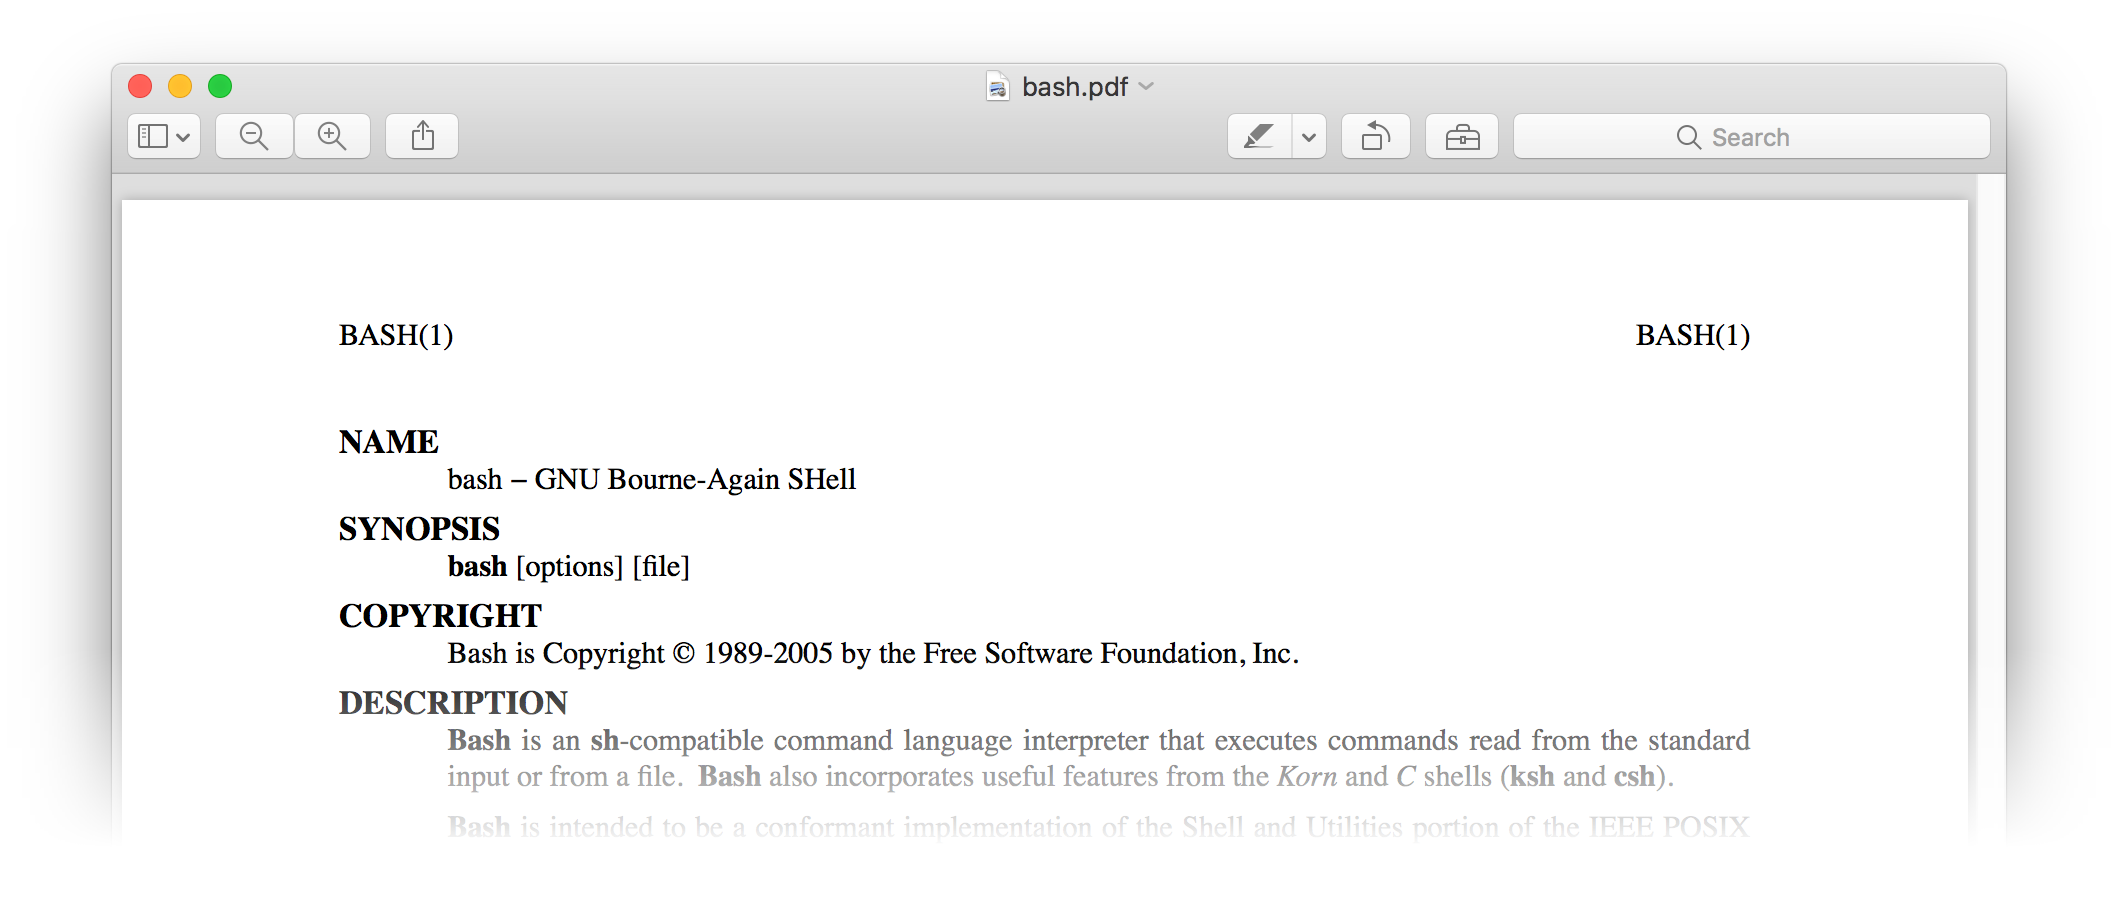
I named this script preman, because it uses Preview to open man pages. Once saved, I made it executable (chmod 755 preman), and I can then open any man page in Preview by typing, for instance, preman bash.
The output is nicely formatted, and by opening the man page in Preview, my Terminal session is uninterrupted. A quick adjustment with Moom, where I have a saved layout to position Preview and Terminal, and I can scan the man page while working in Terminal.
But what about when I'm not in Terminal? For that, I basically implement the same shell script, but with it set up to run within a Keyboard Maestro macro.
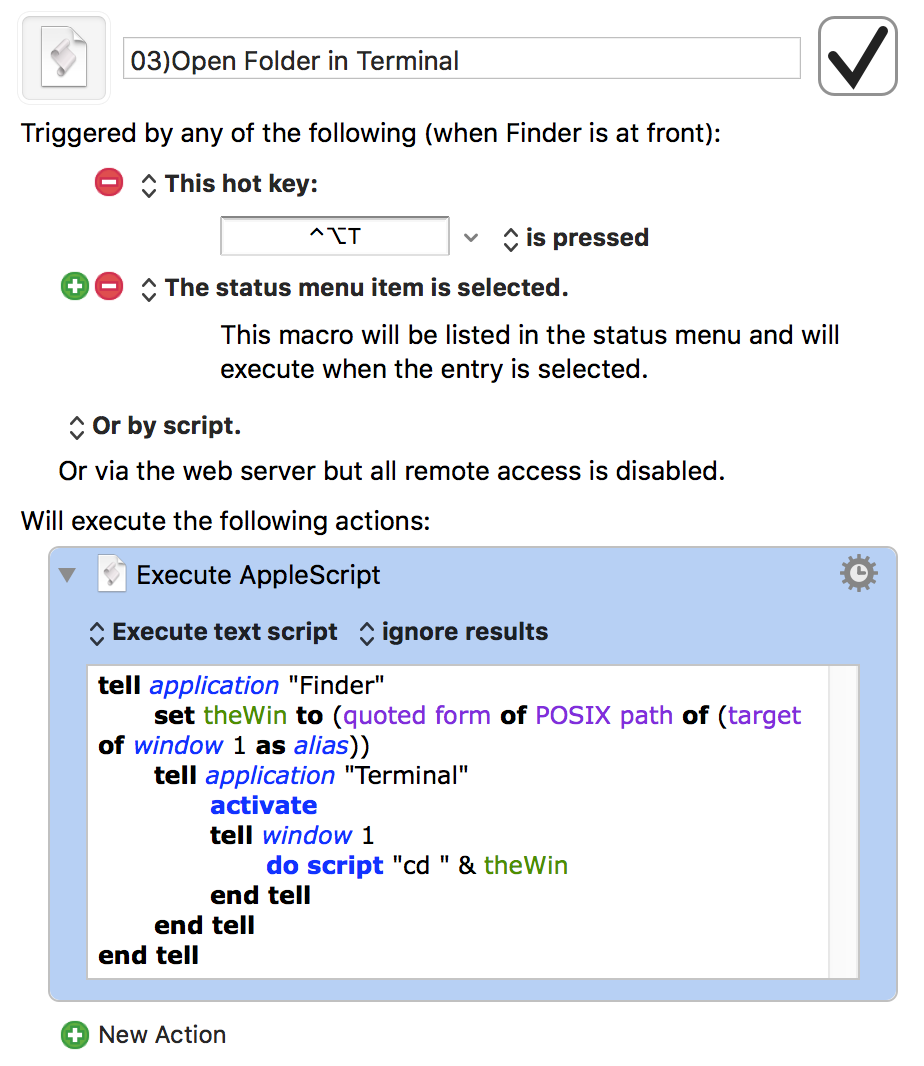
Today's tip is just a re-implementation of a really old Mac OS X Hints AppleScript that lets you open a Terminal window with the working directory set to (i.e. cd'd into) the selected Finder folder.
This makes it really easy to jump into Terminal to do something from Finder, without having to do any mousing and minimal typing. What's new is that I've used Keyboard Maestro to turn the AppleScript into a macro that runs only in Finder, where it's available via hot key or menu bar trigger.
Here's the complete macro; download it now to look at and/or use as you wish. [Note: If you use iTerm2 instead of Terminal, you'll want to download this version instead. My good friend James, who runs Out of Control, did so. He tells me it works great.]
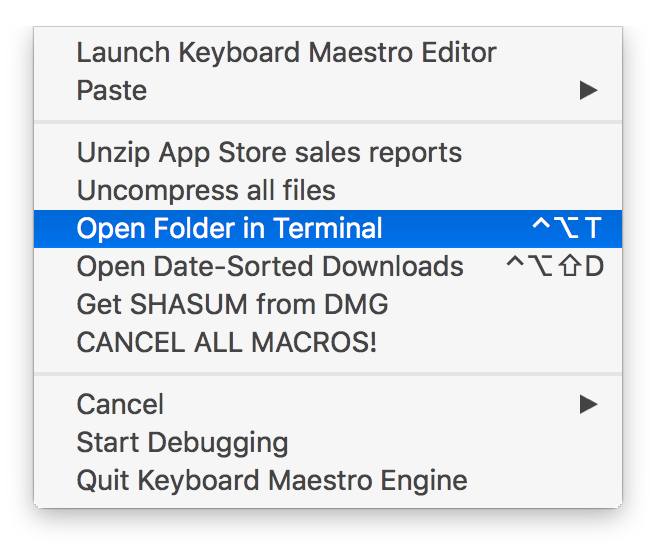
The name of the macro may look a bit odd—the 03) controls the sort order in the Keyboard Maestro menu bar item, and does not display when the menu is activated:
Keyboard Maestro also helpfully displays the assigned keyboard shortcut in the menu bar item, in case I've forgotten it.
 So this time, it was my turn to travel, and in April of 2016, I set out for Germany for a couple weeks. Being something of an aviation freak, though, I couldn't book just any flight to Germany: I wanted to fly on Boeing's newest jet,
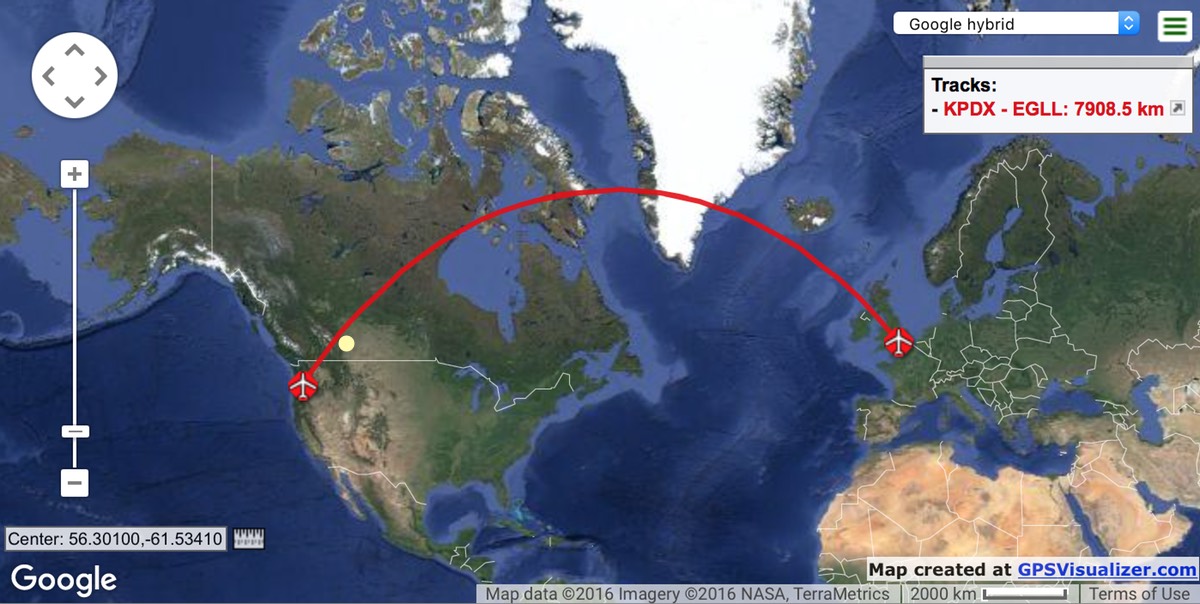

 After talking with some people and reading some reviews, I bought a