Skip to content

Rob Griffiths

The useful yet useless Services menu

One of the most-useful tools in macOS is also one of the most useless: The Services menu. In theory (and occasionally actually true), the Services menu lets you quickly take action on something—a selected file or folder, or a chunk of text. In reality, the Services menu is a vaste wasteland of unused functionality, and a place where pre-assigned keyboard shortcuts go to hide from your attempts to use them elsewhere.

If you install a fair number of apps on your Mac, you may be surprised by the amount of stuff in your Services menu. Here's a look at my iMac, after I reset the Services panel (System Preferences → Keyboard → Shortcuts → Services) to its defaults:

If you're good at counting, you spotted 123 separate services flowing past. Not all are active, of course—"only" 58 are. Of those 58, you'll see some subset based on whatever you've selected…but even that subset can present itself as a huge list:

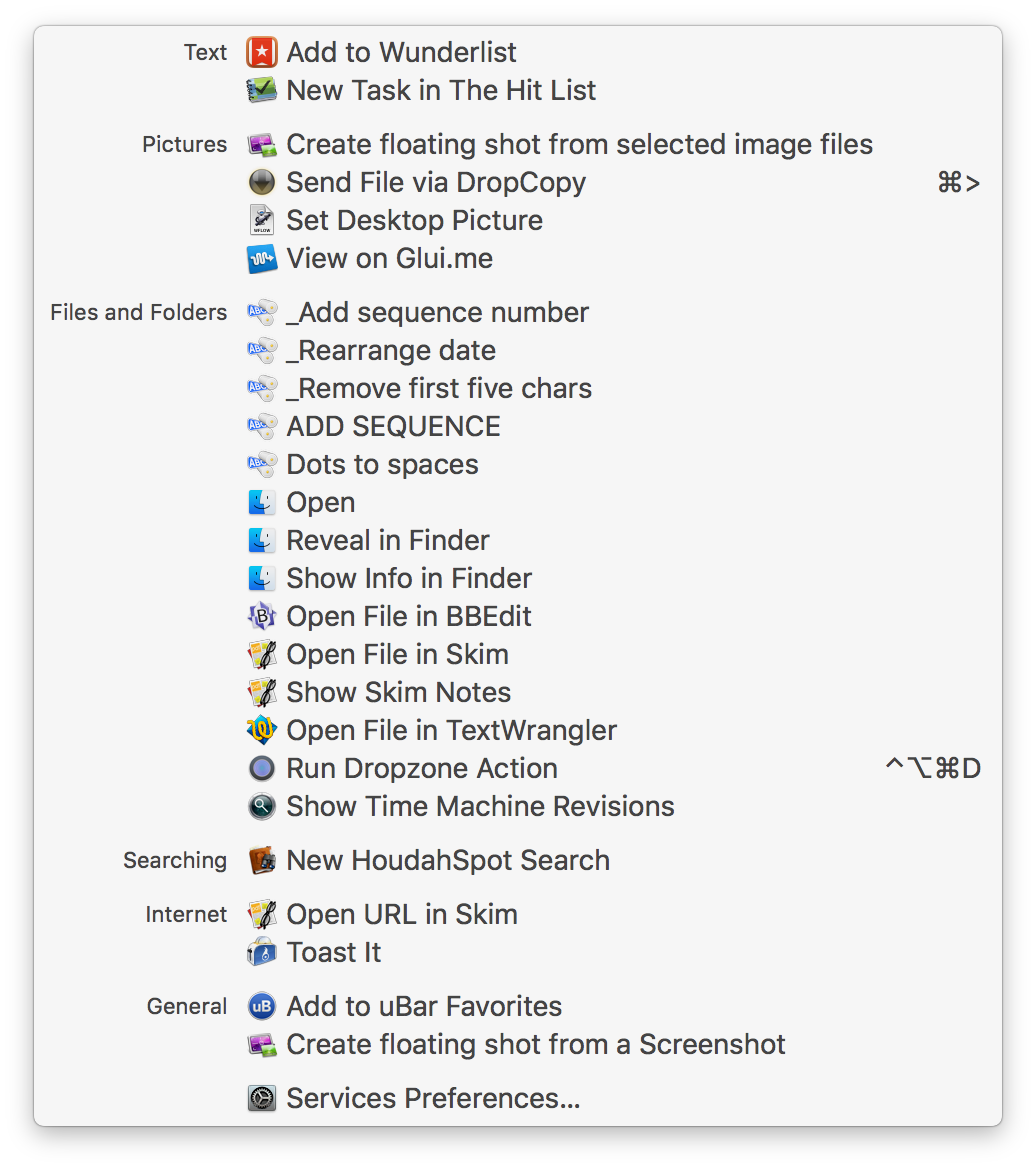
That's really not very helpful when you want to quickly apply some action to your selection. To make the Services menu useful again—and to potentially free up some keyboard shortcuts—you'll need to actively manage your Services.

[continue reading…]


More about macOS Sierra and Library shortcut keys

Yesterday, I wrote about an apparent change in Finder's Library shortcut key. To wit, it used to be that holding the Option key down would reveal a Library entry in Finder's Go menu.

However, on my iMac and rMBP running macOS 10.12.3—and on others' Macs, as my report was based on similar findings by Michael Tsai and Kirk McElhearn—the Option key no longer worked; it was the Shift key. But on a third Mac here, running the 10.12.4 beta, the shortcut was back to the Option key.

To further add to the confusion, a comment on the original article—as well as replies to the others' tweets—states that the user's Mac is still using the Option key in 10.12.3. So I thought I'd create a new user account, and see if I could figure out what was going on.

After some experimentation, I was able to discover why the shortcut key changes, and how to change it between Shift and Option at any time. This clearly isn't a feature, so I guess it's a bug, but it's a weird bug.

[continue reading…]


macOS Sierra minor update changes Library shortcut keys

Update: See this article for the cause of the shortcut key change. It's a bug, not a feature…I think.

Via Michael Tsai and Kirk McElhearn, today I learned that I've been giving bad advice to our users ever since macOS Sierra 10.12.3 shipped.

It used to be that holding Option in Finder and then clicking the Go menu would reveal an entry for the normally-hidden Library folder. In macOS 10.12.3, for reasons unknown, Apple has changed this: The only thing the Option key does now is change Go > Enclosing Folder into Go > Enclosing Folder in New Window. To see the Library folder entry, hold down the Shift key instead.

So that's the bad news: They changed an undocumented shortcut that many users have been told to use when troubleshooting. The good news is they added a better, easier, and faster way to get to the Library folder: Just press ⇧⌘L in Finder. This matches all the other shortcuts—⇧⌘O for Documents, ⇧⌘D for Desktop, etc. (Downloads is the odd one out, as it uses ⌘⌥L.)

Note: This may be a short-lived change, perhaps even a bug—it seems to be gone in the 10.12.4 beta release. Either that, or the 10.12.4 build is a bug, and it's supposed to be how it is now in 10.12.3. Hey Apple, I have some advice on how to fix this whole messy situation: Stop hiding the Library folder by default! (Note that you can unhide it by showing View Options (⌘J) on your home folder and checking Show Library Folder.)


iOS App: Pool Break pool simulator

I recently got back into playing pool, joining a local 8-ball and 9-ball league. It's been many (many) years since I played pool, and I can't really put a table in our home (unless I want to take over the living room or the master bedroom, probably a no go on either one). So I went looking for an iOS pool simulation that would help me visualize angles and cue ball spin (English).

I tried quite a few, and in the end, found Pool Break to be the best for my needs. Here's a very brief snippet of the gameplay…

You can turn the guidelines off; I use them to help understand the cue ball's movements after contact. Pool Break supports 8-ball, 9-ball, straight pool, snooker, and a couple things I've never heard of (Carrom and Crokinole). You can play against the computer, or against others on the Internet. The physics appear to be very good, plus you can change some of the friction values if you wish.

I've only been playing against the computer opponents; if you choose their highest skill level, you probably won't win, even with the aim lines on—they make some absurd shots! The only mode that's lacking is a straight practice mode where I could position the balls as I like to try various shots. But that's a minor nit; Pool Break is a very nice pool simulation…whether it will help my real-world ability to see various angles or not, only time will tell!


iOS App: Jollyturns tracks your day on the mountain

I spent yesterday at Mt. Bachelor, enjoying a bunch of fresh snow and surprisingly light crowds. To track my tracks, I've been using an app called Jollyturns Ski & Snowboarding. The app is free and includes one ski area; you can buy five more for $3.99, or $9.99 gets you "every ski area in the world."

For each area, you can see a summary page with current conditions and info on lifts, runs, and restaurants, as well as a zoomable scan of the official trail map. (For Mt. Bachelor, that means four maps, as they have quite a bit of terrain.)

You can drill down into run type to find a specific run; it'll be highlighted on the map. (Though if your area has more than one map, you may need to switch views to see the run on the proper map.) Click on a lift name, and it will be similarly highlighted on the map. Ditto for restaurants.

Jollyturns can also find and map your friends on the mountain, assuming they're using the app, of course. I haven't yet tested this social aspect of the app.

The one thing Jollyturns doesn't do is track your runs on a map—there's no way to see exactly what you skied in a given day. This is no longer true as of the latest update—you can view your tracks on Google Earth on the iPhone, or export as KML (or a couple of other options). As an example, here's a map from my February trip to Mt. Bachelor, as seen in Google Earth on the iPhone:

Beyond the map, you can also see how much you skied (vertical feet), how far you skied (miles), and your peak speed. I'd love it if it would map my day (I assume there are other apps that do this, but I haven't gone looking…recommendations?), but what it does do, it does well.

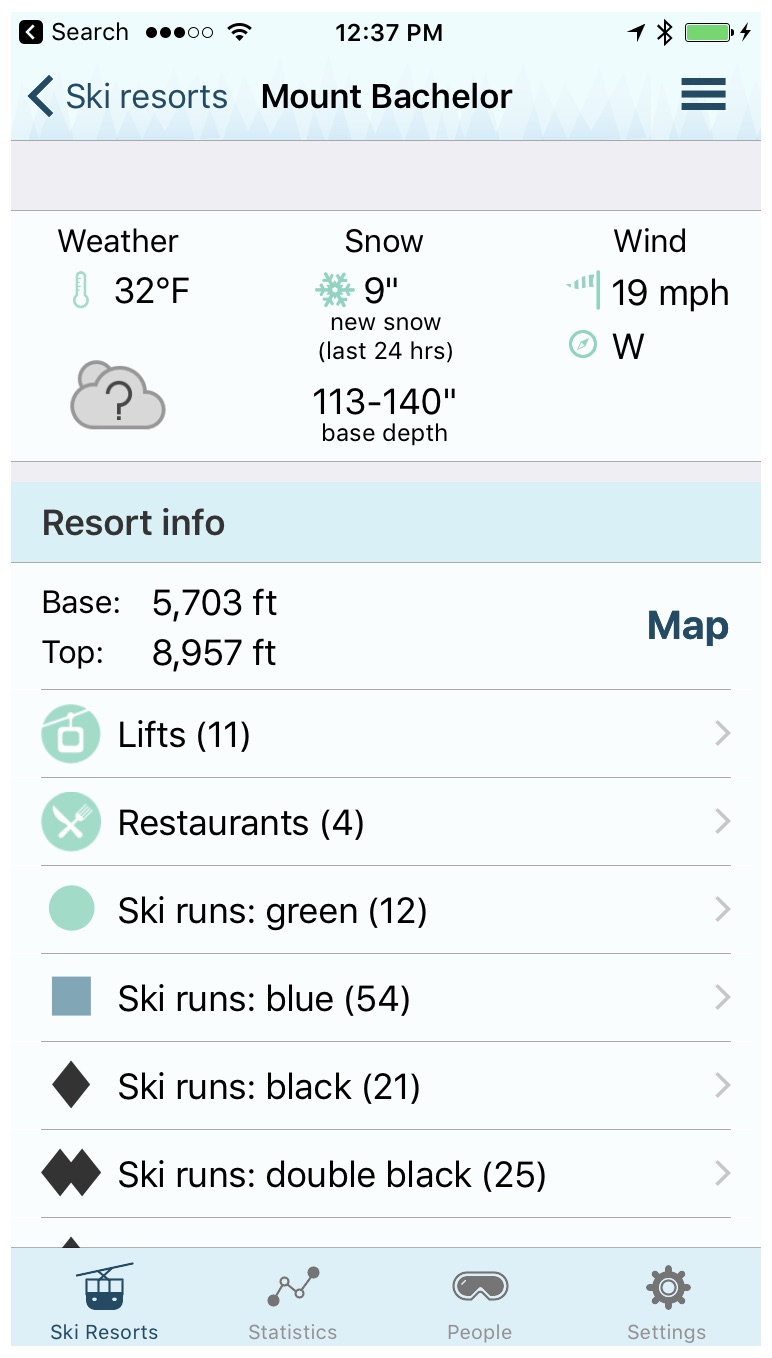
Jollyturns also includes an Apple Watch app—it provides a quick view of your vertical feet, distance, and peak speed. I much prefer a glance at my watch versus digging out the iPhone from multiple layers of clothing.

The one caveat I will add is that running Jollyturns can suck your battery down, as it's updating location info via GPS, and doing so quite often. Yesterday, after 4.5 hours of continuous skiing, my phone was down to about 25% battery. So if you want to make sure you get all-day phone battery life while skiing, Jollyturns is probably not the app for you.


Construction of the Millau Viaduct

I've long been fascinated by massive engineering projects, whether they be for ships or tunnels or skyscrapers…or in this case, a bridge.

The Millau Viaduct is an amazing structure in the south of France; it spans a deep and wide valley with incredibly tall pylons and an elegant design.

Photo by logopop. [original photo]

While browsing YouTube the other day, for something completely unrelated (isn't it always like that?), I stumbled on this excellent show about the construction of the bridge:

https://www.youtube.com/watch?v=AHACv9hs9ds

Just amazing what they did to get that bridge built—and without a single worker injury of any note, despite working hundreds of feet above the ground for four years.


Limited ports limit my interest in new Mac laptops

As I sit here working on my late 2013 13" Retina MacBook Pro (rMPB from here on), I wonder if it will be the last Mac laptop I ever own.

That's a strong statement, I know, but Apple's pursuit of an insanely stupid "as thin as a knife edge at all costs" design goal has led to a new generation of machines that make them much less portable than they were before…despite being thinner and lighter.

Here't the thing, Apple: Beyond a certain point, thinness is irrelevant. And honesty, you've more than reached that point with every laptop you make. You reached that point, in fact, a few years ago.

[continue reading…]


It’s hard to see the light in a dark (interior) car world

  • Auto

In 1909, Henry Ford described his philosophy on offering customers different car colors:

Any customer can have a car painted any color that he wants so long as it is black.

While paint is no longer only available in black, it seems that car interiors are—or at least, they might as well be. And to me, that's a shame—I really dislike dark interiors. (They get overly hot in the sun, they show every single scuff, and they hide some lovely design details. They can also make interiors feel much smaller than they are.)

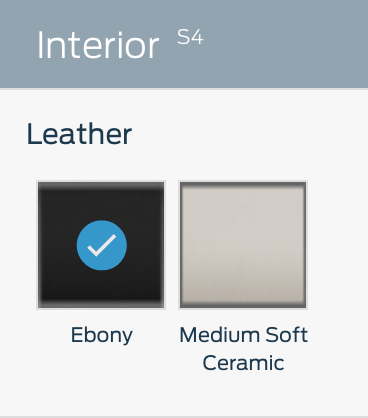
You'd never know this is a problem, though, when you start looking at cars on manufacturers' web sites. Visit most any car maker's web site, and for most any car you're interested in, you'll see a mix of available interior colors—black, grey, tan, brown, red, etc.

Using the ubiquitous configuration tools on such sites, you can mix and match your exterior and interior colors to get what you want. (Not all interior colors will be available with all exteriors.) For me, of course, I build with light interiors.

But if you want to actually buy the car you've designed, and you like light interiors, you'll find you'll probably have to custom order your vehicle. Why? Because dealers (at least in the USA) don't stock the light colors.

[continue reading…]


Disable local Time Machine backups on laptops

Just noticed this post over on iMore…did you know that Time Machine automatically creates local backups on your laptop Mac? As described by iMore…

On Apple laptops, like the MacBook, MacBook Air, and MacBook Pro, Time Machine includes the added feature of creating local snapshots so that, if you disconnect your MacBook from its external hard drive, you'll still have backups stored on your internal hard drive so you can recover data if you need to.

While the iMore article points out how to disable/enable the feature (sudo tmutil disablelocal or …enablelocal in Terminal), here's a bit more detail not provided in the article.

First, this is not some hidden hack; you're merely changing a setting using an Apple-provided command line interface to Time Machine. Apple, for whatever reason, chose not to include this setting in the GUI, but you're not risking anything by making this change.

Second, you'll find the local backups in a root-only folder named .MobileBackups, at the top level of your hard drive. You can—sort of—see how much space they take up by selecting About this Mac from the Apple menu, then clicking on the Storage tab. On my MacBook Air, which has a 2GB local backup, I see 4GB of purgeable space, which I assume includes that backup.

To get the actual size of the local backup, run this command in Terminal:

sudo du -h /.MobileBackups/

Provide your password, then wait a bit. The last line of the output will be the total size of the folder, stated in gigabytes…

…
…
 23M	/.MobileBackups//Computer/2017-02-16-092144
2.0G	/.MobileBackups//Computer
2.0G	/.MobileBackups/

And finally, if you disable this command, how do you know you've done so, months from now when you've forgotten about this? Time Machine itself will tell you, on its System Preferences panel. (Sorry for the low-res shot; I only have local backups enabled on my 11" Air!)

As seen, after disabling the setting, Time Machine's System Preferences panel will no longer list local backups as one of the tasks it performs.


Easily copy or move a WordPress blog

I was looking for an easy way to make a development copy of the Many Tricks blog, which (like Robservatory) is powered by WordPress. In the past, I've done this manually, but it's a bit of a pain to get the required edits done correctly and make everything work at the new URL.

So this time, I went searching for a plug-in, and found Duplicator. Borrowing from the plug-in's description of itself…

Duplicator gives WordPress administrators the ability to migrate, copy or clone a site from one location to another. The plugin also serves as a simple backup utility. Duplicator supports both serialized and base64 serialized string replacement. If you need to move WordPress or backup WordPress this plugin can help simplify the process.

Once installed, usage is pretty easy: You follow a simple three-step process that creates a new package. Move that package to the new location, expand it, and then run the installer.php file. (I had to rename the three files from the package to remove everything except the filenames; the plug-in adds a bunch of identifying text in front of each filename.)

The installer asks questions about the new site's URLs and database connection info, then does its magic. I had a clone site up and running in minutes, saving what (for me) is usually an hour or so's aggravation. Duplicator should work equally well for moving a WordPress installation to a new host, too, though I haven't tested it in that situation (yet).