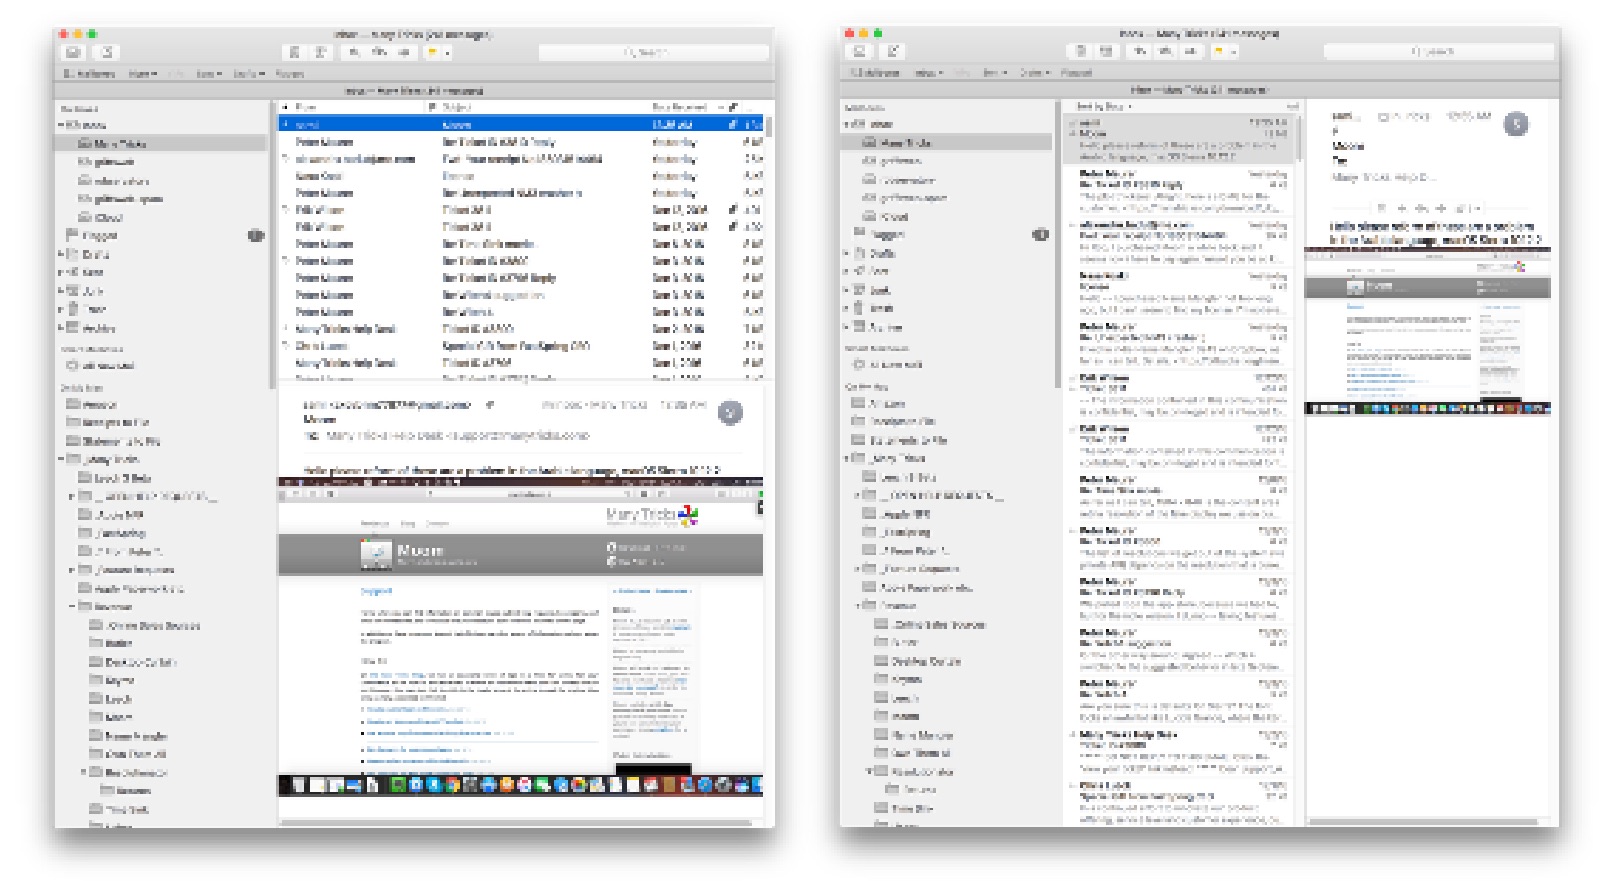
To me, the modern view in Apple's Mail app is basically useless: I keep my Mail window at 1,020 pixels in width, because really, there's no need for it to take up more space than that. But at that width, the modern view's message preview is so tiny as to be basically worthless:
Obviously, that's classic view on the left and modern view on the right. With the classic view, I can read each email as soon as I select it in the list; with modern, I have to double-click a message to open in a new window, which is a waste of time and screen space. Modern only gets truly usable if I'm willing to make the window roughly 1,500 pixels in width.
So which layout do you use? Vote in the Twitter poll for the next day (well, 23 hours and counting).
A couple years back, I explained how I rip Blu-ray discs. A lot of time has passed, and I now use a slightly different procedure that results in much faster rips—with the caveat that the resulting file will be larger than the "slow" method, and is technically of slightly lower quality, though I can't visually distinguish the two.
The new method uses Don Melton's amazing video transcoding tools, a set of Unix programs that optimize video conversion in ways you cannot do (or easily do) in the Handbrake GUI. If you're new to Unix, but would still like to try these tools, I wrote a detailed set of instructions that should help get you up and running.
Using these Unix programs, you can rip a disc with various parameters, including one to optimize for speed (with good image quality) and another that tries to minimize the file size.
Here's a quick comparison of all three methods, as tested with the three-hour Hamlet Blu-ray. The 'Handbrake GUI' rip was done using, well, the Handbrake GUI as described in my original article. The second and third rows use Don's tools set to quick and veryquick modes, and the final row uses Don's tools set to optimize the file size.
Method
Data Copied
Convert (hrs:mins)
File Size
Handbrake GUI
47.5GB
3:52
6.8GB
transcode - quick
40.1GB
2:20
9.2GB
transcode - small
40.1GB
3:12
6.5GB
Tested on a late 2014 27" iMac with a 4GHz Core i7 and 24GB of RAM.
Using Don's tools in "quick" mode, you save time two ways: 7GB (15%) less data is copied to the hard drive, and the conversion process is over 90 minutes (38%) faster. The downside is that the final file size is 2.4GB (35%) larger. And that's what they call a tradeoff.
Using the "small" mode in Don's tools, you still save the 7GB (15%) of data copy, and still save 40 minutes (17%) over the original method. In addition, the file size is smaller than the Handbrake GUI version.
To summarize, regardless of whether you care more about file size or ripping speed, Don's tools provide an advantage over the Handbrake GUI: Either method is notably faster, and the small option generates smaller (or probably at worst, very similar) file sizes. (There's also a "big" option, if you don't mind somewhat larger files at a higher quality level.)
Keep reading to see some examples of the image quality of each method, and information on how to install and use Don's video transcoding tools.
In this post, I lamented on the incredible slowdown seen when expanding many compressed files in Finder. To save a trip back to that article, here's the tldr; version:
Expand 24 .gz files
Finder: 12.8 seconds
Terminal: .013 seconds
Terminal is 984.6x faster than Finder
With a bit of work, though, you can harness the power of Unix in Finder, and get both the GUI and the speed when expanding files. There are many ways to do this, including third-party apps such as The Unarchiver. You could also write an Automator Service to do the work for you. But I chose to write a Keyboard Maestro macro, because I could make the macro a menu bar option that only shows when Finder is frontmost:
As seen, I actually have two expanders, one that expands just the Apple sales reports mentioned in my original post, and the other that will handle any mix of compressed files. (Yes, the 'all files' macro could also handle the Apple sales reports, but because of how it has to run for multiple file types, it's marginally slower than the dedicated macro.)
These macros both work in the same way—they call on Unix apps to do the expansion, bypassing Apple's slow GUI expander (which is called Archive Utility). If you're curious how they work, and/or would like to download them for your own use, keep reading.
Once a month, I download roughly 25 gzipped (.gz) files from Apple—these are our Mac App Store sales reports, with one file for each App Store region. I could have Safari expand these files (via the "Open 'safe' files after downloading' item in its preferences), but I prefer to leave that option unchecked. (Why? I often download archives that I want to leave archived, and I like to keep originals of many of the things I download).
If you work with lots of compressed files, you're probably familiar with what happens in Finder (see note) when you go to expand any semi-large number of files: The infamous Dancing Dialog™. It looks something like this…
[Note: Technically, this isn't Finder, it's Archive Utility doing the expansion. But this is the service that Apple provides to expand compressed files, and it's what 99% of macOS users will use. It can be changed via the Get Info dialog, but very few people will take that step. So to most users, it seems it's Finder handling the expansion. For ease of reference, I'm going to say it's Finder doing the expansion.]
Not only is this randomly-resizing dialog box visually annoying, it turns what should be a super-fast process into one that takes a ridiculous amount of time. The end result is that users think they have a slow machine—"it took over 12 seconds to expand 25 tiny little archives!"—when what they really have is a horrendously slow GUI interface to a super fast task.
Just how fast is the task, if the GUI doesn't get in the way? Thanks to the Unix core of macOS, we can answer that question using Terminal, the geeky front-end to the Unix core. The Unix command to expand .gz archives is gzip; so to expand all the .gz files in a folder (and keep the originals), you'd use this command in Terminal:
gzip -d -k *.gz
If you try this, you'll find out it's nearly instantaneous—press Return, and the files are expanded. Unix actually gives us a way to see exactly how fast it is, via the time command:
$ time gzip -d -k *.gz

real	0m0.013s
user	0m0.002s
sys	0m0.005s
This was for a set of 24 .gz archive files (on a solid state drive), and the real line in the output shows exactly how long it took to expand them all: 0.013 seconds. By comparison, I made a screen recording (with an onscreen stopwatch for timing) of Finder expanding the same 24 files; it took 12.8 seconds for all the dialog dancing to end. Think about that…
Expand 24 .gz files
Finder: 12.8 seconds
Terminal: .013 seconds
Terminal is 984.6x faster than Finder
To put those results another way, if expansion time is linear, gzip could expand 23,631 files in the time Finder takes to expand 24 files. That's nuts!
(You can watch this video for a visual comparison of expanding the same set of files in Finder and Terminal.)
So it's not the computer that's slow, it's the GUI interface to the computer that (in this particular use case) is incredibly, horrendously slow. And there's no need for it—the separate individual progress bars, appearing and vanishing in under a second each, provide no useful feedback to the user. They just slow down the task.
Finder (née Archive Utility) should just execute the task without any visual feedback (though it should pop up a window if there are exceptions). If visual feedback is really required, a window with a single progress bar for the entire task would be OK, but would still slow operations down.
This is a great example of how an everyday task can make you think you have a slow computer, when what you really have is a fast computer with a slow interface element. Given how often we all deal with compressed files, it'd be nice to see Apple clean up this mess. Until they do, however, you can harness the power of Unix—even while in Finder—to speed up the task. Here's one way to do just that.
Back in 2013, Apple introduced the new Mac Pro, an amazing wonder of design. But it was also a study in compromise for "Pro" users, requiring all peripherals to be externally attached, and not allowing for any after-purchase upgrades (video card, CPU, etc.). It was also shockingly expensive.
I can only imagine how hard it must have been for Apple to try to build a perfect Mac "Pro" desktop for everyone. As nicely designed as the new Mac Pro was, it missed the perfect mark for many Pro users by quite a bit.
So how does Apple try to design one Mac that can satisfy a diverse group that encompasses design professionals, gamers, scientific researchers, video creators, and who knows what else? Quite simply, they shouldn't try, as such an exercise is destined to fail. (See "new Mac Pro," above.)
Instead, Apple should design one Mac that can become anything and everything to each type of "Pro" user. While that may sound daungting, the good news is that Apple's already done this in its recent past. And done it very well, I might add…
Last weekend, I ran (along with about 7,000 other entrants) the Portland Marathon. This was my first ever marathon, and also my last-ever marathon. I finished, in 4:12:53 (1,365th place, of 4,295 finishers), which is about how long I thought it'd take me. What follows is a brief look back at how I got to the point where I willingly chose to run 26.2 miles; you may find the information useful if you're contemplating running a marathon yourself someday.
About the race
The Portland Marathon is a great race, now in its 45th year. It's actually two races in one, as there's a half-marathon with the same start and finish points. As seen on the course map(caution: 2.8MB PDF), the two races share the same course until the 11 mile mark. At that point, the half marathon returns downtown for the finish, while the marathon heads into Northwest Portland, then loops up and over the St. John's Bridge, which would typically provide some amazing views. Of course, it was pouring rain and cloudy all day, so the views weren't quite so good for us.
The course then follows along a bluff (again, typically scenic) overlooking Portland before descending down into the east side industrial area (running right along the rail yard), then returning to downtown (over the much less scenic Broadway Bridge) and on to the finish.
Why did I decide to run a marathon?
When this year started, I had no thought of running a marathon. I have thought about it in years past, when I was running regularly—and my dad had run them when I was younger, so they intrigued me. (My dad was quite fast; his best was a 2:40, which is an insane 6:08 a mile for 26.2 miles!) But as of the start of the year, it'd been roughly four years since I was running on a regular basis, so running even one mile seemed ludicrous.
To force myself to get in shape this year, I set a pretty ridiculous goal: I decided I'd walk or run 2,016 miles in 2016. This meant averaging 5.5 miles a day, every day, for the entire year. From someone who had probably ran a total of five miles in 2015. Yea, it's a pretty insane goal.
One aspect of Apple's decision to remove the headphone jack from the iPhone 7/7 Plus that I haven't seen discussed anywhere is the impact it will have on third-party battery pack case makers. Traditionally, third-party battery pack cases plug into the Lightning port, and typically provide a micro USB connector in its place. They also then usually have a headphone passthrough, either via a port extender or a special headphone cable extender, to allow you to plug in headphones without removing the battery pack.
I was curious how the case makers were going to address this for the iPhone 7, because blocking the Lightning port means that users will have to use wireless headphones when using a battery pack. I searched Amazon for iPhone 7 battery case, to see what might be in store. However, the results were disappointing—basically, everysingleproductusesmicro USBforchargeandsync. I could go on, but you get the idea: None of the manufacturers seem to be worried about blocking the Lightning port with their battery cases.
The only exception I found was the SOLEMEMO Ultra Slim Charging Case, which isn't actually designed for the iPhone 7. But as designed for the iPhone 6, this case uses an ultra-slim bottom with a tiny Lightning pass-through, as seen in the photo below (borrowed from one of the reviews on Amazon).
This style of connector would allow you to connect wired headphones (either Apple's Lightning pods, or standard headphones via Apple's Lightning to 3.5mm adapater cable). I don't know if this company will be making an iPhone 7 version or not; the iPhone 6 case should fit the iPhone 7, but the camera opening won't line up with the camera's new position on the iPhone 7.
(I checked Mophie, too, but they're early on in their iPhone 7 case building process; their iPhone 7 link takes you to their Explore our Process page, which describes the method and timeline they follow in making products for new devices.)
So if you're buying an iPhone 7, and you want a battery case right now, and you want to use wired headphones with that case, as of today I see three solutions:
Buy the SOLEMEMO Ultra Slim Charging Case for $35, knowing you won't be able to take pictures. Note that this is a 2400mAh battery pack, so it's not as large as some of the others (but it is very slim).
Buy Apple's $99 iPhone Battery Case. This is an 2365mAh battery pack (up from 1877mAh for the iPhone 6s), and it nicely integrates—at the iOS level—with your iPhone. But it's pricey, underpowered, and has The Hump. For the cost of the Apple pack, you could get two SOLEMEMO packs and have $30 left over!
Buy any of the forthcoming iPhone 7 battery cases and use wireless headphones. OK, so that totally skips the 'use wired headphones' requirement, but it's really the only other option at this time.
I'm hoping we'll see someone come out with something truly innovative here, such as Lex Friedman's suggestion on Twitter:
Million dollar idea: Battery case with headphone jack pass through
Adding an actual headphone jack would probably be a home run product; I have no idea if it's technically possible to split the Lightning port's signals in that way (I would bet it's not). Even lacking that, though, it'd be nice to see more third-party cases that pass through the Lightning connector, so that wired headphones could still be used.
After hearing my The Committed podcast cohosts rave about Plex (a free media server), I thought I'd give it another shot: I'd tried a few months back, but because of the way I store my personal videos (using our own Usher app), it was going to be a big migration project, and I just never got into it. So today, I resolved to try again.
And today, I'm giving up again. I've spent the last few hours fighting Plex, and despite the awesomeness of the streaming (it *is* awesome), it's just not worth the aggravation in configuration and setup—to me, of course. Plenty of others find it works just fine.
But for me, it doesn't work at all, basically. Here's a short list of some of the things that bother me about Plex…
Note: This post will only (possibly) be of interest to buyers of the 2016 RAV4; if you're not one of what I assume is a handful of people (at most), move along—there's really nothing to see here! Posting mainly so I remember what I did.
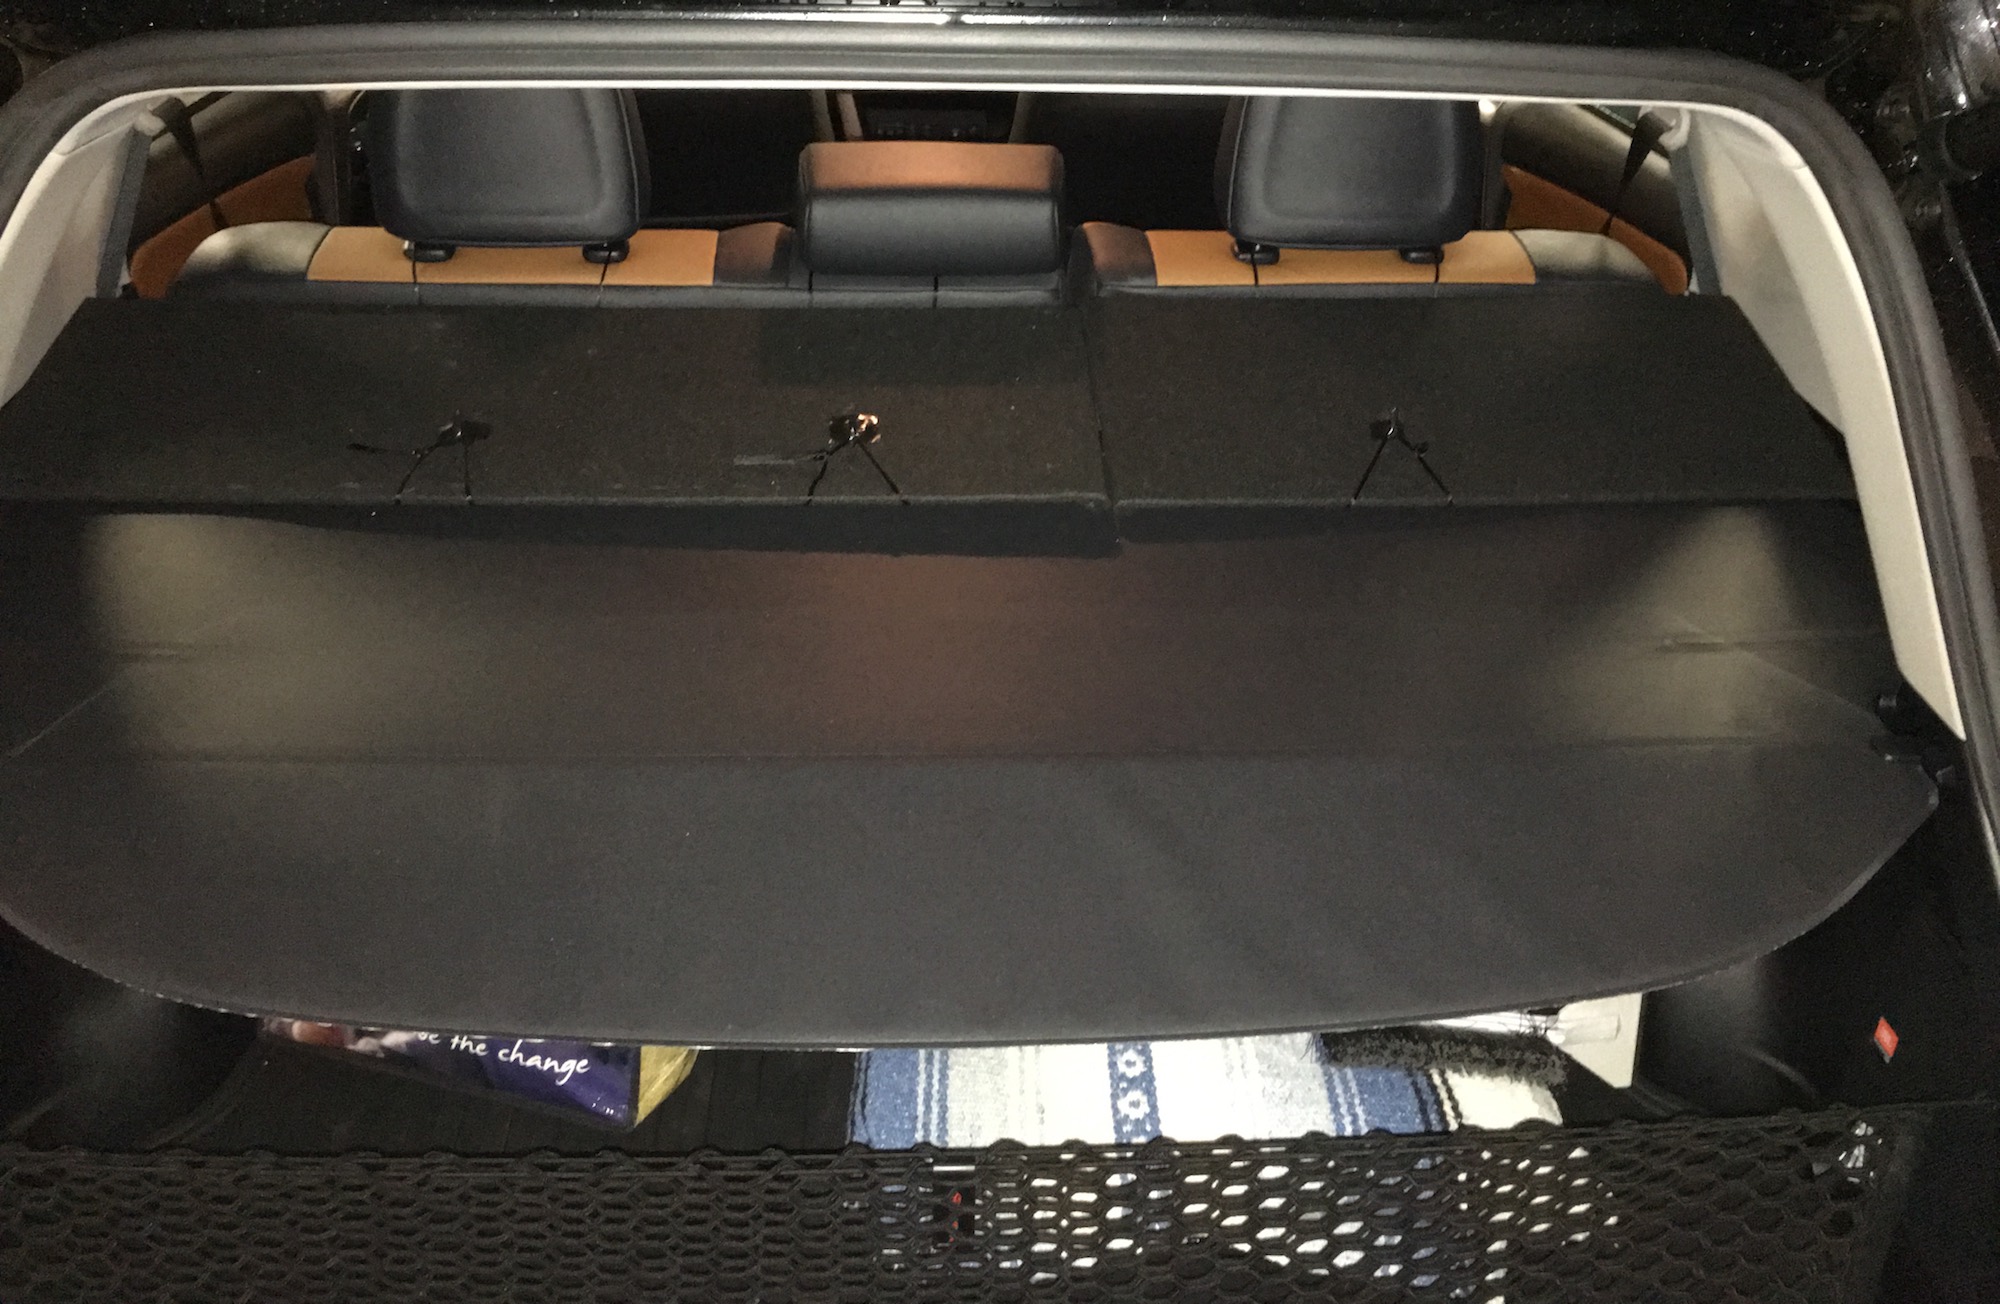
We recently bought a 2016 RAV4, and (so far) love it. However, there's one thing that bothered us: the front of the rear cargo area is visible to anyone who glances in. Toyota sells a cover for the cargo area, but unlike those for past RAV4s, it doesn't attach to the rear setbacks, leaving the front area uncovered. This means that a good sized chunk of the cargo area is still visible, even with the cargo cover in place.
I didn't want to wait for Toyota to release something, so I set out to MacGyver a solution. I had a few requirements for my homemade fix:
Absolutely no added rattles/noise
Very light
Very cheap
No bright reflections in back window
Move when the seats' recline angle changes
Easily installed/removed
I had a lot of different thoughts, but wound up using foam core covered by felt, attached with some flat black nylon string. Note: These covers require the cargo cover, as they use its crossbar for support.
They may not be the loveliest things in the world, but they work perfectly and meet every one of my original objectives.
If you'd like to create your own covers, here's how I made ours…
Recently, we were in the market for a new car, well, not car but SUV. My wife really likes small to mid-size all wheel drive SUVs, so we started looking for one to replace the car she's been driving.
But she also prefers hybrids, both for the environmental and economic benefits (using less gas, spending less money) and for the "not having to wait in Oregon's ever-present gas lines" (because we're too stupid to pump our own gas) benefit. Having now done lots of research, I have to say that looking for a SUV that's also a hybrid greatly reduces the choices available.
The environmental question This analysis completely ignores the environmental side of hybrids: Using less gas means emitting less pollutants, which is good for the environment. However, producing batteries can be a dirty business, and batteries consume rare metals. So are they an environmental net loss or gain?
On the question of plug-in hybrids, which recharge from the power grid, it gets even messier: How is the electricity used to recharge created? In the northwest, much of the power comes from hydro and wind, which are cleaner than the coal used in other areas of the country.
In short, I've completely ignored the environmental issue here because it's very complicated. If someone's aware of a good "green impact" metric that works across hybrids, please let me know.
After doing a lot of reading and searching, and not really worrying about budget just yet, we only found a handful of options (excluding some super-high-end vehicles):
There's also the BMW X5 xDrive40e, but (a) it's not out yet, (b) it's a plug-in hybrid not a straight hybrid, and (c) it's going to be really wacko expensive when it comes out. So I'm ignoring that one, too.
What I found as I started to analyze the various hybrid SUVs is that—with one amazing exception—they don't make any economic sense even for the most long-distance of drivers.