Skip to content

Apple Universe

Top-level category for all Apple, Mac, and OS X related topics.

An alternative way to search Mail for senders and content

For better or worse—most might argue "worse"—I rely on the built-in macOS email client, annoyingly named Mail. (Why annoying? Try searching the web for help when you're having trouble with "Mail"…) I've tried nearly every third party replacement, but something (usually in the UI) always brings me back to Mail.

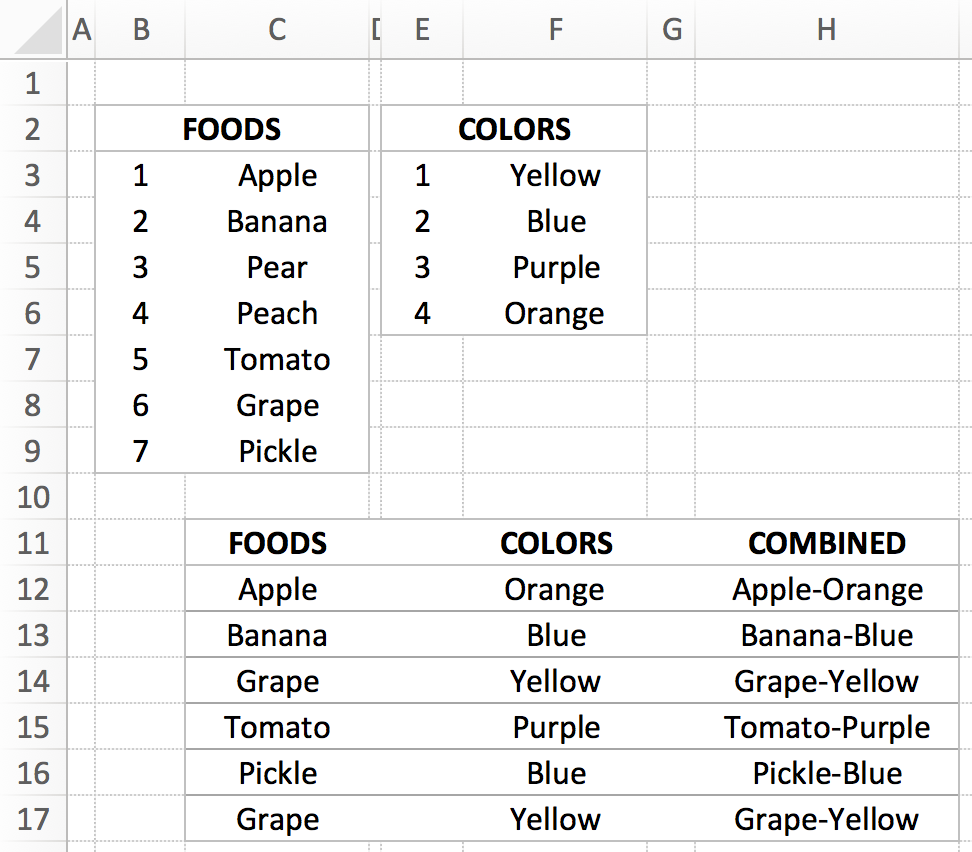
In any event, I have a huge database of messages that I've built up over the years, especially since starting at Many Tricks with Peter Maurer back in 2010. Often I want to find a message that's both from a particular person, and contains certain words. For example, I want to find all emails from Peter that contain the word "pricing."

The "correct" way to do this in Mail is to type From: in the search box, then start typing the name you want to match. As you type, a list of possible matches appears below the search box. Use the arrow keys (or reach for the mou…no, don't do that) to move down and select the right name from the list of matches, then press Return.

When you press Return with the desired name highlighted, the From: text in the search field turns into a token with the selected user's name, as seen at right. You can then continue typing the rest of your search terms; pricing in this case. Press Return again, and the search runs and returns the matches (17 messages in my example).

While this works fine, it's annoying and time consuming to interrupt the flow of typing a search by visually scanning a box, moving a selection, pressing Return, then starting to type again. So I thought I'd try the logical alternative—I just typed in my search query: from:peter maurer pricing. But this returned no matches.

On a lark, I tried reversing the order: pricing from:peter maurer.

Bingo! This works as expected, showing only messages from Peter that contain the word pricing. (Oddly, it finds two more matches than does the official method, and I cannot figure out why those messages are excluded from the other method's matches.)

[continue reading…]


Randomly merge lists in Excel

This morning, while working on a customer request, I had to create a list of words by randomly choosing words from two lists, and then mashing them together. This isn't something that I've ever done before, and I'm not sure how relevant it might be for others, but I'm documenting it here just in case someone is searching for such a solution.

Here's how my little test spreadsheet looked when I was done with it:

I didn't realize it at the time, but this could be a "modern paint color" name generator…"Yes, I'd like two gallons of the Pickle-Purple, please." Anyway, the COMBINED column contains the final result, with the FOODS and COLORS columns showing randomly-selected entries from the two lists. Each time you recalculate the sheet, all the selections will change.

The key bit is the formula to grab a random entry from the list; here's what that looks like in cell C12 ("Apple"):

=VLOOKUP(RANDBETWEEN(B$3,B$9),B$3:C9,2)

It's just a basic VLOOKUP that uses RANDBETWEEN to grab a random row from the lookup table. Not rocket science, but nothing I'd tried before. (For this to work, your table entries need row numbers, obviously.) The COMBINED column is just a simple text formula, i.e. =C12&"-"&F12 to combine the two random values.

I also wasn't aware of the RANDBETWEEN function—it returns a whole number between the values you specify. That is so much easier than using RAND and then having to multiply and round off, etc.

Feel free to download the workbook if you'd like to take a look.


iOS App: OSnap! Pro for time lapse and animation movies

A while back, I created a time lapse movie of a lava lamp warming up. I'd wanted to use my iPhone for this, as time lapse is a built-in feature, but the iPhone implements it in an odd way: The iPhone will vary the time intervals between pictures as your recording time increases. This keeps all time lapse movies to a similar duration (20 to 40 seconds), but it means you can't shoot a constant-rate time lapse movie.

I solved the problem for the lava lamp movie by using OSnap! Pro, a $3.99 iOS app (for both iPhone and iPad). I've wanted to write more about this app for a while (I'll be calling it OSnap from here on out), and a recent snowstorm in central Oregon gave me the perfect chance to test the app again before writing about it…

Ah, if only it went so quickly in reality! Making this movie was a breeze with OSnap! Pro; read on to see what makes OSnap so good (and to see a lame-but-short stop-motion animation movie, too).

[continue reading…]


Hardware: Fujitsu ScanSnap iX500 document scanner

In mid-2015, I decided I wanted to get rid of the mass of paper we'd been accumulating for years. Much of it could be recycled, but there was still a substantial stack of important yet rarely looked at paper that we needed to keep. If anything was ripe for a digitization project, it was this stack of paper. But there were thousands of pages to scan, and that's not something you're going to want to do on your $99 all-in-one printer/scanner/coffee maker.

After talking with some people and reading some reviews, I bought a Fujitsu ScanSnap iX500 document scanner. This was not an inexpensive purchase—it lists for nearly $500, though typically sells for just over $400.

Note that there are two versions of this scanner: The PA03656-B005, which is what I have, and the newer PA03656-B305. The newer one is actually less expensive ($415 vs $490 as I write this), and apparently the sole difference is the bundled third-party software. I haven't seen the newer scanner's bundle, though, so I can't comment.

I've been using this scanner pretty much every day since October of 2015, and I can say it's one of the best pieces of hardware I've ever purchased. (The software is also very good, but the UI is far from lovely.) So far, I've scanned over 8,500 pages with this scanner, and I haven't had any issues with it at all. If you're interested in document scanning, read on for my thoughts on why this Fujitsu is an excellent tool for the task…

[continue reading…]


Put Unix path to selected Finder item on clipboard

Thanks to the commenters for pointing out the much easier way to do this: Select an item in Finder, then press Command-Option-C. All done. Leaving the hint here as an example of a Rube Goldberg machine.

In two recent geeky tips, I showed how you can open a Terminal window in the directory of the selected Finder item, and how you can view Unix man pages in Preview. To finish the trifecta of geekiness, today's tip lets you quickly place the Unix-style path to the selected Finder item on the clipboard. (It's actually a simplified version of the 'open this in Terminal' tip.)

The AppleScript that accomplishes this is quite simple:

If you run that in Script Editor, you'll see that your clipboard contains the path to whatever you had selected in Finder. But running the AppleScript in ScriptEditor isn't a great timesaver. Instead, put it into whatever tool you have that can run AppleScripts via hot key or menu bar entry or whatever.

In my case, I put it into a super-simple Keyboard Maestro macro. I've set it up to show in the Keyboard Maestro menu bar when Finder is active:

There are countless tools that can run AppleScripts in various ways, including our own Butler, LaunchBar if you save the script first, etc.


Useful site: iTunes Artwork Finder finds more than artwork

Ever want to grab the cover art for some album? Or have you ever wanted the full-size icon from an iOS app? Or the cover image from a movie or TV show? A podcast's icon? Ben Dodson hosts an excellent web-based tool that lets you do all that and more: The iTunes Artwork Finder.

Usage is about as simple as it gets: Pick a category, enter your search term, set the geographical region, and click Get the artwork.

Note that this only works for things available from the iTunes Store in the specified region, so you can't use it to find cover art for that digitized copy of some obscure record you found at an underground music store in New York City back in 1973.

Also note that if you have your own web site, you can host your own artwork finder, as Ben has made the code available for all. I wouldn't recommend making it publicly available, though, unless you have bandwidth to spare—a single search for "Friends," for instance, returned about 25 high-resolution images.

Here's how I set it up on our family's web site; it's really easy to do, and it works great:

  1. Download the zipped archive from GitHub.
  2. Create a new folder on your server. I called mine getart.
  3. Upload the two files (php, js) from the archive into the folder.
  4. Add basic HTML tags (html, head, body) to the stub of HTML shown on the GitHub page, and save it as index.html in the same folder. If you like fancy and have time to spend, go ahead and pretty it up with CSS and layout. I just left it bare.

That's all there is to it; you can now look up artwork by loading http://yourdomain/getart (or whatever you called it) in your fave browser.


Useful site: iStockNow finds Apple products

During today's recording of our The Committed podcast, Ian mentioned a site he uses to check for sometimes hard-to-acquire Apple products. The site, iStockNow, is very nicely designed and makes it really simple to check availability not only at your local stores, but also globally.

Start by clicking the left-side filters section for the products you'd like to check on, then view the map on the right to see where they're in stock. For example, a search for the 15" MacBook Pro Touch Bar in Space Gray shows that it's available throughout North America, except in Mexico City:

But if you search for a 42mm Apple Watch in Stainless Steel in retail stores, you'll see that most of North America is a sea of red. Zoom in on the map, though, and there are some stores with stock:

When you find a store with inventory—the green pushpin—click on it to get the details of that store's inventory:

If you're looking for something particularly hard to find—cough AirPods cough—iStockNow may just help you secure your item. According to Ian, at least, that's exactly how he got his AirPods!


View Unix man (help) pages in Preview

Today's tip goes well with yesterday's tip, which explained how to open any Finder item's folder in Terminal via Keyboard Maestro. Once in Terminal (and sometimes even when not in Terminal), I'll often want to check out the man page (help) for a given command.

You can do this directly in Terminal with man [name of command], of course, but then it opens on top of whatever you were working on, and you have to read it in Terminal. You could use another tab or window, but you'd still be reading in Terminal. There are times, too, when I'm writing about the Unix side of macOS, so I'm not even in Terminal, but still want to view a man page.

My solution to this problem is two different ways of doing the same thing: I open man pages as nicely-formatted PDFs in Preview. The method I use to get to that point depends on if I'm working in Terminal or not.

Update: I've modified the script and macro so that they properly handles two-argument man commands, such as man 3 printf.

In Terminal

Based on an old Mac OS X Hints tip, I created a very simple shell script:

The key to this little script is the -t option on the man command. From the (hehe) man man help file, here's what that does:

  -t     Use /usr/bin/groff -Tps -mandoc -c to format the manual page,
         passing the  output to stdout. The default  output format  of
         /usr/bin/groff -Tps -mandoc -c is  Postscript, refer  to  the
         manual  page  of /usr/bin/groff -Tps -mandoc -c for  ways  to 
         pick an alternate format.

In other words, the -t converts the help page into a PostScript file, which is something that Preview can easily open (which is just what the last line of the script does).

I named this script preman, because it uses Preview to open man pages. Once saved, I made it executable (chmod 755 preman), and I can then open any man page in Preview by typing, for instance, preman bash.

The output is nicely formatted, and by opening the man page in Preview, my Terminal session is uninterrupted. A quick adjustment with Moom, where I have a saved layout to position Preview and Terminal, and I can scan the man page while working in Terminal.

But what about when I'm not in Terminal? For that, I basically implement the same shell script, but with it set up to run within a Keyboard Maestro macro.

[continue reading…]


Open Terminal in selected Finder folder

Today's tip is just a re-implementation of a really old Mac OS X Hints AppleScript that lets you open a Terminal window with the working directory set to (i.e. cd'd into) the selected Finder folder.

This makes it really easy to jump into Terminal to do something from Finder, without having to do any mousing and minimal typing. What's new is that I've used Keyboard Maestro to turn the AppleScript into a macro that runs only in Finder, where it's available via hot key or menu bar trigger.

Here's the complete macro; download it now to look at and/or use as you wish. [Note: If you use iTerm2 instead of Terminal, you'll want to download this version instead. My good friend James, who runs Out of Control, did so. He tells me it works great.]

The name of the macro may look a bit odd—the 03) controls the sort order in the Keyboard Maestro menu bar item, and does not display when the menu is activated:

Keyboard Maestro also helpfully displays the assigned keyboard shortcut in the menu bar item, in case I've forgotten it.

[continue reading…]


The ridiculous economics of Real Racing 3

I used to play a lot of Real Racing 3 (RR3), an iOS auto racing game. Like, quite a lot. At one point, I owned all 132 cars available at that time, and had completed all the events.

To reach that point, I spent about $60 on in-app purchases—RR3's in-app purchases were really expensive. And yes, that's a lot, but I didn't own a console at the time, and I judged the app worth the cost of a console racing game. (I also took advantage of some programming glitches that enabled occasional free in-app purchase items; without these glitches, I doubt I would have made it as far as I did.)

Once I'd spent $60 and could go no further without spending more, I stopped playing; $60 was my limit. I did keep my iCloud save game file in case I wanted to revisit it someday. That someday was yesterday.

Since I left, the game has grown a lot: There are now 171 cars available, or 39 more than when I stopped playing. To finish the game again, I'd need to acquire (and upgrade) all of those cars (and race a huge number of new races). I thought "maybe it's OK to spend another $60 or so; it's been a few years."

But as I looked into what it might cost to finish the game, I found that the economics are still absolutely ridiculous. How ridiculous? About $3,665 ridiculous. Yes, I estimate it would cost me $3,665 to finish RR3. At that spending level, though, there are some other purchases I could consider…

Instead of finishing RR3, I could purchase a commercial-grade 48" gas range. Or I could buy a loaded Touch Bar Retina MacBook Pro with a 2.9GHz Core i7 CPU, 1TB SSD, and upgraded graphics.

The third option, though, is the best comparison: For $129 less than what I think it would cost me to finish RR3, I could purchase all of the following:

That's a full console-based driving setup, including a 65" 4K TV, for less than what I'd probably have to pay to finish (temporarily, until the next expansion) Real Racing 3. Yes, I'd say that's ridiculous.

But where do my numbers come from, and how could I possibly think it'd cost that much to finish the game?! Read the rest if you'd like the nitty-gritty on my $3,665 estimate.

[continue reading…]