Skip to content

Macs

Use Intel’s Power Gadget to keep an eye on your CPU

If you're the type who likes to keep an eye on your system, you may be familiar with tools such as Activity Montior's CPU meters, or iStat Menus, which displays a ton of system info via its menubar icon. Neither of these tools, however, really show you what the CPU itself is up to—and that's where an Intel-provided tool enters the scene.

The Intel® Power Gadget shows you exactly what your CPU is up to: how much power it's using, what speed it's running at, and its temperature. As seen in the image at right (click for larger), it graphs these three values over time.

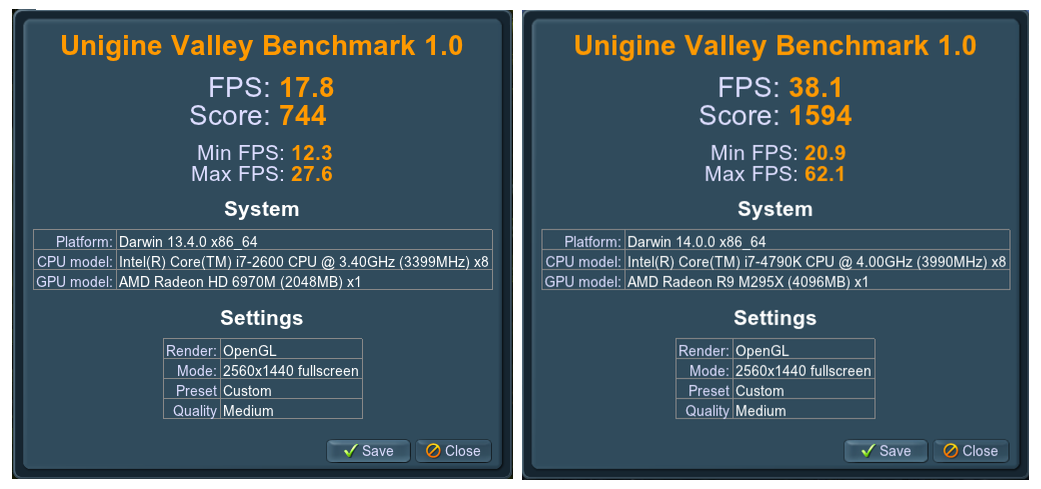
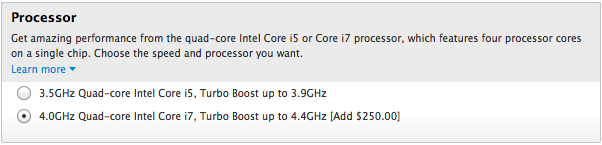
The data you're seeing there is from my 4GHz Retina iMac, and the screenshot was grabbed while it wasn't doing much in particular. What really stands out to me is how often my 4GHz CPU is running at something closer to 3GHz; if the CPU isn't being called on for its full power, I'm assuming it slows itself down to reduce power usage.

But as soon as you do something that demands the CPU's full power, the napping stops. Here's a brief movie I created showing the CPU tracking when I started ripping a Blu-Ray:

The machine is basically idle at first, then I start the rip after 15 seconds or so. As soon as the hard work starts, the power and temperature charts shoot upwards, and over time, the CPU speed pegs right around 4GHz; the naps are gone.

I'm not sure how much real-world use this tool has, but from a geeky perspective, it's pretty cool being able to see exactly what your CPU is up to at any point in time. (You can even send the data to a log file, in case you really want to study power, speed, and temperature over an extended time period.)


Send your Retina iMac’s desktop to deep space

Last week, I used the just-released Hubble Space Telescope images of the Andromeda galaxy to create a couple of desktop images for my Retina iMac. I liked the results so much that I spent some time collecting other suitable images from the Hubble site, and then cropping and/or scaling them to create interesting high-res desktop images. (I used Acorn for all the edits; it had no troubles, even with TIF images as large as 20,323x16,259!)

The end result is a collection of 50+ Retina iMac-sized (5120x2880) desktop wallpapers, courtesy of the Hubble Space Telescope. Here's the full collection:

Tip: If you click on the caption below the image, you'll be taken to the source page on the Hubble telescope site where I found the image.

There are at least two versions of nearly every image—one or more where I cropped out an interesting area of the photo at 5120x2880, and one where I scaled down and then cropped as needed to get as much of the full image as possible.

There are three ways to get an image (or all the images):

Method One: One at a time

  1. Command-click on the image (anywhere other than on the navigation arrows) you'd like to download. This will create a new background tab (in Safari, Chrome, and Firefox, at least), loaded with that image's high-resolution page on my OneDrive.
  2. At the top of the page you'll see a Download icon and text; click there to save the file to your Mac.
  3. Repeat for each image you want, and then organize as you wish, and set them up as rotating desktop images.

Method Two: Another way to get one at a time

Open the full folder on OneDrive, and browse/download directly from there. Click on any image, then click the Download icon to download the selected image to your Mac.

Method Three: Gimme the full set!

If you want all 54 images, just download this zip file from OneDrive.

Images courtesy of NASA/ESA, and full image credits can be found on the linked image page for each image reproduced above.


Seeking clarity in Retina iMac desktop images

I'll admit it: I'm a desktop image (nee wallpaper) addict. I love to use a wide variety of images, and change them often throughout the day, just to keep my work environment fresh. On my two external displays, I use iPhoto images—general photos on one, kid pictures on the other. But for the main iMac screen, I prefer to use photos taken by others—typically stunning landscapes and cityscapes from all over the world.

With the arrival of my 5K iMac, however, my existing collection was no longer sufficient. Yes, they were all 2560x1440 images, which matches the "apparent" resolution of the Retina iMac. But in order to make that image fill the Retina iMac's screen, it's first scaled up to 5120x2880, then displayed by OS X at 2560x1440. As a result, my desktop images aren't nearly as sharp looking as they were on my old 27" iMac's display.

As an example, here's a segment of two versions (2560x1440 and 5120x2880) of the Sydney Skyline, as screen-captured when set as my Retina iMac's desktop picture. As you move the divider bar right, you're revealing more of the 2560px version; move it left, and the 5120px version takes over.

After scrolling back and forth a bit, you might be thinking these pictures are identical, and I'm just seeing things. While I may be seeing things, the pictures are not identical. (Compare some closely-spaced lights and the crispness of vertical lines in each image to spot the differences.)

Read on for a closer look at the image, which really shows what you're losing by using a 2560x1440px desktop image on a Retina Mac…as well as a list of places I've found that have 5120x2880px images available.

[continue reading…]


Migrating away from FireWire hard drives

If there's one downside to my new Retina iMac, it's that it completely lacks FireWire ports. While my main data storage is a Thunderbolt RAID array, all my backups (Time Machine, offsite drive, boot drive clone, and extra paranoid backups) are done on FireWire drives.

My setup precludes using Apple's Thunderbolt to FireWire adapter. (Because I use two external non-Thunderbolt displays, they end any sort of chaining capabilities. With some rewiring and an expensive Thunderbolt dock, I can sort of work around that problem—but those docks are pricey.)

The money-is-no-object solution is, obviously, to replace all the FireWire drives with Thunderbolt drives. Given I drained the computing budget to purchase the Retina iMac, that's not going to happen any time soon. ($400 for a 4TB drive, and I'd need three of them plus a smaller drive for the boot clone.)

After some digging, I managed to convert from FireWire without buying new hard drives, and spent just over $100 in total. The solution? The more-than-fast-enough USB3 bus in the new iMac.

[continue reading…]


A very quick look at the Retina iMac’s graphics performance

While I'm still busy setting up my Retina iMac—given I always do this by hand, it's time consuming—I did take a few minutes to see how the graphics performance compares to that of my mid-2011 iMac.

To test the Macs, I use a visual benchmark called Unigine Valley. This benchmark puts the graphics card through a real workout, and is fun to watch while running. Before the results, here's a quick comparison of my two iMacs:

2011 iMac2014 iMac
CPU3.4GHz Core i74.0GHz Core i7
RAM16GB24GB
GraphicsAMD HD 6970MAMD R9 M295X
VRAM2GB4GB

And here's how they did…

2011 iMac

2014 iMac

I'm no math whiz, but it looks like the new Retina iMac is over twice as fast in the graphics realm as my older machine. I knew it'd be faster, of course, but I wasn't expecting that kind of speed up. Wow.


Yosemite: Dark Dock and App Switcher with light menu bar

High Sierra update: This trick no longer works in High Sierra. As far as I know, there is no workaround.

Here's my first (only?) Yosemite hint, courtesy of my Many Tricks partner, Peter Maurer. Peter wanted a light menu bar, but preferred the contrast given to application icons in the dark Dock—like this:

Here's how to achieve that effect.

  1. Open Terminal, then copy/paste this and press Return: defaults write NSGlobalDomain AppleInterfaceStyle Dark
  2. Paste or type killall Dock and press Return. The Dock will relaunch in its dark mode.
  3. Copy/paste this and press Return: defaults remove NSGlobalDomain AppleInterfaceStyle

The first step sets dark mode, step two restarts the Dock to switch it to dark mode, and step three turns off dark mode—but the Dock won't notice, and will remain in its dark state (until it's next restarted, which isn't often). Because the Command-Tab switcher is associated with the Dock, it will also be dark.

If you're going to script this, you'll want to insert a delay between the second and third steps, so that the Dock can finish launching before you disable dark mode. Neat trick!


How I configured my 5K TV with bundled computer

After seeing the new iMac with Retina 5K display (I'm just going to call it a Retina iMac from here on out, or even riMac for short), I decided it was time to upgrade my aging but still oh-so-functional mid-2011 27" iMac.

For those contemplating the same upgrade, you may be mulling decisions on processor, RAM, storage, and graphics cards; here's the logic behind each of my choices in those areas, in case it helps you with your decision.

CPU

This was the simplest decision to make—I always buy the most powerful CPU I can afford. In the case where the choice is a Core i5 vs. Core i7, I will always go for the Core i7. That's because only the Core i7 supports hyper threading, which, as Apple writes, is "a technology that allows two threads to run simultaneously on each core. So a quad-core iMac has eight virtual cores, all of which are recognized by OS X. This enables the processor to deliver faster performance by spreading tasks more evenly across a greater number of cores."

In addition, by upgrading the CPU, I make the machine more usable many years down the road—whether for my own use, or when reselling to someone else.

[continue reading…]