Skip to content

macOS

Debugging Bluetooth issues in macOS Sierra

I have quite a number of Bluetooth devices connected to my iMac: Apple's Magic Mouse 2, Magic Keyboard, and the original Magic Trackpad. (Yes, I use both the mouse and the trackpad.) There's also a pair of Sentey Bluetooth Headphones and a Satechi numeric keypad. Up until macOS Sierra, I hadn't had any issues with these devices at all.

Since Sierra, though, my trackpad would occasionally disconnect then reconnect, which was annoying but generally harmless, given its role primarily as a shortcut touchpad. Much worse, though, were the Bluetooth headphones: I would hear horrible stuttering and skipping at random but frequent intervals. The audio dropouts were bad enough to make using the Bluetooth headphones impossible.

What follows isn't really a tip per se, because there's nothing here that shows how I fixed the problem for good. I have, however, found a workaround that restores my audio, which is something, at least. But if you're having Bluetooth-related issues, you may find this writeup useful, as I cover some of the tools I used to try to resolve my Bluetooth issues.

[Note: This article was updated to include information on how to use Apple's free developer accounts to download one of the tools I used—thanks to Torben for pointing this out in the comments; I had no idea there was still a free level of developer account.]

[continue reading…]


Peer into package installers before installation

Recently, I went looking for a new accounting package for Many Tricks. I found a few demos that I wanted to try, including Cognito's MoneyWorks line.

When I downloaded the demo, though, I was a bit surprised to see it was a package installer (.pkg extension). Typically, a package installer is used for system extensions, or other complex installs that have bits that go into many different places.
Being the curious sort, I wanted to see what the package would install before I installed it. You can do this the hard way, by drilling into the package in Finder (Right-click and Show Package Contents), but there's an app for that.

In the past, I've used CharleSoft's Pacifist to peer into packages. However, it's a $20 application, and somewhere along the line, I lost my registration information (or maybe I hadn't ever registered). In any event, I wondered if there were any less-expensive alternatives that did the same thing, as I only use an app like this maybe a few times a year.

A bit of web searching led me to the free Suspicious Package, so I gave it a try (hard to beat free). What I found is a very nicely done app that has replaced Pacifist for my occasional forays into packages.

[continue reading…]


Capture a series of screenshots and create a movie

At my day job with Many Tricks, we recently updated our time tracking app Time Sink to version two, and an updated web page was part of the project. For the header area, I wanted to create a time-lapse movie showing the Time Sink Activity Report window changing over an extended period of time (90 minutes), but compressed into a short amount of real-world time (about 14 seconds).

Before the how-to, here's how the final project came out:

To create the time-lapse movie, I'd need a series of screenshots recorded at a fixed interval. I wanted to shoot only the content area of the report window, as I didn't need the "chrome" for the movie (it would just distract from the content). So using the built-in screenshot tool wouldn't work—I didn't want to have to crop 500+ images (even by script).

While I'm sure there are many utilities that can do this (and I'll see them shortly in the comments), a brief web search found nothing that was designed to capture areas of the screen at a set interval. Luckily for me, though, Keyboard Maestro has a screenshot action that can record an area of the screen, along with repeat and wait actions I could use to capture a series of stills.

[continue reading…]


Safari and the YouTube 4K video problem

When I posted my 787 takeoffs and landings video, I ran into a weird problem: When embedded here, the video would play in Safari at 4K (2160p), but when viewed on YouTube, the max resolution available was 1440p. After failing with web searches, I asked Twitter about it…

…but didn't hear anything back. I pretty much gave up on the issue until today, when I stumbled across this article, which describes the exact problem I'm having. The summary of the article describes both the problem and the apparent cause:

What appears to be Google's shift to the VP9 codec for delivering 4K video on the YouTube homepage is preventing Safari users from watching videos uploaded to the service since early December in full 4K resolution, but not from viewing webpage-embedded videos in the same resolution.

Bingo! Google seems to now be using the open and royalty-free VP9 codec for 4K videos viewed on its YouTube site, but reverts to the H264 codec when those same videos are embedded on other sites.

Note that this issue only affects videos uploaded after December 6, 2016:

Videos uploaded to the service prior to Dec. 6 in 4K resolution can still play back in full 4K resolution on Safari from the YouTube homepage.

I was curious about which macOS browsers this issue affects, so I thought I'd do a little experiment…

[continue reading…]


Easily insert special Mac characters using Keyboard Maestro

Note: I'm leaving this up for historical purposes, but there's a new special character palette in town, and the new one is vastly superior to this version. This hint might be useful for general Keyboard Maestro knowledge, but really, use the new version if you want a special character palette.

Between blog posts and documentation for Many Tricks, I find myself typing the Mac's "special character" symbols quite often: ⌘ (Command), ⌃ (Control), ⌥ (Option), ⇧ (Shift), and  (I think that's an Apple).

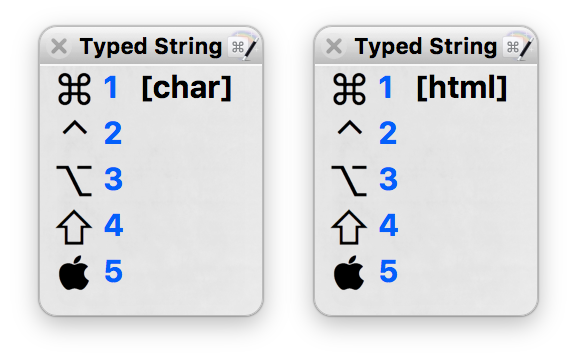
You can type some of these via keyboard shortcuts (the  is ⇧⌥K), or by using the Emoji & Symbols viewer. But I find both those methods clunky and slow; instead, I used Keyboard Maestro to create a couple of pop-up palettes that show all the characters:

I use two palettes because while I typically can paste the character itself, that doesn't work in some spots—like here in the WordPress' blog post editor, for instance. In those places, I need to use the HTML code for each character—so that cute little  appears when I insert . Ugh. Hence the character palette on the left and the HTML palette on the right.

When I want to insert a special character, I first type the activation keys for either the character (ccc) or HTML (hhh) palettes. When the palette appears, pressing one through five will insert the corresponding character or HTML code for that character. No keyboard shortcuts to memorize, no need to negotiate the Emoji & Symbols viewer. Just a few keystrokes, aided by a visual representation of each character, and I'm done.

As always, you can download these macros if you'd like to use/modify them for yourself.

[continue reading…]


An even easier way to use Excel’s Paste Special dialog

I recently explained how to use the keyboard in Excel's Paste Special dialog box, and this is a great timesaver on its own. But I use Paste Special a lot, especially with Formats, Formulas, and Values, so I made those three even easier to use via the keyboard…

Each one has its own direct keyboard shortcut, courtesy of Keyboard Maestro. Here's how I set it up; these instructions should work (with some changes, of course) for any app that can script keystrokes.

First, I created these macros in an Excel group, so they're only active when Excel is frontmost (no need to create global hot keys that you only use in one program). The actual macros are pretty trivial:

  1. Send Command-Control-V to bring up the Paste Special dialog
  2. Pause just long enough for the dialog to appear onscreen
  3. Send the chosen shortcut key—T, F, or V in my vase
  4. Send the Return key to execute the action

Then I just assigned each one to the same key used within the dialog, but with Command and Option to make it usable from anywhere within Excel.

[continue reading…]


Use the keyboard in Excel’s Paste Special dialog box

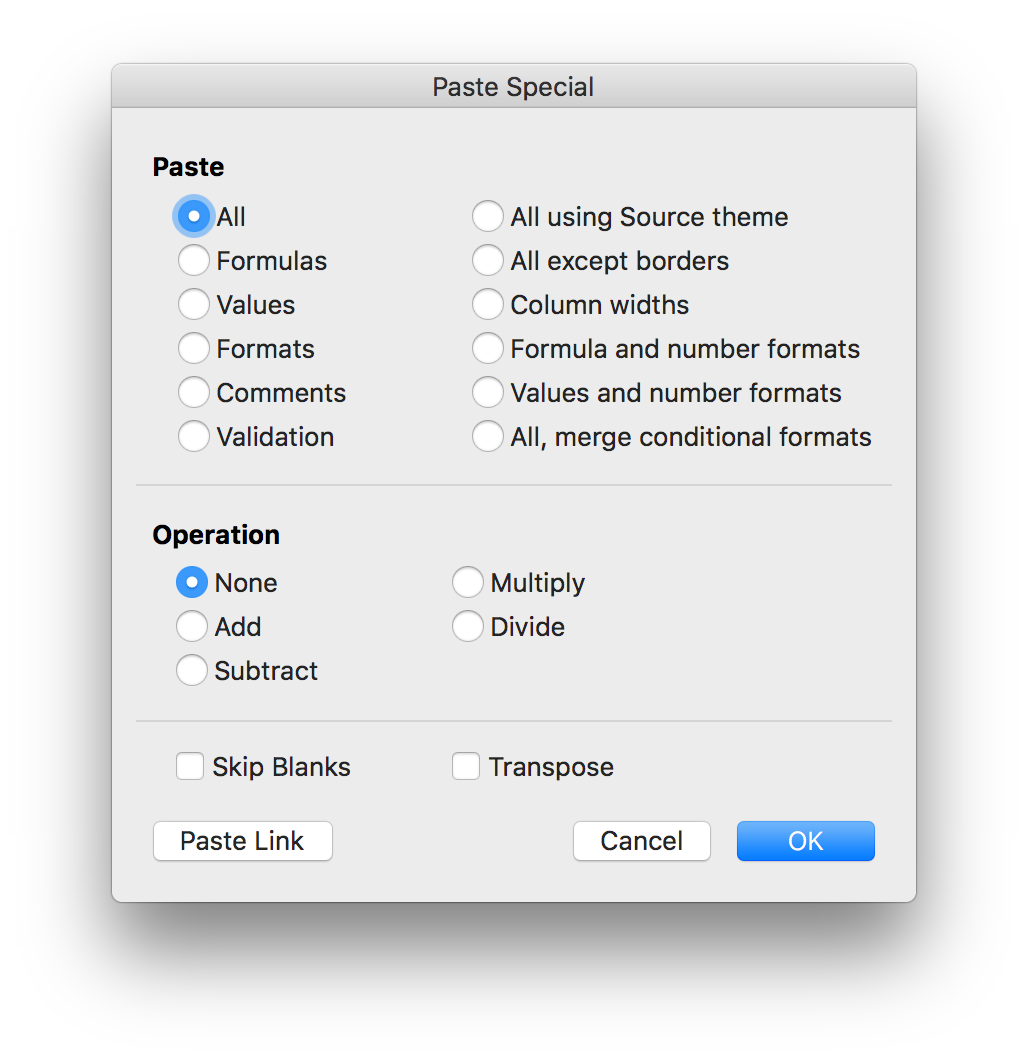
When I'm working in Excel, I spend a lot of time in the Paste Special dialog box—pasting formulas, pasting all but formats, pasting only formats, etc. You can call up the dialog with a keyboard shortcut (⌃⌘V), but it then looks like you're stuck using the mouse, because there aren't any keyboard shortcuts for the various actions. But really, there are…

(Note: This applies to the current version of Excel, i.e. the one in Office 365. Based on the comments, it apparently also works in Excel 2011 if you add the Command key.)

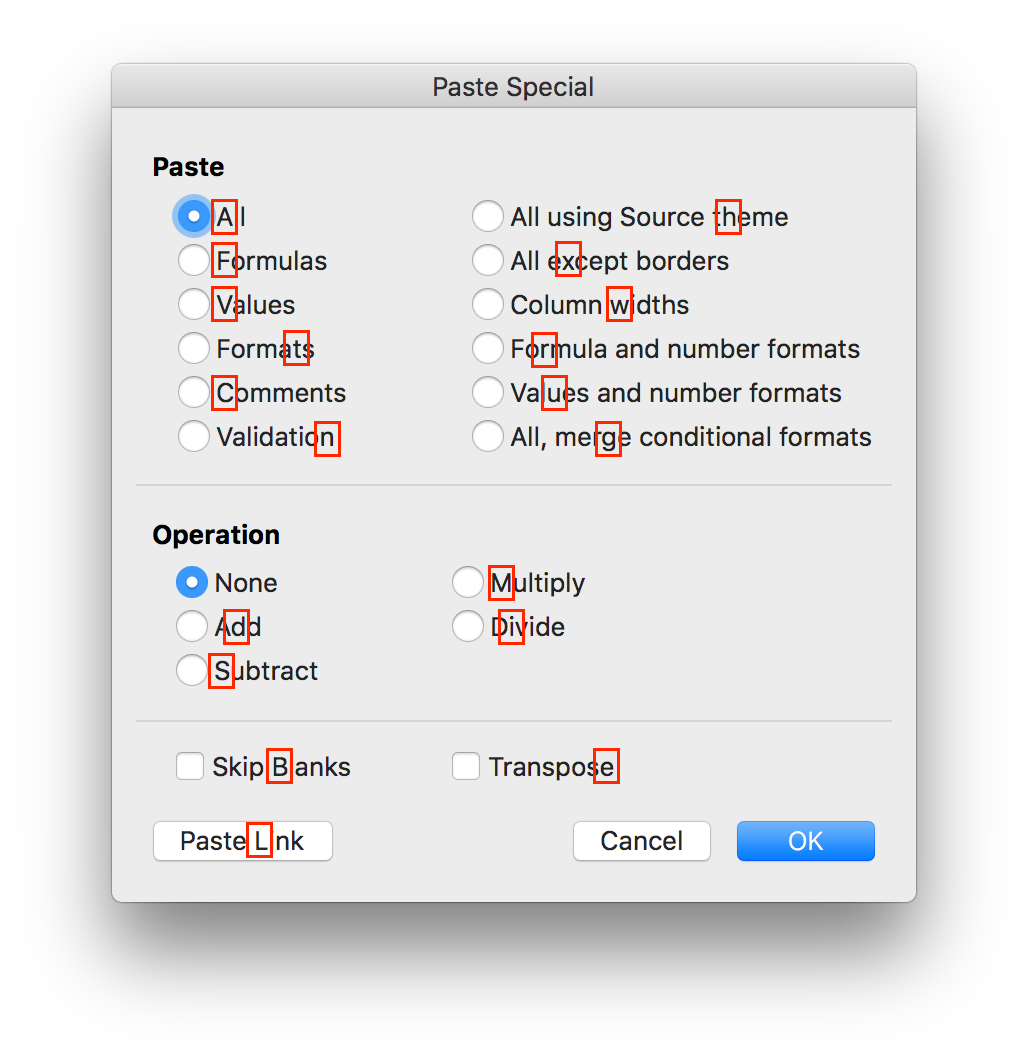
On Excel for Windows, one character in each option has an underline, indicating that option's keyboard shortcut. The good news is that these same shortcuts work on the Mac, even though they're not shown. (There is one apparent oversight: The O key should select Operation: None, but it doesn't seem to work on the Mac.)

Here are all the shortcuts, graphically:

Press the highlighted key, and that action will be selected; press Return to execute the chosen command, and you can use the Paste Special dialog without ever touching the mouse. (Note that the Paste Link action executes immediately when chosen, so it's a one-key operation.)

Because graphics are horrid for web searching, the text version of each shortcut, in alphabetical order, is shown below.

[continue reading…]


An alternative way to search Mail for senders and content

For better or worse—most might argue "worse"—I rely on the built-in macOS email client, annoyingly named Mail. (Why annoying? Try searching the web for help when you're having trouble with "Mail"…) I've tried nearly every third party replacement, but something (usually in the UI) always brings me back to Mail.

In any event, I have a huge database of messages that I've built up over the years, especially since starting at Many Tricks with Peter Maurer back in 2010. Often I want to find a message that's both from a particular person, and contains certain words. For example, I want to find all emails from Peter that contain the word "pricing."

The "correct" way to do this in Mail is to type From: in the search box, then start typing the name you want to match. As you type, a list of possible matches appears below the search box. Use the arrow keys (or reach for the mou…no, don't do that) to move down and select the right name from the list of matches, then press Return.

When you press Return with the desired name highlighted, the From: text in the search field turns into a token with the selected user's name, as seen at right. You can then continue typing the rest of your search terms; pricing in this case. Press Return again, and the search runs and returns the matches (17 messages in my example).
While this works fine, it's annoying and time consuming to interrupt the flow of typing a search by visually scanning a box, moving a selection, pressing Return, then starting to type again. So I thought I'd try the logical alternative—I just typed in my search query: from:peter maurer pricing. But this returned no matches.

On a lark, I tried reversing the order: pricing from:peter maurer.

Bingo! This works as expected, showing only messages from Peter that contain the word pricing. (Oddly, it finds two more matches than does the official method, and I cannot figure out why those messages are excluded from the other method's matches.)

[continue reading…]


Randomly merge lists in Excel

This morning, while working on a customer request, I had to create a list of words by randomly choosing words from two lists, and then mashing them together. This isn't something that I've ever done before, and I'm not sure how relevant it might be for others, but I'm documenting it here just in case someone is searching for such a solution.

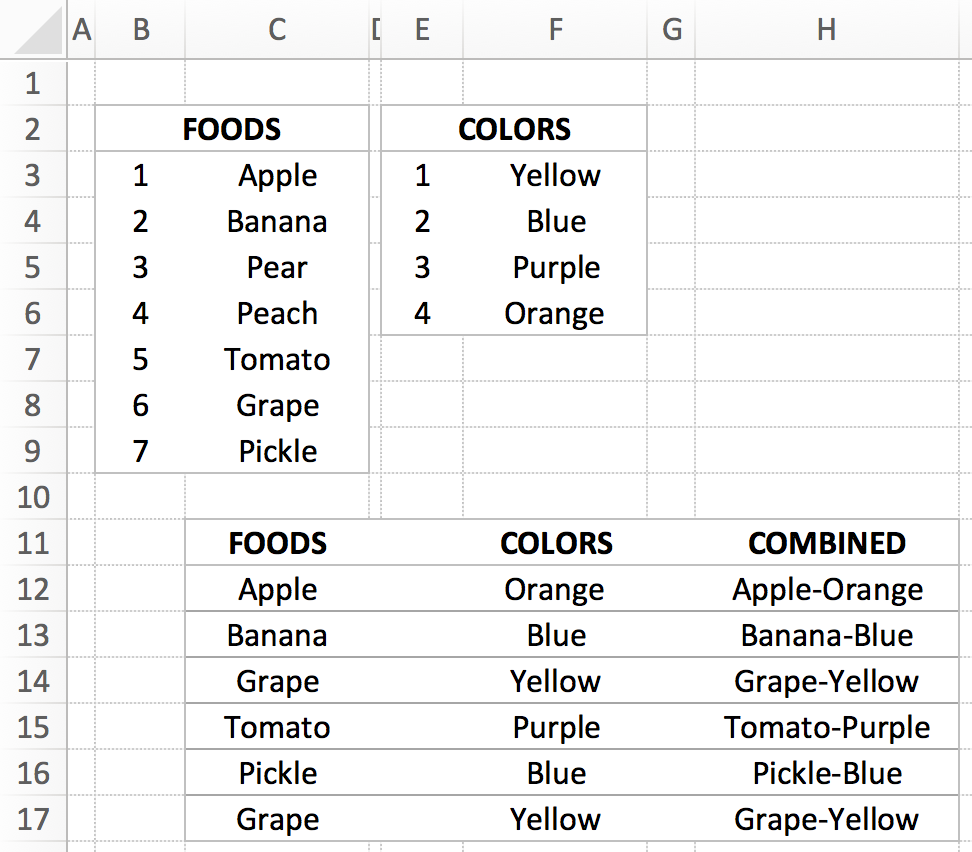
Here's how my little test spreadsheet looked when I was done with it:

I didn't realize it at the time, but this could be a "modern paint color" name generator…"Yes, I'd like two gallons of the Pickle-Purple, please." Anyway, the COMBINED column contains the final result, with the FOODS and COLORS columns showing randomly-selected entries from the two lists. Each time you recalculate the sheet, all the selections will change.

The key bit is the formula to grab a random entry from the list; here's what that looks like in cell C12 ("Apple"):

=VLOOKUP(RANDBETWEEN(B$3,B$9),B$3:C9,2)

It's just a basic VLOOKUP that uses RANDBETWEEN to grab a random row from the lookup table. Not rocket science, but nothing I'd tried before. (For this to work, your table entries need row numbers, obviously.) The COMBINED column is just a simple text formula, i.e. =C12&"-"&F12 to combine the two random values.

I also wasn't aware of the RANDBETWEEN function—it returns a whole number between the values you specify. That is so much easier than using RAND and then having to multiply and round off, etc.

Feel free to download the workbook if you'd like to take a look.


Put Unix path to selected Finder item on clipboard

Thanks to the commenters for pointing out the much easier way to do this: Select an item in Finder, then press Command-Option-C. All done. Leaving the hint here as an example of a Rube Goldberg machine.

In two recent geeky tips, I showed how you can open a Terminal window in the directory of the selected Finder item, and how you can view Unix man pages in Preview. To finish the trifecta of geekiness, today's tip lets you quickly place the Unix-style path to the selected Finder item on the clipboard. (It's actually a simplified version of the 'open this in Terminal' tip.)

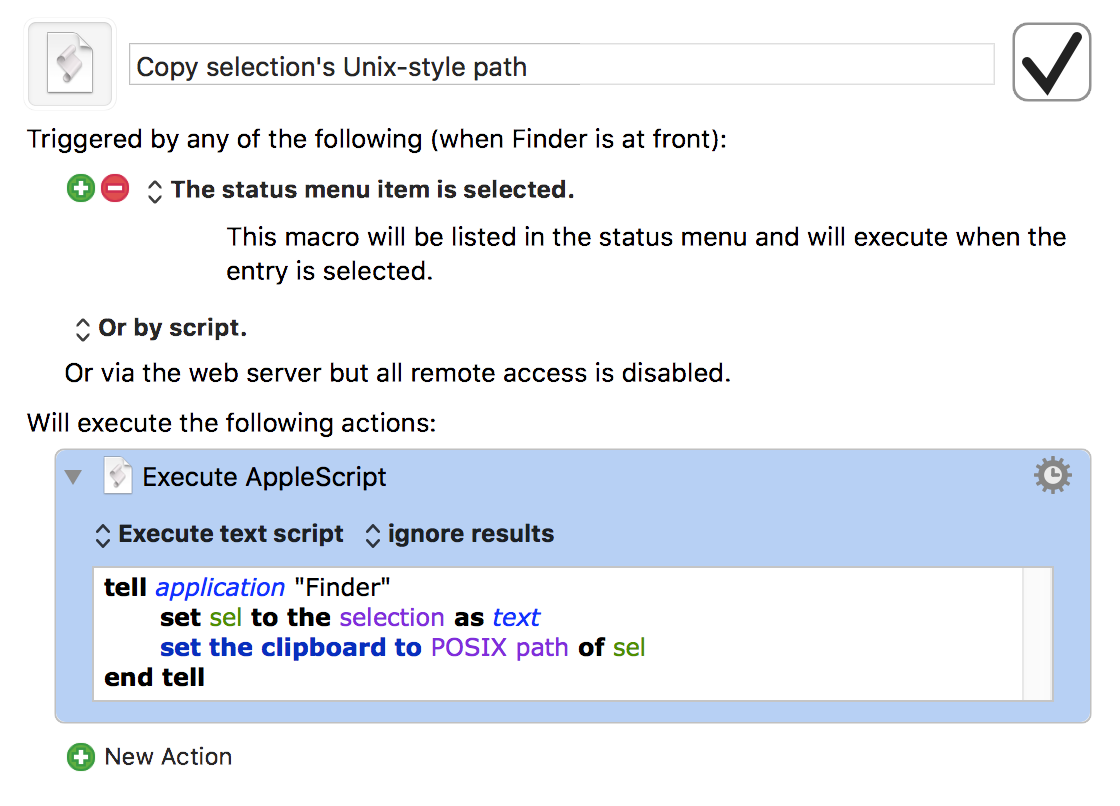
The AppleScript that accomplishes this is quite simple:

If you run that in Script Editor, you'll see that your clipboard contains the path to whatever you had selected in Finder. But running the AppleScript in ScriptEditor isn't a great timesaver. Instead, put it into whatever tool you have that can run AppleScripts via hot key or menu bar entry or whatever.

In my case, I put it into a super-simple Keyboard Maestro macro. I've set it up to show in the Keyboard Maestro menu bar when Finder is active:

There are countless tools that can run AppleScripts in various ways, including our own Butler, LaunchBar if you save the script first, etc.