Skip to content

macOS

macOS app: Test DNS servers with namebench

If you've got a speedy internet connection at home, but it seems slow, it's possible its' not the connection itself but the speed of your chosen DNS server.

To figure out if the DNS servers are part of the problem, check out namebench, a DNS server benchmarking app. namebench compares your existing DNS servers to a large list of other DNS servers, and shows you how they all perform.

When namebench launches, you'll see a window populated with your current DNS server addresses, and a few other settings you can modify:

Click Start, then go ahead and find something else to do for a while—the benchmarking process may take 15 minutes or more, depending on how many name servers it can see.

[continue reading…]


macOS app: BackupLoupe examines Time Machine backups

I'm somewhat paranoid about backups—I have many of them, both online and offline, onsite and offsite. I test my backups to make sure they're good. In short, I do my best to make sure a hardware failure or natural disaster won't take out my data.

My backup strategy includes Time Machine, mainly for recovering from "oh crud I didn't mean to delete that!" moments. We also use it, via a Time Capsule (RIP, sigh), to back up our laptops.

While I love how Time Machine works, I dislike that it doesn't tell you anything about a given backup other than how big it was. Enter BackupLoupe, a $10 "honorware" app. BackupLoupe examines your Time Machine backups and computes a "diff" for each one, letting you know exactly what was backed up in a given run:

Each backup is color coded—on the left of each backup's name, the color indicates the size of the backup, and on the right, the deviation of that size from the norm.

[continue reading…]


Transforming text via Keyboard Maestro

Recently, Melissa Holt wrote about transforming text via the Transformations menu. After seeing this article, a reader named Hunter wrote to me with this comment:

Today in The Mac Observer Melissa Holt wrote about using the TextEdit/ Edit/ Transformations command to change the case of a sentence or paragraph. However, there is no option to perform, "Sentence Case", i.e., capitalize the first letter of the first word, and keep all other words in lower case.

Is there a way in Terminal, or maybe Keyboard Maestro to add this option to Transformations? It seems to me that the given choices have rather limited uses.

In addition to not offering sentence case, the Transformations menu has a few other drawbacks:

  • Not all apps have a Transformations menu.
  • Only three very basic transformations (upper, lower, capitalize) are supported.
  • The transformations are buried in a sub-menu, requiring lots of mouse navigation to reach.

While I don't believe it's possible to modify the Transformations menu, it's pretty easy to use Keyboard Maestro to build a "Sentence Case" transformation…or more usefully, as seen at right, a palette with many more transformations. Unlike the Transformations menu, the Keyboard Maestro solution will work in any app where you can copy and paste text.

[continue reading…]


Create a workload for your CPUs

Over the weekend, I was testing how some of our apps work when the CPUs are busy. One way to load the CPUs is to rip a Blu-ray disc, but I was looking for a more controllable CPU load.

A quick search through the Mac OS X Hints archive (use this tip to search the site) found the answer from 15 years ago: Just say yes in Terminal to generate sizable CPU loads…

More specifically, use this command in Terminal:

yes > /dev/null &

If there's an award for strangest Unix utility, yes might just be the winner. All it does is output y (or whatever you list after the y; the man page suggests an expletive) until you kill the task.

The above command sends the output (via the > redirect) to the null device, which discards it. The ampersand sends the job to the background, so you get your Terminal prompt back.

You can run this command multiple times, each loading the CPU even more heavily (the screenshot shows three yes tasks running). Keep an eye on Activity Monitor to see just how much CPU it takes—as shown above, it does a great job at loading the CPU.

You can kill the tasks by issuing the command killall yes in Terminal, or by quitting Terminal—you'll be told that quitting will terminate the tasks.


How to make Sims 3 work in macOS Sierra

When we upgraded all our Macs to macOS Sierra, my daughter was upset because Sims 3 broke. After much scouring of the internet, I found the solution and tweeted about it:

It dawned on me, though, that if that forum post ever vanishes, I'll be in trouble with future new Macs and/or reinstalls, so I thought I'd document it here, too. Read no further unless you (or a family member) play Sims 3 and want to get it working in macOS Sierra. And really, try the linked forum post first; this is just a backup plan.

[continue reading…]


macOS App: OmniDiskSweeper

There are tons of "where's my disk space going?" apps out there—search the Mac App Store for "disk space," and you'll get pages of results. Many are of the newer graphical style, where you see a pie chart or square or some other graphical representation of your files.

I've tried a bunch of these tools over the years, both graphical and text-based, but I still keep coming back to an oldie-but-goodie—and it's free: Omni's OmniDiskSweeper has everything I want in a disk space usage tool. It's got an intuitive interface, and a way to either delete what I find or open the containing folder to take a closer look.

Perhaps it's because I'm a column-view Finder kind of person, but I love the columnar drill-down layout that OmniDiskSweeper uses. Select the drive you want to examine, then start drilling down into folders to see what's taking up all your space:

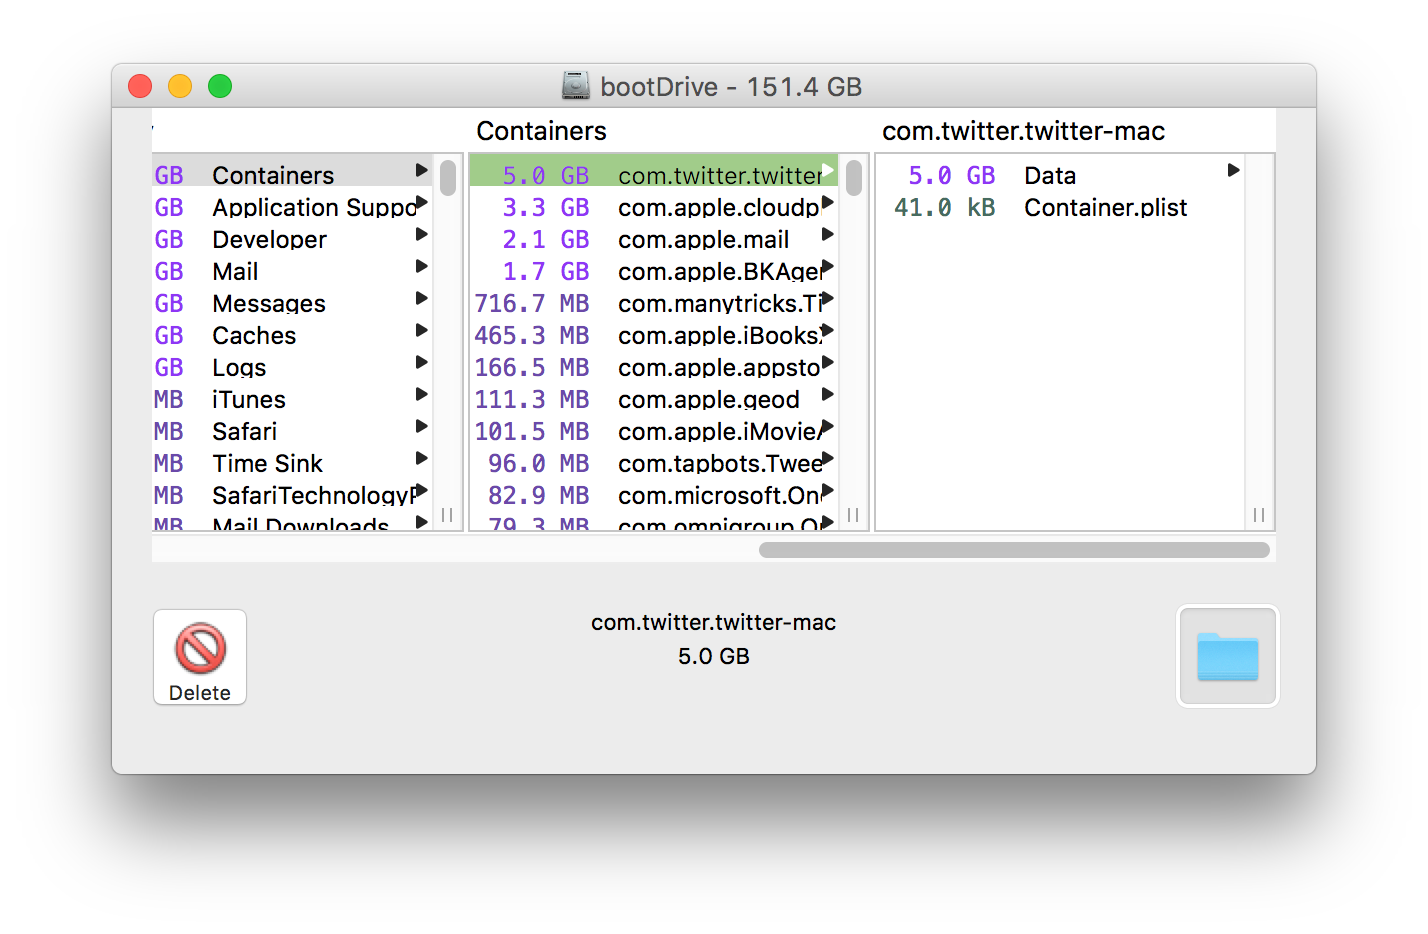
Oh look, five gigabytes of cached Twitter content. Just what I didn't need. This is where the bottom left button comes into play: Select an item, click that, and (after a warning), it's gone. This is not a "move to trash" operation, this is a destroy operation. Be very careful with it! This is why you'll see a warning before the delete proceeds, because there's no going back.

The folder icon on the bottom right is the one I usually use, though—it opens the chosen folder in Finder, where I can then manually remove the cruft.

If you're a more visual person, you probably won't like OmniDiskSweeper, because the layout is completely text-based and columnar. But for me, it's the perfect tool to manage the limited space on my iMac's boot SSD.


Create a pop-up web search tool using Keyboard Maestro

My original Keyboard Maestro special character palette (which has been replaced by a much better version), used the Conflict Palette to display a window from which you could pick the special characters.

While this turned out to not be ideal for the special character palette (no way to pick more than one at a time), the Conflict Palette is ideal for many other tasks.

I use the one at right to search a number of web sites—activate the palette with ⌃⌥L then press a, for instance, type a query, press Return, and my browser loads with search results from my old macosxhints.com site.

Feel free to download my macro if you'd like to use/modify it.

I use a couple additional palettes—one for retrieving iTunes' artwork and searching the store, and the other for inserting commonly-used bits of code while writing help files in Coda for the Many Tricks' apps.

Here's how the web search palette looks in use; I love being able to search a specific site from anywhere without first switching to my browser. And because I have Keyboard Maestro syncing its macros, I can do this from any Mac I own.

The advantage of using the Conflict Palette for these web searches is that I need only remember one shortcut, not 11 different ones, and the palette is a nice visual reminder of which service I wanted to search.

[continue reading…]


Start Terminal sessions with a possibly-witty quote

Really long-time Unix users—as in mainframe-based Unix—are probably familiar with fortune. This silly little program grabs a random line from a collection of files holding quotes, sayings, jokes, etc. The Unix I used many decades ago would print an entry from fortune each time you started a new session. Here are some examples of what might greet me each time…

"It's a dog-eat-dog world out there, and I'm wearing Milkbone underware."
-- Norm, from _Cheers_

Mobius strippers never show you their back side.

All constants are variables.

Years ago, I had set up my Mac's Terminal to output a fortune each time I opened a new session (window). At some point, though, I forgot to set it up on a new system, so it was gone. While fortune isn't included in macOS' Unix core by default, there are many ways to get it back, and it's relatively simple to do so. Here's one way…

[continue reading…]


A much-improved special character palette

A while back, I created a pop-up character palette using Keyboard Maestro to allow easy insertion of the Mac's special characters (like , ⌘, ⌥, etc.). While this worked fine, I discovered a few major shortcomings:

  • I couldn't create more than one character without calling up the palette again.
  • I had to decide in advance if I wanted HTML entities or the actual characters.
  • Two palettes (HTML or character) meant two keyboard shortcuts to remember.
  • Adding characters to the palette was a real pain, because they had to be done twice.
  • I was out of digits for shortcuts, so I was going to have to change the palette structure.
  • It was slow: From calling up the palette to identifying which icon I wanted to use to selecting that icon, and then doing it all again for a second character was just really slow.

I set out to fix all of these issues, thinking I could use Keyboard Maestro's Custom HTML Prompt action, as I did for my iTunes song info window. And, in the end, that's what I used for the new-and-improved character palette:

This doesn't have to be used just for Mac special characters, of course. You could make yourself a customized pop-up for emoji, math symbols, whatever…

Read on for the how-to and download, if you'd like to put this to use…

[continue reading…]


Easily create animated GIFs from video via ffmpeg

I recently explained how I captured a series of screenshots and turned them into a movie. While I was working on my tweet about the write-up, I thought an animated GIF of the final movie would be a nice way to show what it was I was trying to do. So that's what I wound up doing:

So how did I create the animated GIF from the movie file? I know there are any number of great apps that will do this (ScreenFlow, for one), but I had another thought: While working on the animated screenshot movie (which I created using ffmpeg), I had happened to read about ffmpeg's ability to create high quality animated GIFs, so I thought I'd give that a try.

[continue reading…]