Skip to content

Mac OS X Hints

Span one large image across multiple printed pages

I was looking for a way to print a large image across multiple pages, so I could make my own do-it-yourself poster-size printout. By way of background, I wanted to print a huge virtual fire, to cover a piece of insulation we put in front of a drafty fireplace in the winter. (We don't like to burn wood, so the fireplace goes unused, but staring at a piece of shiny foam insulation all winter isn't all that interesting.)

Conceptually, this seemed pretty easy: find a huge image, open it in some app that handles images, and print. What I found is that doesn't work, at least not in the apps I had at hand (Acorn and Preview). After some web searching, I stumbled across an odd but effective solution: use Excel.

Open a new blank Excel workbook, then select Insert > Photo > Picture From File, and select your massive image. Now when you hit Print, you'll see the output spans multiple pages. I used Page Setup to select a borderless US Letter size, and printed out 16 pages of a roaring fire.

After some cut-and-tape operation, the drafty fireplace's insulation became more visually appealing:

Note that this was a "proof of concept" operation, so I printed in draft mode (hence the vertical striping on the printout) and wasn't overly careful about lining up the pages. I had originally planned to print the final version on glossy photo paper, but instead opted to buy a 36x48 poster-size printout from an online vendor. (I haven't yet received the print, but when I do, I'll post about its quality. Until then, though, I don't want to link to the vendor, as I don't yet know what I've bought.)

I knew Excel could do a lot, but I never thought to try it for printing huge images across multiple pages.


Encrypt files then backup to a cloud service via script

Most cloud services tell you that their data stores are safe, that your data is encrypted in transit and on their drives, that employees don't have access, etc. For the vast majority of the stuff I store in the cloud, this is more than good enough for me—the data isn't overly sensitive, and if someone were to hack their way in, all they'd get are a bunch of work and personal writing files and some family photos.

For other files—primarily financial and family related—those assurances just aren't enough for me. But I still want the flexibility and security that comes from having a copy of these files in the cloud. So what's a paranoid user to do to take advantage of the cloud, with added security, but with a minimum of hassle?

The solution I came up with involves using local encrypted disk images and a shell script. Using this script (and some means of scheduling it), you can automatically encrypt and back up whatever files you like to a cloud service.

[continue reading…]


RIP Mac OS X Hints, Nov 4 2000 – Nov 4 2014

Note: The following is my unofficial eulogy for Mac OS X Hints; IDG has not announced any plans regarding the site, though I would hope they'll leave it online, even if no new hints appear in the future. The site is now officially in read-only mode; there will be no new hints. So it's officially comatose, at least.

Dearly beloved…

On this, the occasion of its 14th birthday, we're gathered here to mark the passing of Mac OS X Hints.

While it can be hard to tell exactly when a web site has died, the signs are fairly obvious. It's been over 45 days since the last new hint appeared on the site. There is no way for new users to sign up for an account. There's been one new comment posted in the last two days. A sidebar box proudly proclaims Latest Mountain Lion Hints. The site design, logo, and icons were last updated when I worked for Macworld, over four years ago. To paraphrase a Star Trek character, "it's dead, Jim."

To be fair, it's a bit more Monty Python "I'm not dead!" than officially dead, but really, the site is a dead man walking. Now that I'm done with movie analogies, let me explain why the passing of Mac OS X Hints isn't a bad thing. (Note that Mac OS X Hints' passing is in no way a reflection of its management by Macworld. In fact, the opposite is true: I believe the site would have ceased to exist years ago without their involvement.)

The simple truth is that the need for OS X hints has tapered off to near zero over the last 14 years. And that's a good thing.

[continue reading…]


Mac OS X Hints turns 14

Fourteen years ago today, I launched Mac OS X Hints, with this simple post. The Mac OS X 10.0 Public Beta was only a couple months old, and many Mac users (myself included) were feeling lost in the land of Unix and Terminal. (Despite anything Apple said at the time, Terminal was very much a required aspect of using Mac OS X in those early days!)

Related post: RIP Mac OS X Hints, Nov 4 2000 - Nov 4 2014

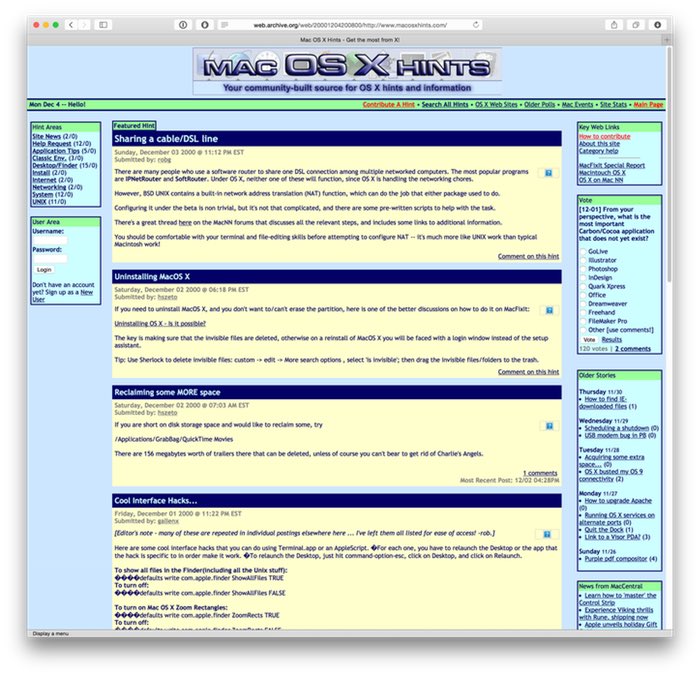
At the time of launch, I knew nothing about content management systems or PHP; I knew enough HTML to be dangerous, and very little about anything else—including design, as you can see from the image at right.

That image, courtesy of the Internet Archive's Wayback Machine, was taken one month after launch. Could it be any brighter and uglier? Probably not. While I did many things wrong during that launch, I did get a few things right…

  • The site was all about the community; it was my intent from day one that it would be a users helping users site, not a "me telling the world what to do" site.
  • The content management system I chose, Geeklog, has proven to be very long lived—fourteen years on, and it's still what powers the site. In all that time, we had (I believe) exactly one hacking incident. Not bad.
  • The site had a laser focus on hints; I'd do a pick of the week, but outside of that, it was all about the hints.

So despite my poor design and lack of PHP skills, the site flourished. So much so that Macworld purchased the site and hired me in June of 2005. I spent nearly five years with Macworld, before leaving in 2010 to join Many Tricks.

In looking back, never in my wildest dreams did I imagine the site would flourish to the point where it would actually change my career. But it did, and for that, I'm eternally thankful to everyone who helped make macosxhints.com what it was. So happy birthday, Mac OS X Hints!


Yosemite: An alternative zoom-to-fit action

As you're probably aware, Apple changed the functionality of a green button click in Yosemite: it not longer "zooms to fit" (which could have different behaviors per app), but instead it enters Full Screen mode (if the app has one; otherwise, it does zoom to fit). If you want zoom-to-click, you can option-click the green button; there's no apparent way to toggle these two functionalities.

But today, I discovered a second zoom-to-fit shortcut: double-click the window's title bar. This is easier to do, as you don't have to hit the small green button target; just get the mouse anywhere in the title bar, and double-click.

Note that this won't work if you have "Double-click a window's title bar to minimize" enabled in the Dock System Preferences panel.


Yosemite: Tweaking Safari’s URL bar settings

Safari in Yosemite is a familiar yet new beast. Among the interface changes, I really didn't like the way the URL bar behaved. In particular, these things bugged me:

  1. Not being able to see the full URL.
  2. The width of the URL entry box.
  3. The drop-down that appears when you click in the URL bar (when you have a page loaded).

Thankfully, the fixes for these three issues are easy, if not completely obvious.

Full URL not visible in URL bar

By default, Safari truncates URL to just the base "dot" address, regardless of where you are on a site. So if you're reading my hint about using a dark Dock, Safari's URL bar will display this:

https://robservatory.com

But you're really on this page:

https://robservatory.com/yosemite-dark-dock-and-app-switcher-with-light-menu-bar/

If you prefer knowing where you are in the site hierarchy at all times, the fix is simple. Open Safari's Preferences, go to Advanced, and add a checkmark next to "Show full website address."

The URL box will now show the full URL of the page you're viewing. Of course, that will lead to a second problem—the URL box isn't large enough to display much of the extended URL. Thankfully, that too is an easy fix.

[continue reading…]


Yosemite: Dark Dock and App Switcher with light menu bar

High Sierra update: This trick no longer works in High Sierra. As far as I know, there is no workaround.

Here's my first (only?) Yosemite hint, courtesy of my Many Tricks partner, Peter Maurer. Peter wanted a light menu bar, but preferred the contrast given to application icons in the dark Dock—like this:

Here's how to achieve that effect.

  1. Open Terminal, then copy/paste this and press Return: defaults write NSGlobalDomain AppleInterfaceStyle Dark
  2. Paste or type killall Dock and press Return. The Dock will relaunch in its dark mode.
  3. Copy/paste this and press Return: defaults remove NSGlobalDomain AppleInterfaceStyle

The first step sets dark mode, step two restarts the Dock to switch it to dark mode, and step three turns off dark mode—but the Dock won't notice, and will remain in its dark state (until it's next restarted, which isn't often). Because the Command-Tab switcher is associated with the Dock, it will also be dark.

If you're going to script this, you'll want to insert a delay between the second and third steps, so that the Dock can finish launching before you disable dark mode. Neat trick!


Goodbye cron task, hello launchd agent

On April 29th, 2005, Apple launched Mac OS X 10.4, aka Tiger. With Tiger came launchd, a new Unix-side job scheduling tool. launchd was intended to replace cron, the long-established (and quite cryptic) tool for such tasks.

And now, a mere nine-plus years later, I decided it was time to give up cron and move to launchd myself. Mr. Bleeding Edge, that's me! (Note: Unless you enjoy the Unix side of OS X and currently use cron to schedule tasks, this article won't be of much interest to you.)

Why now, after so long as a holdout? Primarily because I kept running into issues with cron tasks that needed to do things as "authorized me," such as mounting an encrypted disk image, or even just mounting a network share. Or my Mac would be asleep for a scheduled cron task, and it therefore wouldn't run. (launchd will queue any missed tasks to execute when the Mac reawakens.) Finally, my cron file was getting huge and unwieldy, and making simple changes was fraught with danger of breaking something.

So I dedicated a portion of a recent weekend to figuring out launchd, and migrating my cron tasks to this brave no-longer-at-all-new world. If you're still hanging on to cron, read on to see what I've learned about launchd—maybe it'll inspire you to move, too (or not).

[continue reading…]


A nasty little iTunes/iOS bug may be causing media sync issues

November 18th update: My sync issues returned, but due to a different cause this time. Details in this post.

After complaining to Tim Cook, and separately starting a (now closed) support ticket, it appears that my iOS/iTunes sync nightmare has finally come to an end!

I have not seen a progress bar that busy since the day I brought my iPhone 6 back home. Whatever I tried, iTunes simply would not sync everything in my library. In the end, the problem turned out to be as simple—but as deadly—as this:

In the current version of iTunes/iOS, there's a bug that only appears when you have duplicates of purchased songs. When encountered, a duplicate of a purchased song will (almost always) cause iTunes to silently stop syncing.

This is a known-to-Apple issue, and it will be fixed in a forthcoming update. I'm fairly certain it's an iTunes bug, but as Apple didn't clearly state which it was, I'm calling it iTunes/iOS. Either way, until it's fixed, it's a really bad bug.

Here's what happens: If you have duplicates of purchased songs, iTunes simply silently stops syncing when it hits one of those duplicates. From your perspective, it will look like everything is working—iTunes never throws an error, and it proceeds through all six (or seven or whatever) steps of the sync process, as seen in the status window of iTunes.

But behind the scenes, nothing is happening—at least, nothing relative to syncing your files. As seen by my troubles, this can be incredibly frustrating and hard to fix.

Continue reading to see how I was able to finally (with Apple's help) get my devices syncing again—the tricky part is finding all the duplicates, because they're not all obvious. Also note that if you are not having sync issues, I wouldn't worry about duplicates—no need to endanger what's already working well!

[continue reading…]


Silently mute the mic input via AppleScript

Note: The scripts in this hint don't truly mute the mic input; they drop its volume to zero. That's because there's no way to mute an input source via AppleScript (while you can mute an output source). At zero level, the mic will still pick up sounds, but they're very quiet.

Thanks to John Welch, though, you can download an app that will mute the mic with a simple one-click HUD—he posted it in the first comment here, but that download link is broken. Instead, download it via this link, and you should be good to go.

While recording our weekly podcast, The Committed, I often want to mute the microphone input for one reason or another. (Yes, my microphone has a big Mute button on it, but pressing it results in an audible CLICK in the recording.)

There are any number of ways to do this quietly, including just sliding the level down in the Sound System Preferences panel (though it's hard to then get it back to exactly the right spot). There are also any number of App Store apps that will do this for you; some are free, some are paid. And doing it programmatically yourself is as easy as two one-line AppleScripts:

Save those separately, assign keyboard shortcuts (or more quietly, trackpad gestures) using your favorite third-party tool, and you're done.

But I wanted something more. I wanted one script to mute and unmute the volume. I also wanted a visual reminder when I was muted. After an afternoon of slogging around the internet, looking up obscure AppleScript command syntax, and diving into Sal Soghoian's AppleScript 1-2-3 book, I came up with something that seems to work. This short video shows one version of it in action:

Read on for the code and a how-to on putting it to use.

[continue reading…]