Skip to content

How to upgrade a web host’s command-line PHP

The following is a very geeky, very niche1Where 'niche' is defined as 'of interest to maybe one person' tip, and I'm only documenting it here because it took me a while to figure it out, and I'd like to not have to go through that again if the need arises.

This site, and a few other personal projects, are hosted at Ionos, with whom I've been generally happy. On the web/GUI side, Ionos makes it really easy to control which version of PHP is used on your sites.

But I also have command line access to my server there, and I ran into an issue trying to run a PHP script (to upgrade another site). It threw an error, so I thought I'd check which version of PHP was in use…

$ which php
/usr/bin/php
$ /usr/bin/php --version
PHP 4.4.9 (cgi-fcgi) (built: Aug 29 2019 12:59:15)
Copyright (c) 1997-2008 The PHP Group
Zend Engine v1.3.0, Copyright (c) 1998-2004 Zend Technologies

PHP 4.4.9 was discontinued in 2008—no wonder the script threw an error!

[continue reading…]


Taking it back to the matte

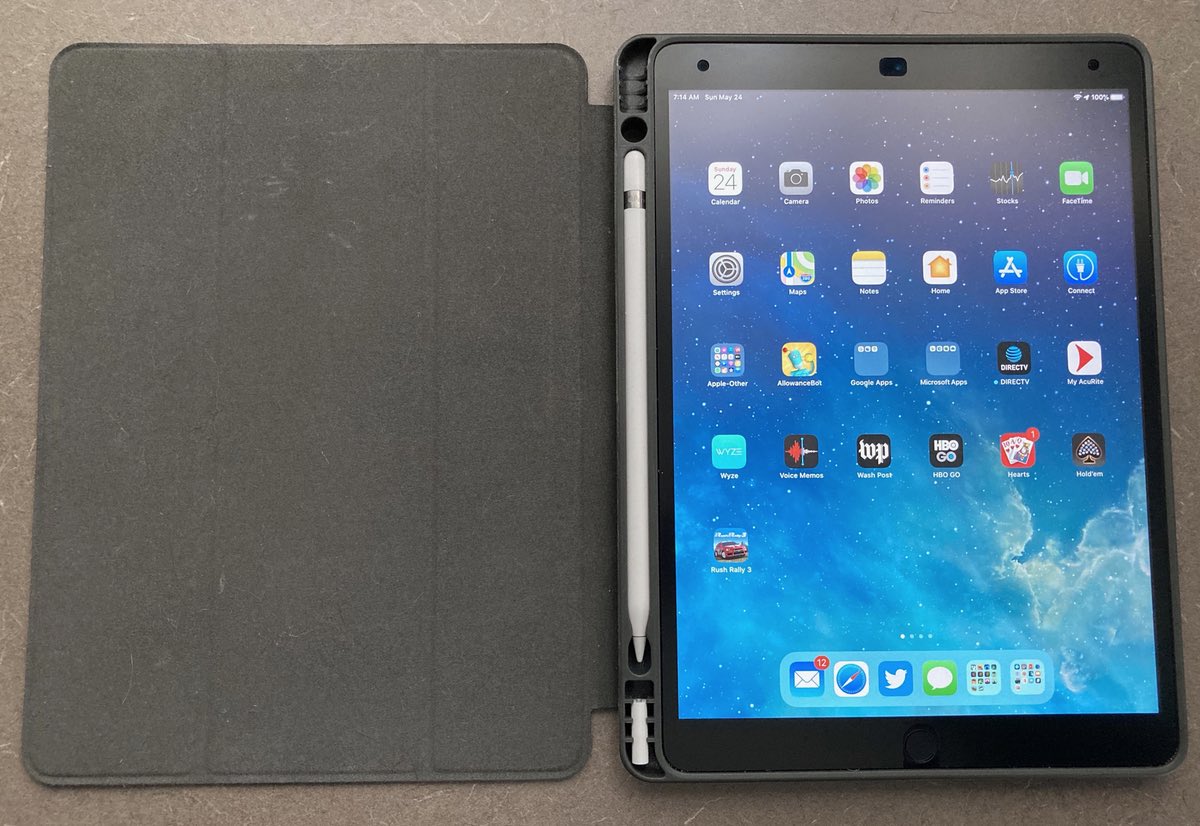
Many many years ago, Apple made glorious laptops with matte screens. Sadly (for me, at least), these gave way to brighter, shinier, and much more reflective glossy displays. These same glossy screens are found on iOS devices as well, including my new iPad Air.

But on iOS devices, glossy screens are even more annoying than they are on laptops, because of fingerprints. It sometimes seems I spend almost as much time cleaning my iPad as I do using my iPad. But what if there were a product that could solve both the glossy issue and the fingerprint issue?

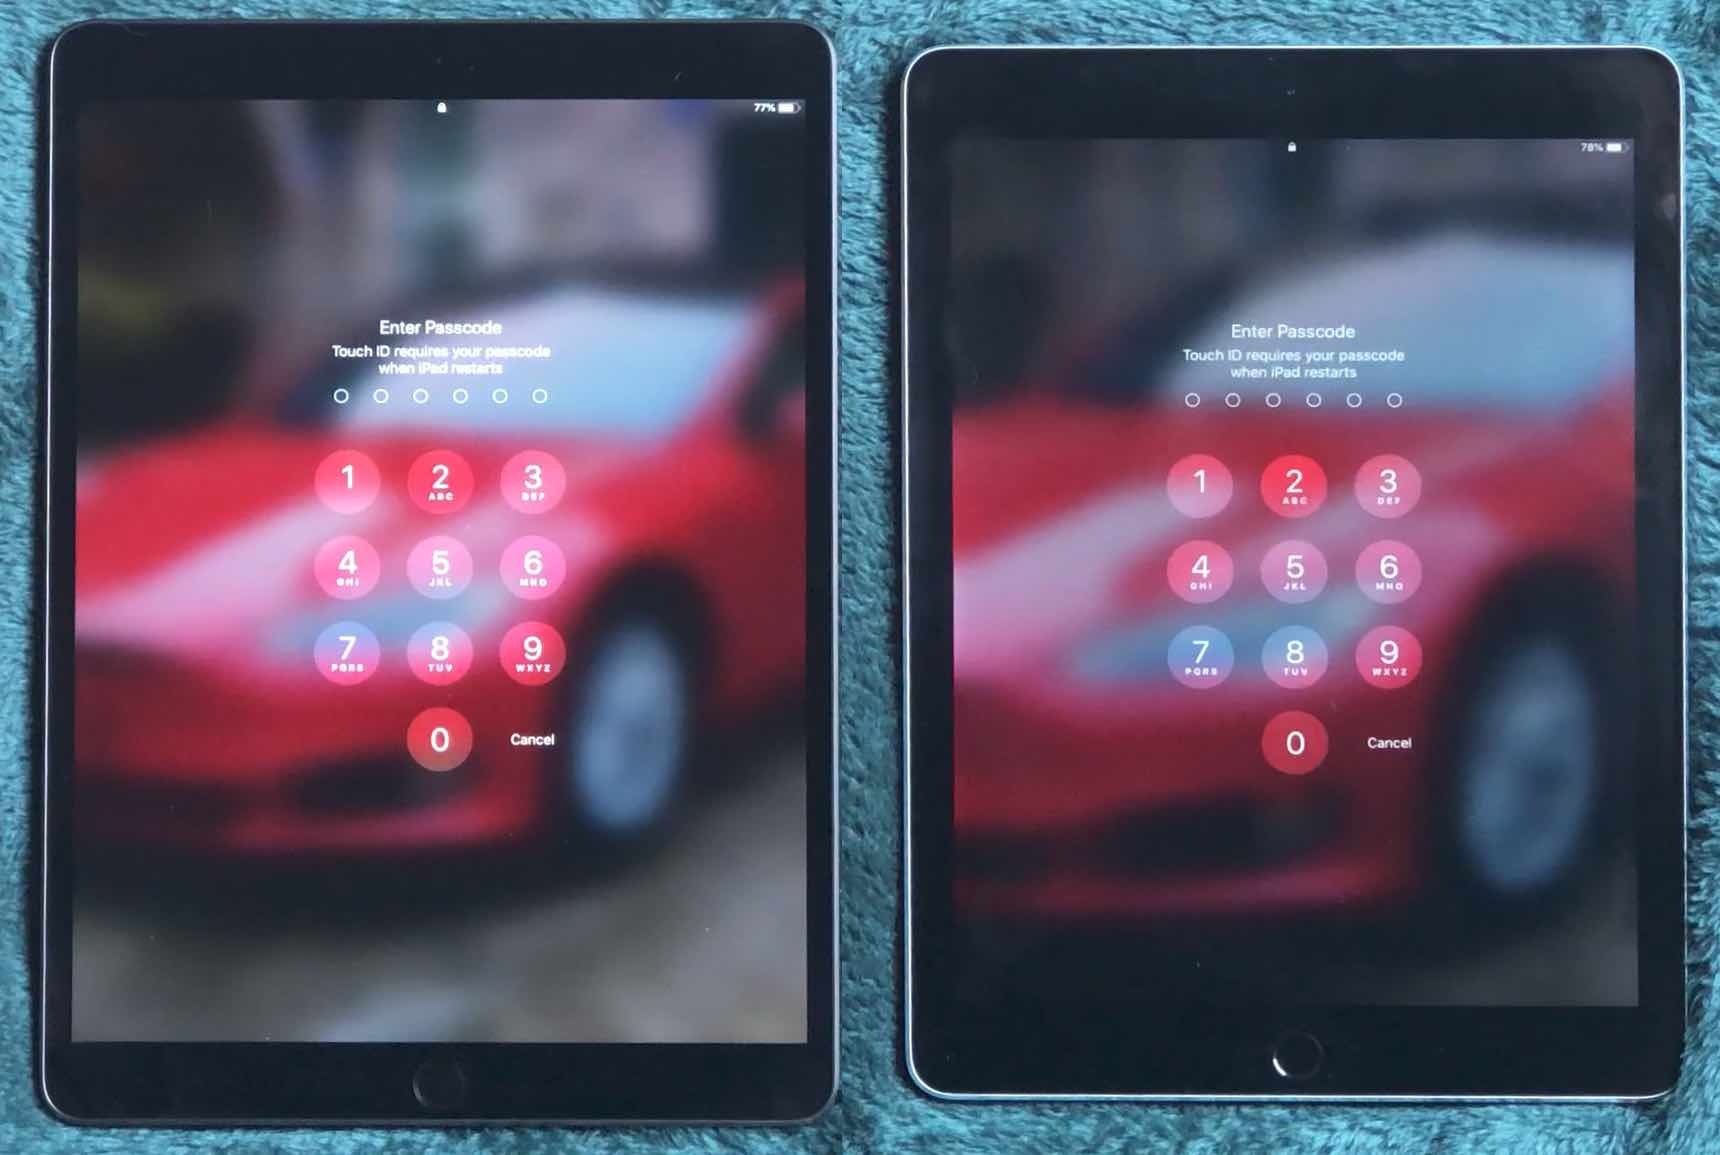
A friend of mine clued me in to just such a thing…the Moshi iVisor iPad screen protector. (The full line, including iVisor for iPhones, is also available via Amazon.) While I don't have two iPads for comparison sake, here's how my iPad now looks against an uncovered iPad mini:

Obviously, there's a lot less glare on the covered iPad, which I love—it's still not ideal with bright overhead lights, but it's a whole lot more usable.

But what about installation, use with the pencil, fingerprints, and the brightness of the screen under the cover?

[continue reading…]


Send URLs to a video download app via Automator

When I find things I enjoy watching on YouTube, sometimes I want to download them—because they may go away, or I may want to watch offline. There are any number of tools out there that will do this for you, including web sites and Mac-specific apps. On the Mac side, I had been using 4K Video Downloader, but recently found VIDL, which had one big advantage for me: It comes with a Safari toolbar icon.

When I see a video I want to keep, I click the VIDL toolbar button, and VIDL launches and downloads the video. (Because it's based on the open source youtube-dl, VIDL supports a lot more sites than does 4K Video Downloader, which is also nice.)

But recently, I noticed that some of the videos I downloaded with VIDL were at 640x360 resolution, even though the source on YouTube was at least 1920x1080. I tried those same URLs in 4K Video Downloader, and I was able to download the full HD versions. There aren't many settings in VIDL, so I didn't see any obvious way to force it to get higher resolution versions1youtube-dl is supposed to get the highest-resolution version automatically, so I switched back to 4K Video Downloader…but I really missed the handy toolbar button.

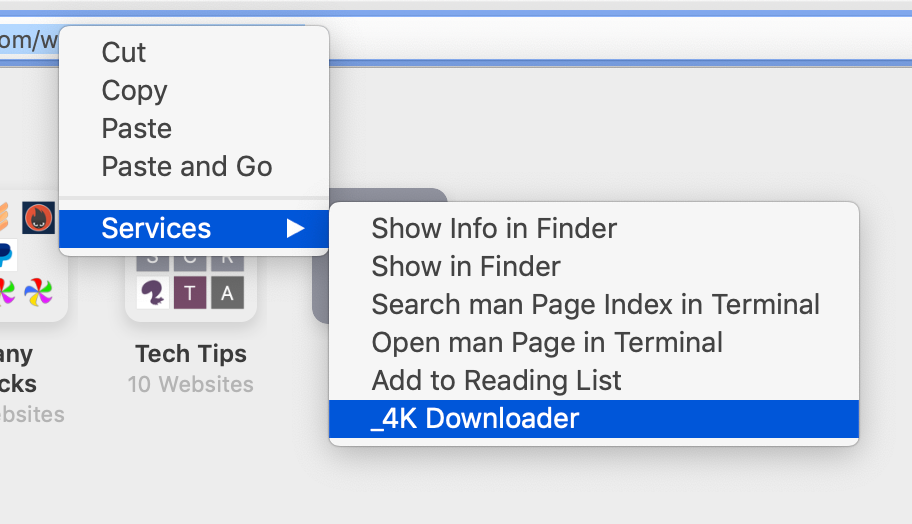
It's not like it was a lot of work to copy a URL, switch to 4K Video Downloader, and paste, but it was just enough work to get annoying. If I had the skills, writing a basic extension like this for Safari should be pretty simple. But as I don't have the skills, I went looking for another solution, and I found one using Automator:

I created a new Service in Automator that sends URLs to 4K Video Downloader via the contextual menu in Safari's URL bar.

[continue reading…]


Living the bifurcated life in macOS Catalina

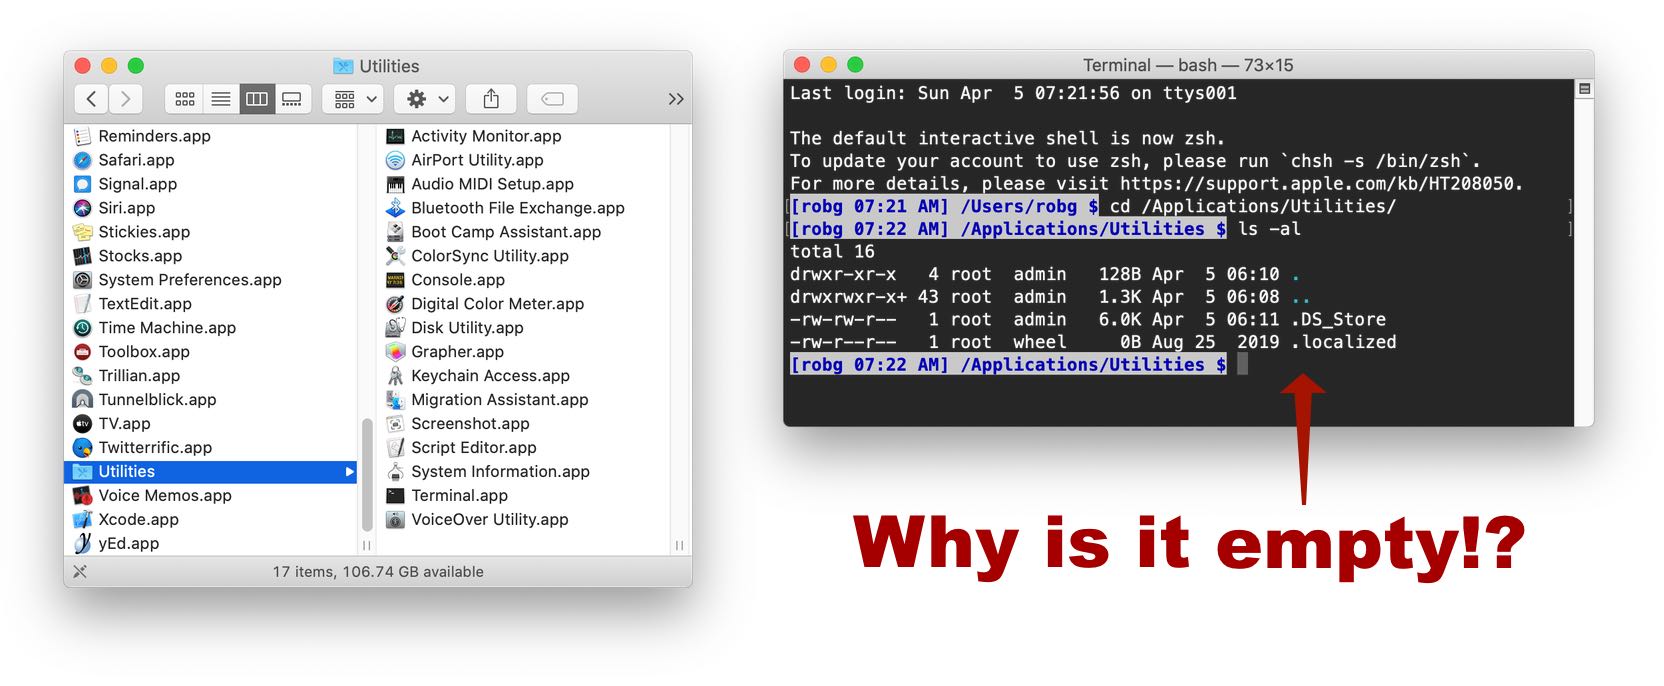
If you're a macOS Catalina user, and a user of Terminal for various tasks, you might be surprised at how some things work—or rather, don't work, in Catalina. As a first example, consider the Utilities folder…on the left is how it appears in Finder, and on the right, the contents of that same folder listed in Terminal:

While Finder shows a full Utilities folder, Terminal shows it as empty. Why? If you're somewhat familiar with the technical side of macOS Catalina, you probably know the answer: Apple has separated much of the OS and placed it on a read-only volume.

Apple's "About the read-only system volume in macOS Catalina" page explains things fairly well—basically, what you see as one Utilities folder in Finder is really two things: A read-only Utilities folder, and a user-writable Utilities folder. (If my machine had any user-installed apps in the Utilities folder, they would have shown up in the Terminal output above.)

[continue reading…]


An unfair fight? New iPad Air versus 2016 iPad Pro

At the end of March 2016, I purchased one of the newly-introduced 9.7" iPad Pros—a Gray 128GB Wi-Fi only version, to be exact. And until Friday, that was the last full-size iPad I bought for my personal use. (I did buy an iPad mini at the end of 2017, mainly as a test device for new iOS releases.)

However, early last week I decided it was time to upgrade, and after comparing a few models, I chose the iPad Air—Space Gray, 256GB, WiFi only for $649. I didn't really need 256GB of storage, but Apple, of course, only offers the Air in 64GB or 256GB capacities—and as I had about 110GB of stuff on my old iPad, I had to get the 256GB model.

Physically, they two iPads are nearly identical—despite the iPad Air's much larger display area, it's only 0.4" taller and 0.2" wider than the old Pro (they're both .24" thick), and it weighs but 0.6 ounces more.

As I had a Pro before, why didn't I buy a Pro this time, too?

I mainly use my iPad for games, watching movies or listening to music, using the internet, reading books, and sending the occasional email. As an iPad will never be my primary work machine, I didn't feel it necessary to pay the extra $2502An iPad Pro 11" with 256GB and WiFi is $899 for an iPad Pro. (And by choosing the Air, I still don't own an Apple device with Face ID.)

[continue reading…]


How to securely hide worksheet(s) in an Excel workbook

Important note: Please see the comments—the method I discuss here is secure from casual users. However, the Excel files are just zipped XML files, so it's possible to unzip them and open them with a text editor. When I tested with my dummy salary worksheet, I could see individual salary values, but no actual text—so there wasn't any way to associate a salary with a person. Still, the following should be considered as only a semi-safe solution.

My wife wants to create a budget spreadsheet for the various departments in her company to use. Each department would have their own tab, showing their planned yearly budget by month for the coming year. A super-simplified and unrealistic input worksheet might look like this:

The green areas are the portions that the users would fill out—probably not the department heads, but just someone in the department. Which leads to the problem: There's a worksheet called Salary Info that's used to populate the Salaries line in the workbook. (In my silly example, I just divided the total salary into four equal quarters.)

The problem is that the Salary Info worksheet contains salary information for the entire organization, and this isn't information that should be shared with everyone.The Salary Info sheet might reveal, for instance, that a coworker is leaving in three months—the coworker has told management, but the employee isn't ready to tell the entire company just yet.

So how can you distribute the workbook to all the departments, with the salary info intact, but without revealing that data to everyone?

[continue reading…]


When a light drone is the right drone

Many years ago, I had a big, spendy drone—the DJI Phantom 2 Vision +. This was a monster of a drone, measuring over a foot along the diagonal between the motors, and probably just under a foot in height—this image gives a good sense of the size of the thing:

It was also heavy, weighing in at 2.7 pounds (1.2 kilograms), and it used a 5200mAh battery to provide a claimed 20ish minutes of flight time, though 15 was more typically what I saw. The camera was mounted on a precision gimbal, providing incredibly smooth video—1080p at 30fps (stills were 14mp), which was very good for the time.

While I liked the big drone, for a part-time hobbyist drone user like me, it was also a pain: I needed a big case to transport the Phantom and its spare parts and batteries and charger, it took a while to set up (install propellers, configure controller, make wifi connections, etc.), and I never mastered flying it low-and-slow (perhaps due to the amount of wind its powerful rotors generated). It was also really loud.

Because of the hassle involved with using the drone, I didn't use it as often as I wanted to. So I eventually sold it, and left the world of drones behind for a few years. But lately, I'd been getting the itch again, and after doing some research, bought something much different…

[continue reading…]


See exactly when an app launched

Update: I guess I should have searched here before I posted this—I wrote up another solution a few years ago, and that one includes a Keyboard Maestro implementation. Whoops! As this one's another method, though, I'll leave it up.

I was working on some stuff for our upcoming Usher 2 release, and needed to know how long Usher had been running. A quick web search found this post, where one of the comments had an answer that works well in macOS:

ps -p pid -o lstart=

Replace pid with the process ID (PID) from ps -ax for the app or process in question, and you're done. But it's possible to make it even easier to use by automating the task of getting the process ID. Here's what I came up with:

ps -p `ps ax | grep [U]sher$ | cut -c 1-5` -o lstart=

The bit between the backticks gets the matching process line from ps, then uses cut to keep just the first five columns, which contain the PID.1When the shell encounters backticks, it processes the commands within those backticks before processing the rest of the command—in this case, the backticked command returns the PID.

[continue reading…]


The 2020 edition of my Excel run tracking workbook

At the end of 2016, I first posted about my run tracking Excel workbook. That first version was crude, but functional, and I used it to track every mile of my "2,016 miles in 2016" running goal. I posted a minor revision for 2017, then made some major updates for 2018. When 2019 rolled around, I made a few more changes, which I released by way of a note added to the 2018 post.

Now that 2020 is here—I know, it's a bit past January, sorry!—I've made yet more changes, and have decided it's time to replace both of the previous posts with one new all-in-one post. Here you'll find a link to the latest version of the workbook, as well as full instructions on how to use it.

[continue reading…]


Fun family card games to help pass the time

As many of us are under stay at home orders, and schools are canceled (or on partial-day remote learning), it can be a challenge keeping the kids entertained without relying on electronic devices all the time. I thought I'd share three of our favorite card games, which are playable for anyone from kids of roughly middle school age up through adults.

Each can be played with as few as three people (the max varies by game), and all are relatively simple to learn but hard to master, and don't take a huge amount of time to play. The first two are packaged games (from the same company), while the third simply requires two decks of cards.

Five Crowns

Five Crowns is a rummy-style card game, where the objective is to score the fewest points possible. The first hand is three cards per player, with threes wild (plus jokers, which are always wild). Players need to build either straights or of-a-kind collections, consisting of at least three cards. Each turn, you can either draw one card from the discard pile, or from the top of the deck; at the end of you turn, you must discard (including when you go out). The objective is to go out by playing all the cards in your hand. So for the first hand, it's pretty simple.

Once one player goes out, the others put down what minimum three-card groupings they can, then have to add up the value of remaining cards, and that becomes their score for the round. The second round is four cards, and fours are wild; then five with fives wild, etc., all the way up to 13 cards with Kings being wild.

[continue reading…]