Skip to content

Disable local Time Machine backups on laptops

Just noticed this post over on iMore…did you know that Time Machine automatically creates local backups on your laptop Mac? As described by iMore…

On Apple laptops, like the MacBook, MacBook Air, and MacBook Pro, Time Machine includes the added feature of creating local snapshots so that, if you disconnect your MacBook from its external hard drive, you'll still have backups stored on your internal hard drive so you can recover data if you need to.

While the iMore article points out how to disable/enable the feature (sudo tmutil disablelocal or …enablelocal in Terminal), here's a bit more detail not provided in the article.

First, this is not some hidden hack; you're merely changing a setting using an Apple-provided command line interface to Time Machine. Apple, for whatever reason, chose not to include this setting in the GUI, but you're not risking anything by making this change.

Second, you'll find the local backups in a root-only folder named .MobileBackups, at the top level of your hard drive. You can—sort of—see how much space they take up by selecting About this Mac from the Apple menu, then clicking on the Storage tab. On my MacBook Air, which has a 2GB local backup, I see 4GB of purgeable space, which I assume includes that backup.

To get the actual size of the local backup, run this command in Terminal:

sudo du -h /.MobileBackups/

Provide your password, then wait a bit. The last line of the output will be the total size of the folder, stated in gigabytes…

…
…
 23M	/.MobileBackups//Computer/2017-02-16-092144
2.0G	/.MobileBackups//Computer
2.0G	/.MobileBackups/

And finally, if you disable this command, how do you know you've done so, months from now when you've forgotten about this? Time Machine itself will tell you, on its System Preferences panel. (Sorry for the low-res shot; I only have local backups enabled on my 11" Air!)

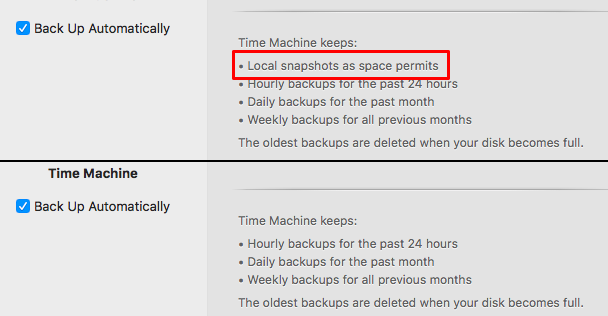
As seen, after disabling the setting, Time Machine's System Preferences panel will no longer list local backups as one of the tasks it performs.


Easily copy or move a WordPress blog

I was looking for an easy way to make a development copy of the Many Tricks blog, which (like Robservatory) is powered by WordPress. In the past, I've done this manually, but it's a bit of a pain to get the required edits done correctly and make everything work at the new URL.

So this time, I went searching for a plug-in, and found Duplicator. Borrowing from the plug-in's description of itself…

Duplicator gives WordPress administrators the ability to migrate, copy or clone a site from one location to another. The plugin also serves as a simple backup utility. Duplicator supports both serialized and base64 serialized string replacement. If you need to move WordPress or backup WordPress this plugin can help simplify the process.

Once installed, usage is pretty easy: You follow a simple three-step process that creates a new package. Move that package to the new location, expand it, and then run the installer.php file. (I had to rename the three files from the package to remove everything except the filenames; the plug-in adds a bunch of identifying text in front of each filename.)

The installer asks questions about the new site's URLs and database connection info, then does its magic. I had a clone site up and running in minutes, saving what (for me) is usually an hour or so's aggravation. Duplicator should work equally well for moving a WordPress installation to a new host, too, though I haven't tested it in that situation (yet).


See the launch date and time for any app or process

I was working on something with Peter about Moom and its disk usage (it doesn't use much), and I was curious as to just how long Moom had been running on my Mac. I last rebooted my Mac a week ago, but I often quit and relaunch our own apps to run test versions.

Finder has this info, but that requires finding the running app in Finder. I wanted a quicker solution. In Activity Monitor (and ps in Terminal), you can see how much CPU time an activity has taken…

…but that doesn't really help at all with knowing when the app (or process) launched. As long as you're in Activity Monitor, you can get the information by doing the following:

  1. Click once on the app or process of interest.
  2. Press Command-I or click the small 'i' icon in the toolbar.
  3. In the new window that opens, click Sample, then wait.

When the sample is complete, you'll see its output, and included there is the selected item's launch date and time:

...
Analysis of sampling Moom (pid 89861) every 1 millisecond
...
Parent Process:  ??? [1]

Date/Time:       2017-02-15 07:41:18.611 -0800
Launch Time:     2017-02-13 19:44:11.957 -0800
...

That's all fine if you're in Activity Monitor, but a bit of a pain if you need to launch it, find the app, run a sample, etc.

As you might expect, there's another way via Terminal: The lsappinfo command, which queries CoreApplicationServices about any app or process on your Mac.

[continue reading…]


A possible fix broken search in macOS Mail

Over the weekend, I wrote about my totally useless search in Mail. I got so frustrated by my inability to search in Mail that I decided it was time to for a complete rebuild. I exported all my locally-saved mail, deleted my accounts, quit Mail, trashed its prefs and data files, rebooted, then rebuild it mailbox by mailbox, account by account.

I started with my iCloud account, which I barely use for anything—it has a total of seven messages in the inbox (four of which are iTunes Store receipts), and only 121 sent messages. As a test, I searched for Linea, an excellent drawing app that I had recently purchased. No matches.

At that point, I decided to quit Mail and force Spotlight to rebuild its index overnight. In Terminal, sudo mdutil -i on / will do just that (and take many hours). Today, opened Mail, and search was still dead. Argh! (I had also tried this suggested fix, but it made no difference.)

But doing some random testing today, I discovered a fix! It's a weird fix, but it seems to work:

If I move all the messages from an inbox or local storage folder into a different local storage folder, they'll be indexed and findable. I can then move them back into the inbox or source folder, and they remain findable.
Even more important, newly-added messages seem to be properly indexed, in both the inboxes and the local storage folders.

This doesn't make any sense to me, as any one of my recent actions—rebuilding mailbox indexes, reimporting, and redoing the entire Spotlight index—should have been enough to force a rebuild. But for whatever reason, only manually moving the messages seems to force a rebuild.

Now pardon me while I go back to manually dragging a quarter-million email messages around…


Transport the cursor to the center of frontmost window

My home workspace is a 27" Retina 5K iMac (2560x1440) paired with a vertical 4K display (scaled to view 1440x2560). While I love this setup in general, there's one time it's annoying: When I need to move the cursor between displays, and it's located far away from its destination.

There are many ways to solve this problem, including our own Keymo, which I still use when I want to teleport a drag across displays. But what I really wanted was a fast way to move the cursor to the other display when I switched to a window on the other display—because generally, if I've activated the window, I'm probably going to use the mouse in that window at some point.

Using Keyboard Maestro, it's possible to create a macro to make this happen automatically:

This macro will activate every time you switch applications, and then move the mouse to the center of that newly-frontmost window and highlight its location with a quick circle. Having tested this, however, I can say it's a non-ideal solution: Most of the time when I switch an app, I do not want the cursor to move. I found it more annoying—much more annoying—than useful.

As useless as the above macro is, with one minor change it quickly became one of my most-used macros…

[continue reading…]


macOS app: Use HoudahSpot for enhanced searches

As I lamented in a recent entry here, macOS Mail search is totally broken for me. I pointed out that I can use Spotlight, but also alluded to a third-party app. That app is HoudahSpot, and it's what I use to not only search Mail, but any time I need a more-powerful search than I can get through Spotlight's interface.

Houdah's UI is a large multi-paned window, with search criteria on the left, results in the middle, and one of file info, Quick Look preview, or text preview in the right-hand pane. Here's how it looked for the same search that failed in Mail:

Using HoudahSpot for a search like this, though, is really overkill—I'd see similar results in Spotlight, because it's a very specific search term that's not going to find a lot of matches. Where HoudahSpot shines is in its ability to build more complex search queries.

[continue reading…]


On the uselessness of search in macOS Mail

For the last couple macOS releases, I've had nothing but trouble searching in Mail. Note that I didn't write "trouble searching mail," but rather, "trouble searching in Mail." For example, today I needed to find an email from my business partner Peter about a hidden pref in Butler. (I was hoping this pref could help a user who was having problems with the pasteboard in a certain app.)

Update: See this post for a possible solution.

Based on a document on my hard drive, I knew the name of the default was Pasteboard Normalization Interval, but I couldn't remember the syntax of the defaults write command to set its value. So I searched in Mail…

So clearly, no emails in my database contain the words I'm looking for, right? Here's the exact same search, run in Spotlight:

Not one but two email messages match my search, and provided the needed syntax for the command.

Wait, I know what you're thinking: "Ahh, look, it's in quotes!" Doesn't matter; searching Mail for "Pasteboard Normalization Interval" still results in zero matches. Searching on even one word of the phrase, like Normalization, also finds no matches.

Again, I know what you're thinking: "Oh, I bet the Mail index is screwed up." Nope; even after rebuilding the index on all 250,000+ messages in my database, no matches are found. (And yes, I let the index complete its rebuild, which took hours.)

I've heard from others that search in Mail works for them. But it's a no go for me, and I know, for others. So something's wrong, but I don't know exactly what it is, nor how to fix it.

So for now, I have to rely on Spotlight to search Mail…or a third-party app, but more on that in a bit.


macOS app: Test DNS servers with namebench

If you've got a speedy internet connection at home, but it seems slow, it's possible its' not the connection itself but the speed of your chosen DNS server.

To figure out if the DNS servers are part of the problem, check out namebench, a DNS server benchmarking app. namebench compares your existing DNS servers to a large list of other DNS servers, and shows you how they all perform.

When namebench launches, you'll see a window populated with your current DNS server addresses, and a few other settings you can modify:

Click Start, then go ahead and find something else to do for a while—the benchmarking process may take 15 minutes or more, depending on how many name servers it can see.

[continue reading…]


macOS app: BackupLoupe examines Time Machine backups

I'm somewhat paranoid about backups—I have many of them, both online and offline, onsite and offsite. I test my backups to make sure they're good. In short, I do my best to make sure a hardware failure or natural disaster won't take out my data.

My backup strategy includes Time Machine, mainly for recovering from "oh crud I didn't mean to delete that!" moments. We also use it, via a Time Capsule (RIP, sigh), to back up our laptops.

While I love how Time Machine works, I dislike that it doesn't tell you anything about a given backup other than how big it was. Enter BackupLoupe, a $10 "honorware" app. BackupLoupe examines your Time Machine backups and computes a "diff" for each one, letting you know exactly what was backed up in a given run:

Each backup is color coded—on the left of each backup's name, the color indicates the size of the backup, and on the right, the deviation of that size from the norm.

[continue reading…]


Transforming text via Keyboard Maestro

Recently, Melissa Holt wrote about transforming text via the Transformations menu. After seeing this article, a reader named Hunter wrote to me with this comment:

Today in The Mac Observer Melissa Holt wrote about using the TextEdit/ Edit/ Transformations command to change the case of a sentence or paragraph. However, there is no option to perform, "Sentence Case", i.e., capitalize the first letter of the first word, and keep all other words in lower case.

Is there a way in Terminal, or maybe Keyboard Maestro to add this option to Transformations? It seems to me that the given choices have rather limited uses.

In addition to not offering sentence case, the Transformations menu has a few other drawbacks:

  • Not all apps have a Transformations menu.
  • Only three very basic transformations (upper, lower, capitalize) are supported.
  • The transformations are buried in a sub-menu, requiring lots of mouse navigation to reach.

While I don't believe it's possible to modify the Transformations menu, it's pretty easy to use Keyboard Maestro to build a "Sentence Case" transformation…or more usefully, as seen at right, a palette with many more transformations. Unlike the Transformations menu, the Keyboard Maestro solution will work in any app where you can copy and paste text.

[continue reading…]