Skip to content


Two ways to navigate column-view folders in Finder

If you use a column-view Finder window, and prefer to use keyboard navigation, here's a trick you may not be aware of—even though this dates back to the original release of Mac OS X. If I hadn't started the Mac OS X Hints site, I doubt I would've known this…

To drill down into Finder folders via the keyboard, you use the Right (down) and Left (up) Arrow keys-don't worry, that's not the tip, because that's totally completely obvious. The tip is this: After navigating into a given subfolder (and optionally selecting an item in that folder), the Shift-Tab key combo will navigate back up, but leave your "path" to the subfolder visible. Think of this like a "breadcrumb" trail that shows your navigation. (By comparison, if you use the Left Arrow, Finder "closes" each folder as you exit it, leaving you with nothing selected once you reach the top.)

One you've used Shift-Tab to navigate all the way back out, pressing Tab will navigate back down the highlighted path. Alternatively, pressing the Right Arrow key will jump immediately to the rightmost-selected item.

Update

As of Mojave (or maybe High Sierra), Apple changed the behavior of the Right Arrow after you back navigate with Shift Tab: It no longer jumps back to the end of the trail, instead it just works like a usual Right Arrow and selects the first item in the next column over.

I did some experimenting though, and found that Control-Tab will jump to the end of the breadcrumb trail.

Here's how that all looks in action—first is the normal arrow key navigation, then navigation using Shift-Tab and Tab.

You may not need/want the breadcrumb path all the time, but when you do, just remember to Shift-Tab your way out of the current folder. Using the arrow keys and the Tab/Shift-Tab keys together provides two complementary methods to navigate your column-view Finder windows.


The right tool for a (floor) stripping job

I haven't posted here the last couple days; between work, family, and a little remodeling project, time has just vanished. And as my blog reflects things going on in my world, today's post is decidely non-tech related: It's about the remodeling project.

We're re-doing our kids' bathroom with a mix of our own work and outsourcing the stuff I know I'd do poorly (tiling the shower, refinishing the tub). On the "own work" side of the ledger was "remove old linoleum floor," as we have some water damaged sub-floor to replace in the shower area, and we hated the linoleum in general. When I peeled up the linoleum, it left huge sections of glue and paper backing behind:

I had no idea how to remove this gunk, so I bought a few tools at Home Depot: A carbide-tipped scraper that looked like a larger putty knife, a "pull to scrape" device, and a heat gun.

[continue reading…]


Selective pruning of old rsync backups

In yesterday's post, I described a couple rsync oddities, and how they'd led me to this modified command for pruning old (older than four days) backups:

find /path/to/backups/ -d 1 -type d -Bmin +$((60*4*24)) -maxdepth 1 -exec rm -r {} +

After getting this working, though, I wondered if it'd be possible to keep my backups from the first day of each month, even while clearing out the other dates. After some digging in the rsync man page, and testing in Terminal, it appears it's possible, with some help from regex.

My backup folders are named with a trailing date and time stamp, like this:

back-2017-05-01_2230
back-2017-05-02_0534
back-2017-05-02_1002

To keep any backups made on the first of any month, for my folder naming schema, the modified find command would look like this:

find /path/to/backups/ -d 1 -type d -Bmin +$((60*4*24)) -maxdepth 1 -not -regex ".*-01_.*" -exec rm -r {} +

The new bits, -not -regex ".*-01_.*" basically say "find only files that do not contain anything surrounding a string that is 'hyphen 01 underscore.' And because only backups made on the first of the month will contain that pattern, they're the only ones that will be left out of the purge.

This may be of interest to maybe two people out there; I'm documenting it so I remember how it works!


How to not accidentally delete all your rsync backups

With my Time Machine-like rsync backups running well, I decided it was time to migrate over the cleanup portion of my old script—namely, the bit that removes older backups. Soon after I added this bit to my new script, though, I had a surprise: All of my backups, save the most recent, vanished.

In investigating why this happened, I stumbled across two rsync/macOS behaviors that I wasn't aware of…and if you're using rsync for backup, they may be of interest to you, too.

[continue reading…]


Kwikset’s smart lock may require another purchase

Just a heads-up for anyone thinking of installing the well-reviewed Kwikset SmartCode 916 Touchscreen Electronic Deadbolt (and probably other similar Kwikset locks): Check your current deadbolt installation to see if you actually need more than what's included in the box.

In the box is one deadbolt (the "A" in the image at right), which assumes your deadbolt screws into a chiseled cutout in the edge of the door. But if—like me—your deadbolt isn't screwed into the door but just inserted in place, you need "A2," a drive-in deadbolt. This part isn't in the $190 lock kit, nor is it sold (best as I could tell) at Home Depot or Lowes or Ace Hardware.

Check your door before you order your lock, so you can add on a drive-in deadbolt if your door is non-chiseled. Me, because I didn't know about this, I didn't check. So I made a 40-mile round trip to Home Depot for a chisel set, then spent an hour chiseling out the door so the included deadbolt would fit.

Mission accomplished, but I think it's pretty dang cheap of Kwikset to not include both deadbolt styles in a $190 lock kit! (Or perhaps even better, they should design a deadbolt with a removable screw-in plate, then one deadbolt would serve all customers.) So, yea, I had a frustrating Sunday morning!


Frankenmac 2017: Fix distorted images at power on

When I originally set up Frankenmac 2017, I did so using an old 1920x1200 monitor, and everything looked fine from power on through booting to macOS.

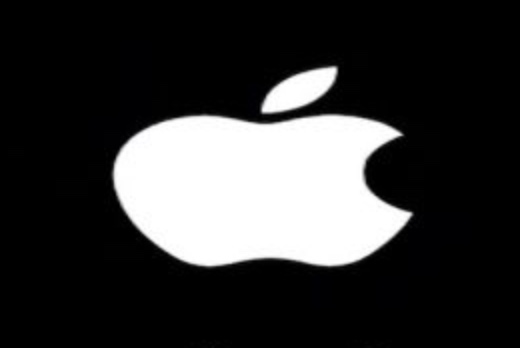
But then, when it came time to get Frankenmac ready for production use (much more on that in a future post!), I connected it to my widescreen Dell 4K display, and was greeted with the ugliness that is a stretched Apple, as seen at right. This problem would fix itself relatively quickly during the boot process, but it was annoying.

Even more annoying was that the same distortion was present in the Clover boot loader that you see every time you power on the machine. In light of all my other issues, solving this problem was near the bottom of the priority list. But once I'd done everything I could on that front (again, more about that soon), it was time to tackle the distortion issue.

The solution turned out to be relatively simple, though not even vaguely describable as obvious. After much web searching, I wound up in this forum thread, where I found many possible solutions. Some seemed incredibly complex, but finally, on page four, I found a simple fix that worked—no more distortion, in either the Apple logo or the Clover screen:

If you're experiencing distorted images on your hackintosh, here's the fix that worked for me:

  1. Power up and enter BIOS (usually by hitting the Delete key)
  2. Find the Windows 8/10 Features setting—on my Gigabyte motherboard, it's in the BIOS Features section. Set it to Windows 8/10
  3. Once you do step one, a new option, CSM Support, will show up. Set it to Disabled.
  4. Confirm that Secure Boot is set to Disabled.

And that's that—with those changes (for me at least), the distortion was gone. As a side benefit, the boot screen is at the full resolution of the display, so there's no more jaggies and everything looks properly scaled. Ah, correct aspect ratio bliss!


Add some System Preferences icons to the Dock

If you have certain System Preferences panels that you access a lot, and you're a Dock person (as opposed to a ⌘-Space and type person), here's a little timesaver: You can add any System Preferences panel directly to your Dock. You can't add it to the left side, as the individual panels aren't applications. But they are documents, so you can add them to the right side of the dock—just drag and drop from Finder.

You'll find the System-provided panels in /System/Library/PreferencePanes; third-party panels may appear in either your user's Library/PreferencePanes folder, or the top-level /Library/PreferencePanes folder. Find the one(s) you'd like in your Dock, then just drag and drop.

You can, of course, keep System Preferences itself in your Dock, and then right-click to see a list of all preference panels. For those panels you access often, though, this method is much quicker.


How to burn an ISO file to a USB stick

I wanted to install Linux on a hard drive in Frankenmac, as Clover is a multi-boot utility—it lets you choose from any OS it sees during power up. (I'll add Windows, too, eventually.) To do this, you need to get Linux onto a USB stick. I've done this in the past, and my vague recollection of the process was download the ISO, convert to an image file, write image file to USB stick. However, as it'd been a few years, I went searching for references to make sure I had all the commands correct.

I found a lot of pages with a general summary of the process, and few with the specific steps. I tried one of those, but my USB stick didn't work. The other specific pages contained the same basic process, so I was stuck. Until I found this page, which contained a critical step I was missing: Formatting the USB stick before copying the image file.

For future reference, here's the precise process to follow if you want to burn an ISO file onto a USB stick…

[continue reading…]


How to install ruby gems in Terminal

In yesterday's tip, See sensor stats in Terminal, I implied that installation of the iStats ruby gem was a simple one-line command. As a commenter pointed out, that's only true if you already have the prerequisites installed. The prerequisites in this case are the Xcode command line tools. Thankfully, you can install those without installing the full 5GB Xcode development environment.

(Rather than starting from scratch, I'm just going to borrow this bit from my detailed instructions for installing the transcode-video tools, because the Xcode command line tools are required there, too.)

Here's how to install the command line tools. Open Terminal, paste the following line, and press Return:

xcode-select --install

When you hit Return, you'll see a single line in response to your command:

$ xcode-select --install
xcode-select: note: install requested for command line developer tools

At this point, macOS will pop up a dialog, which is somewhat surprising as you're working in the decidedly non-GUI Terminal:

Do not click Get Xcode, unless you want to wait while 5GB of data downloads and installs on your Mac. Instead, click the Install button, which will display an onscreen license agreement. Click Agree, then let the install finish—it'll only take a couple of minutes.

If you're curious as to what just happened, the installer created a folder structure in the top-level Library folder (/Library > Developer > CommandLineTools), and installed a slew of programs in the usr folder within the CommandLineTools folder.

[continue reading…]