Skip to content

Apple Universe

Top-level category for all Apple, Mac, and OS X related topics.

On the subject of Apple devices and battery life

In one of his recent "Hey Apple Fix This" columns for Macworld, Kirk McElhearn wrote about Apple's seemingly never-ending pursuit of thinness and its affect on the battery life of its products.

When I got this laptop, replacing a 13-inch MacBook Pro, I was very happy that it was thinner and lighter, but my goal was not to own a computer that could give me paper cuts; I wanted a computer that was practical.

While I completely agree with Kirk about the stupidity of pursuing thinness at the cost of better battery life, as a work-at-home person, the battery life of my Apple devices isn't usually an issue…until I have to take a trip, that is. Recently, I headed to San Francisco for a special "Thanks Sal!" dinner, thanking Sal Soghoian for all he's done for Mac automation over the last 20+ years. This was a very short trip—a 75 minute flight, one night away from home, then 75 minute flight back home. (Plus approximately 2,500 hours in the two airports.)

Because we're a small two-person company that writes Mac software, and it's my job to support our customers, I always have to bring my Mac (a late 2013 13" Retina MacBook Pro). And my iPhone, to contact my family/friends and check email. And my watch, because I've gotten used to having it around for notifications and weather and such. And to pass a bit of time in the hotel room, I'll usually bring my iPad.

Because of Apple's thinness decisions, only one of these devices (the iPad) can make this very short journey without needing a recharge. That meant I'd need to bring a Lightning cable (iPhone/iPad charge from computer), my Apple Watch charging cable (charge from computer), and my MacBook's power brick with wall adapter (I did leave the extension section at home, though).

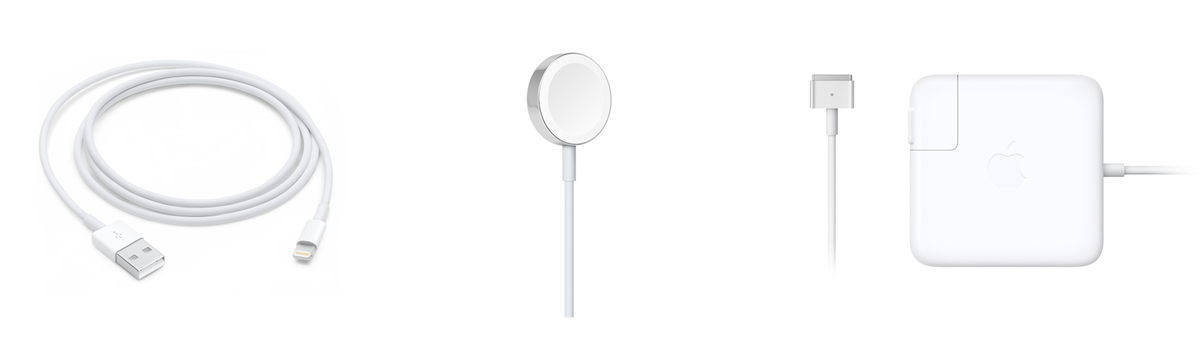
All of that to support a simple overnight trip. Two-day battery life out of my devices would be so worth some extra thickness. (If I owned a newer laptop, it would have been even worse, as I would have needed some USB adapters, too, I'm sure.)

As an aside, what I didn't bring was an in-car charger, and that turned out to be a mistake. I drove a roughly 60 mile round-trip (2.5 hours in the car, with traffic) on Friday to see a friend, using my iPhone for navigation both directions. The rental car didn't have any USB jacks, so I was using my iPhone on battery power.

By the time I got back to the hotel, my phone had entered power saving mode. Thankfully, I was back early enough to charge it before the evening's festivities started. This seems like unusually high battery drain, but I don't do a lot of in-car navigating with my iPhone, so I don't know. (I used Apple Maps on the way there, and Waze on the way back.)


Start Terminal sessions with a possibly-witty quote

Really long-time Unix users—as in mainframe-based Unix—are probably familiar with fortune. This silly little program grabs a random line from a collection of files holding quotes, sayings, jokes, etc. The Unix I used many decades ago would print an entry from fortune each time you started a new session. Here are some examples of what might greet me each time…

"It's a dog-eat-dog world out there, and I'm wearing Milkbone underware."
-- Norm, from _Cheers_

Mobius strippers never show you their back side.

All constants are variables.

Years ago, I had set up my Mac's Terminal to output a fortune each time I opened a new session (window). At some point, though, I forgot to set it up on a new system, so it was gone. While fortune isn't included in macOS' Unix core by default, there are many ways to get it back, and it's relatively simple to do so. Here's one way…

[continue reading…]


A much-improved special character palette

A while back, I created a pop-up character palette using Keyboard Maestro to allow easy insertion of the Mac's special characters (like , ⌘, ⌥, etc.). While this worked fine, I discovered a few major shortcomings:

  • I couldn't create more than one character without calling up the palette again.
  • I had to decide in advance if I wanted HTML entities or the actual characters.
  • Two palettes (HTML or character) meant two keyboard shortcuts to remember.
  • Adding characters to the palette was a real pain, because they had to be done twice.
  • I was out of digits for shortcuts, so I was going to have to change the palette structure.
  • It was slow: From calling up the palette to identifying which icon I wanted to use to selecting that icon, and then doing it all again for a second character was just really slow.

I set out to fix all of these issues, thinking I could use Keyboard Maestro's Custom HTML Prompt action, as I did for my iTunes song info window. And, in the end, that's what I used for the new-and-improved character palette:

This doesn't have to be used just for Mac special characters, of course. You could make yourself a customized pop-up for emoji, math symbols, whatever…

Read on for the how-to and download, if you'd like to put this to use…

[continue reading…]


Easily create animated GIFs from video via ffmpeg

I recently explained how I captured a series of screenshots and turned them into a movie. While I was working on my tweet about the write-up, I thought an animated GIF of the final movie would be a nice way to show what it was I was trying to do. So that's what I wound up doing:

So how did I create the animated GIF from the movie file? I know there are any number of great apps that will do this (ScreenFlow, for one), but I had another thought: While working on the animated screenshot movie (which I created using ffmpeg), I had happened to read about ffmpeg's ability to create high quality animated GIFs, so I thought I'd give that a try.

[continue reading…]


Get more details from transcode-video

While working on my massive Blu-ray ripping comparison, I wanted more information about what some of the transcode-video presets were doing. That is, if you pick --target big, exactly what settings are being used to rip the video?

It turns out there's --dry-run option for transcode-video that will tell you exactly that. (I've added some line breaks for readability here.)

What's neat is that you can also use this to see what the default options are for transcode-video when you don't supply it with any options. Just use the --dry-run parameter option but leave off any of the presets (i.e. --target big), and the output will show you the defaults.

In addition, you can use it on already-ripped media to get their details as well, regardless as to how you ripped the movie.

In a related vein, I was having issues with the above rip, because I thought that the surround sound track wasn't being ripped. Again, thanks to Don, I learned about a second command line option for transcode-video that reveals exactly what's in a ripped video.

[continue reading…]


Podcast appearance: The Next Track

This week, I made a rare appearance on a podcast other than our own The Committed podcast. I was a guest on The Next Track, a podcast about music and related things, hosted by iTunes AppleScript guru Doug Adams and my regular The Committed podcast cohost Kirk McElhearn.

We spent 30 minutes discussing ripping Blu-rays and DVDs to the Mac. I know, a real stretch topic for me, given I've never written about it!

Anyway, it was a fun show, so if you'd like to hear the voice behind these words, give it a listen.


Automatically prevent Messages’ URL Previews

I spend a lot of time in Messages in macOS, and one of its newer features is something called link previews, as seen at the right side of this text block.

While these previews can occasionally be useful, most of the time, they're just annoying: I'm talking with people I know, and we trust the links we send each other, so the preview is superfluous. Plus it makes it nearly impossible to rickroll anyone. But what's really annoying is that they make it impossible to send messages like this:

Oh, have you seen [paste copied URL]http://www.istocknow.com?

Try that, and the URL becomes a preview, and the question mark vanishes. It really interrupts conversational flow. You can prevent this by either writing text on both sides of the pasted URL, or surrounding the URL with angle brackets:

Oh, have you seen <[paste copied URL]http://www.istocknow.com>?

So there's the quick tip: To prevent link previews, surround your pasted links with either text on both sides, or more simply, angle brackets.

A cleaner solution: Use a dot at the front and end of the URL. Messages will make the dots vanish (if the URL is on its own line, otherwise it leaves the leading dot), and yet not preview the message. Thanks to reader Christopher for this tip—using it, URLs pasted on their own line are just clean URLs, no previews, no brackets. I updated my macro, changing the brackets to dots in the relevant steps. I haven't edited the version you see here, though.

But because I often forget to do that, I wanted it to be automatic. Thanks to Keyboard Maestro, I was able to make that happen: When I paste a link in Messages—using the system's standard ⌘V shortcut—it's enclosed in angle brackets. If I paste anything other than a URL, it's pasted as is. If I do want a preview, I can use the actual Paste menu item instead to get a link with preview.

This solution is perfect for my needs, as I always use ⌘V to paste, and I so rarely want to send a link preview that it's OK that it requires a trip to the menu. (If it ever does annoy me, I'll just remap Paste in Messages to ⌃⌘V or somesuch.

[continue reading…]


A deep dive into HandBrake and Video Transcoding

An obvious interest area of mine is in ripping (and watching) movies using my Mac. I've talked about everything from installing the tools I use to how I rip to how to make sure I update the ripping tools. And though I've included some comparison pictures in the how-I-rip article, I've never done a deep dive into the various ripping options and how they compare on three key fronts:

  • Speed: Faster is better; measured in minutes required to rip.
  • Size: Smaller is better; measured in MB of drive space used.
  • Quality: Higher is better; the closer the image quality is to the original, the better.

An ideal rip would be one that happens in seconds, saves into a 10KB file, and has quality matching the original. The reality, though, is far from the ideal. Ripping a movie involves making trade-offs between those three competing measures: Maximizing any one measure requires some sort of tradeoff with one or both of the other measures.

After ripping so many DVDs and Blu-rays over the years, I was curious about how HandBrake and Don Melton's Video Transcoding tools handle those tradeoffs, so I decided to do some testing.

If you'd like to see what I discovered about ripping time, file sizes, and—with lots and lots of frame grabs—image quality, keep reading…

[continue reading…]


Prevent silly mistakes by modifying keyboard shortcuts

A tweet I sent last night triggered my memory of this very-useful tip that I've gotten worse about remembering to implement over the years. First, the tweet…

The issue, of course, is the macOS ships with ⌘O (Open) and ⌘P (Print) as pre-assigned keyboard shortcuts in Finder. Select a bunch of files to open, reach for the O and miss by just a touch, and you've started a dozen print jobs. Whoops!

Years ago on macosxhints.com, there was one of those "duh!" tips with an easy solution to this (and other similar) issues: Reassign the stock keyboard shortcuts. Here's a "fixed" Print shortcut in Finder, for example:

And with that simple change, no more accidental print jobs.

Changing the shortcuts is easy; start by opening System Preferences > Keyboard, then going to the Shortcuts tab. Scroll to the bottom of the left-hand pane, select App Shortcuts, then click the plus sign. You can then select an app—or all apps—from the first pop-up menu, enter the menu item to change/assign in the first input box, and type the shortcut to use in the third:

You can do this for as many of the stock shortcuts as you wish…and obviously, you can add some that you feel Apple left out. Read on to see what I change in the Shortcuts section—not just for applications, but in all of the sections (Launchpad & Dock, Mission Control, etc.)

[continue reading…]


Re-center the Spotlight search window

Starting with OS X 10.11 (El Capitan), the Spotlight search box was no longer anchored to the menu bar. Instead, it became a floating box you could move around. While this is incredibly useful, I couldn't figure out how to get the box back to center, so I did what any normal person would do: I asked the Twitterverse … and as hoped, the Twitterverse came through:

It really is that simple—just click-and-hold on Spotlight's menu bar icon to recenter the search box. And now, a gratuitous video (because I need all the practice I can get with screen recordings!).

Hooray for simple solutions, boo for Apple hiding them from easy discovery: The built-in help references the ability to move the box, but not how to move it back.