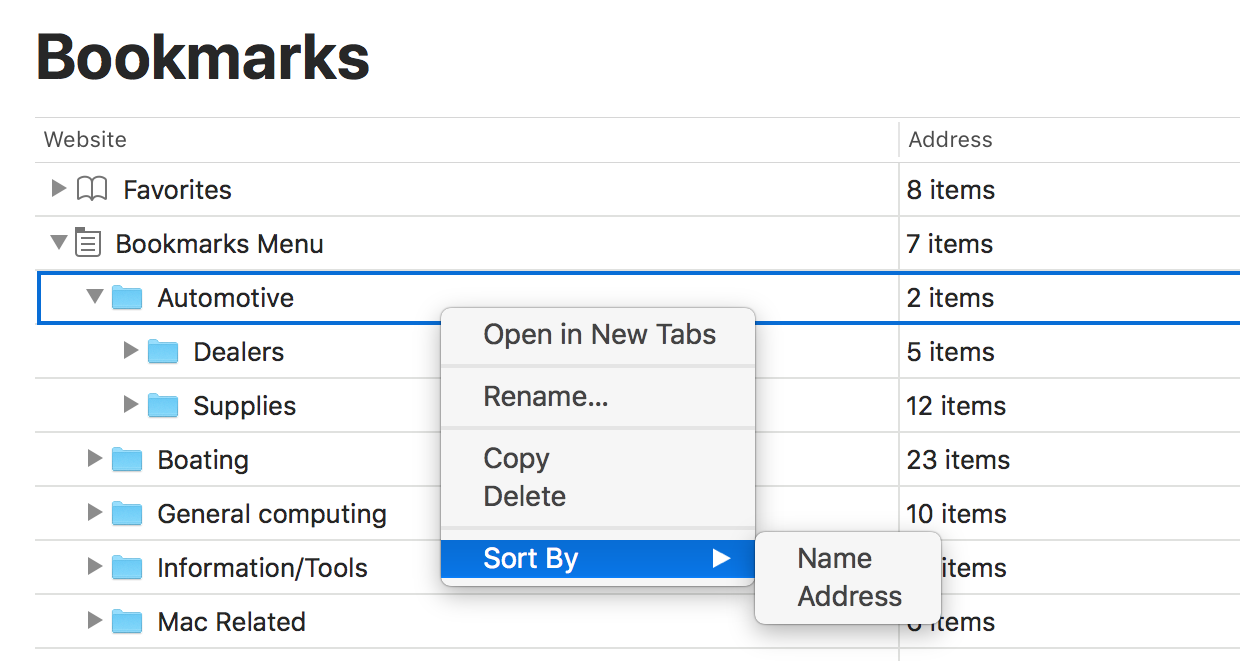
One of the unpublicized nuggets in macOS 10.13.4 is this little doozy in the release notes:
Enables sorting Safari bookmarks by name or URL by right-clicking and choosing 'Sort By…'
This has been a feature request for nearly as long as Safari has existed—Safari was released in January 2003, and I found this MacRumors forum thread from April 2003 asking how to sort bookmarks. So this feature was nearly 15 years in the making!
Sure enough, right click on an entry in your Bookmarks list, and you can sort by name or URL:
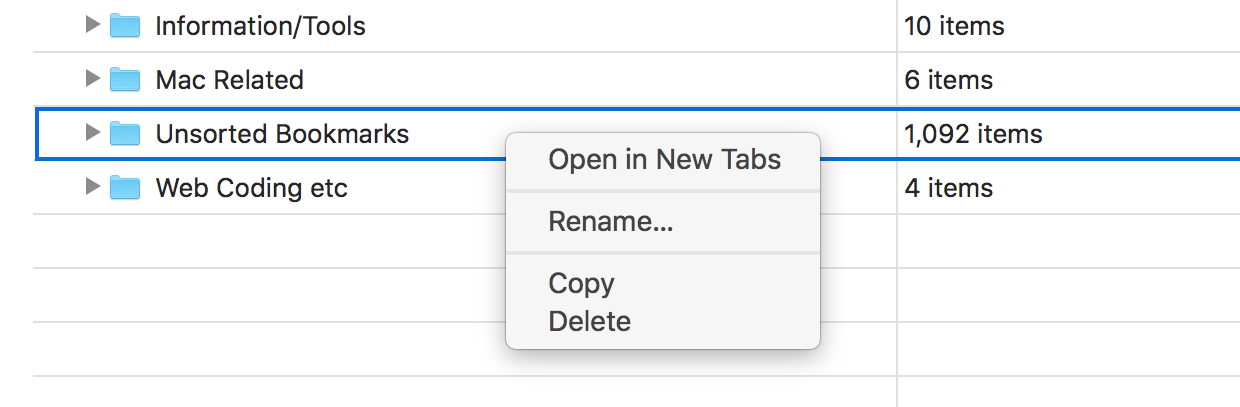
I have a junk drawer in Safari where I bookmark stuff that I might someday want. Like a real junk drawer, it gets filled pretty quickly, and sorting the entries is a great way to trim the out of date entries. But when I tried to sort my junk drawer…
…there was no such option available. Stumped for a moment, it struck me that there may be a limit on the number of entries, as that was the only difference between this folder and others. I removed half the entries, leaving 546, but still, no Sort entry in the contextual menu.
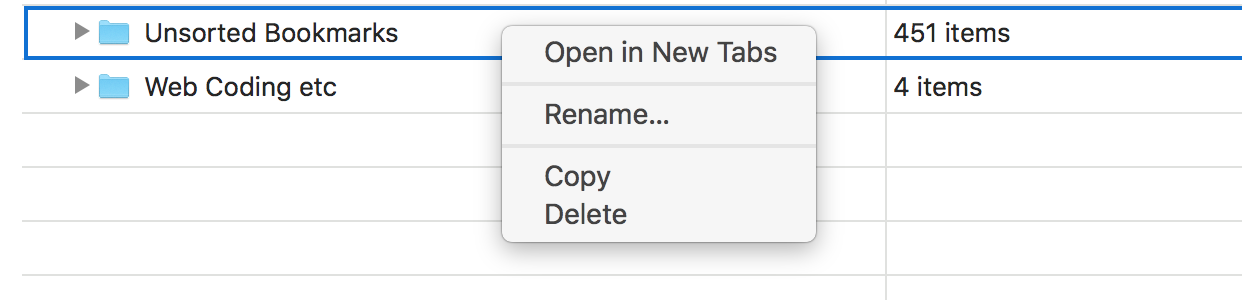
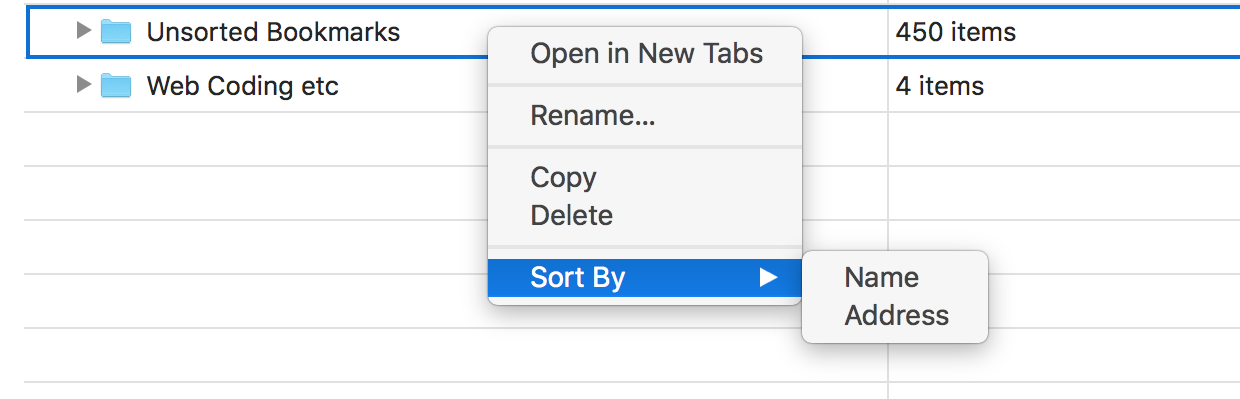
After a bunch of back-and-forth moving (which takes some time, when you move hundreds of bookmarks around), I found the limit: 450 entries.
So if you have a large folder of bookmarks in Safari that you need to sort, you'll have to split it into multiple folders, none of which can have more than 450 entries. Weird but true.
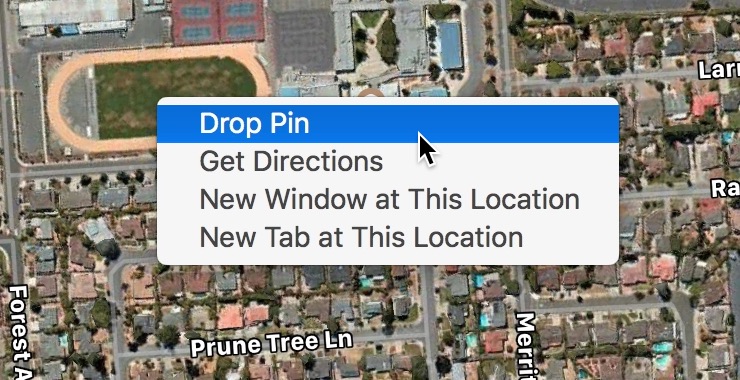
Today I wanted to do something that seemed simple: Add a pin to Apple's Maps app on macOS High Sierra, then rename the pin.
But after trying everything obvious, I was stumped, and took to both Twitter and web searching. About the same time I found the answer on the web, I also received a tweet from @tmneff with the same answer.
This seems absolutely crazy, but here's how you name a dropped pin in Maps on macOS—these are just the instructions from the linked web page, with a few added screenshots:
Drop the pin.
When the info box appears, click the small circled 'i' at the right.
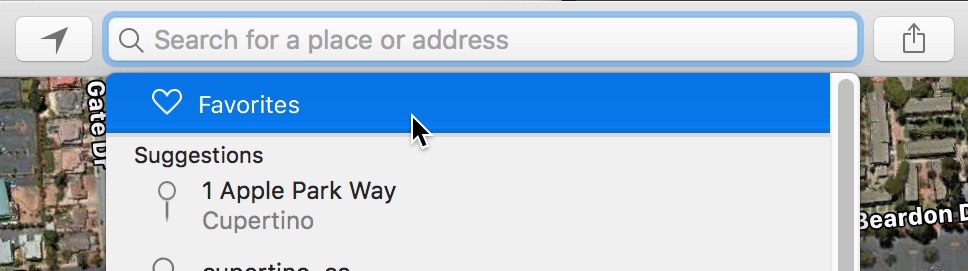
In the new window that appears, click the heart (Favorite) icon, to make your new pin a favorite.
Click in the search bar, then highlight the Favorites entry and click it.
When the list of favorites appears, you'll see an Edit box at the lower right corner; click that, and you can then click-and-edit any of the pin names as you would a filename in Finder. You can also delete favorites here by clicking the 'x' icon.
Click Done, and your custom name should be saved with the dropped pin.
Apparently in iOS, you're prompted for a name when you tap the Favorite icon—that makes a lot sense, and macOS should follow the same convention. But it doesn't, sigh.
A friend asked if there was a way in Photos to see which albums a selected photo had been added to. This is one of those things that would be incredibly easy for Apple to provide: Select a photo, press Command-I, and in the info window, you could see a list of all albums containing the selected photo.
Unfortunately, Apple doesn't seem to think people might care about what albums a photo is in, so this feature exists only in my mind. Thankfully, Mac users Jacques Rious and léonie wrote an AppleScript to solve the problem. I used the first instance (version 4) of the script in that post and it worked fine in High Sierra. (In case Apple ever decides to remove its forums, I've recreated the script below.)
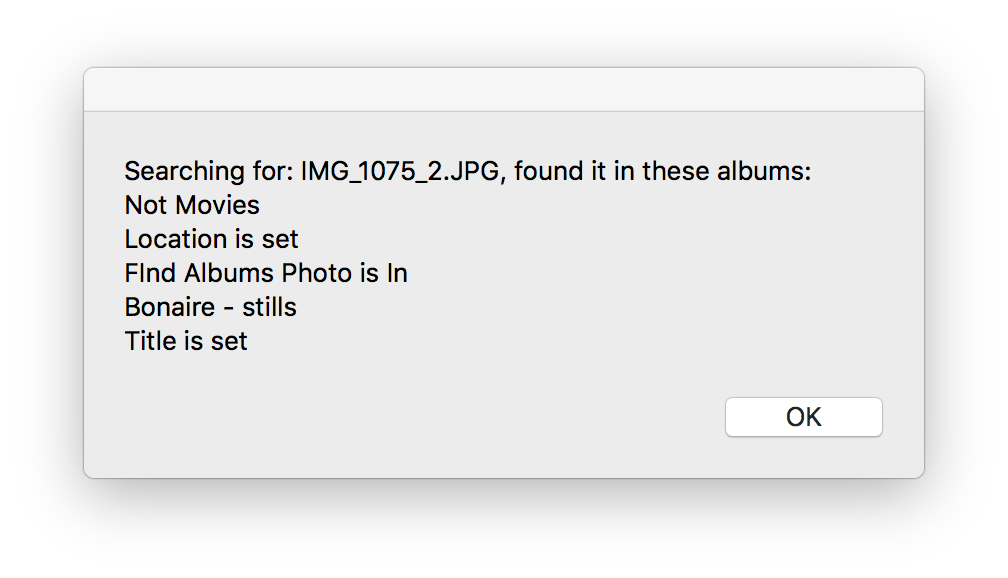
To use the script, paste it all into AppleScript Editor and save it as an application (or you can just run it in AppleScript Editor). In Photos, create a top-level album (I named mine Find Albums Photo Is In), and place the photo you want to know about into that album. Leave it selected, then run the AppleScript. You'll see one dialog stating what photo is being used, then after a bit, you should see a results dialog, like this:
As you can see, the album used for the search is included in the results; someone with better AppleScript skills than I could probably modify the script to exclude that album (any takers?). While I'd much prefer Apple include this feature directly in Photos, at least there's an alternative when you need this information.
I thought "Well, that's an easy question to answer—via the Mac App Store, of course." As it turns out, that's the right answer, but it was much harder to find than I expected it to be. I started on the Purchased tab in the Mac App Store app, where you can (theoretically) see all past purchases, including prior Mac OS X versions. However, those old releases stop with Mac OS X El Capitan from 2015; neither Sierra nor High Sierra are listed.
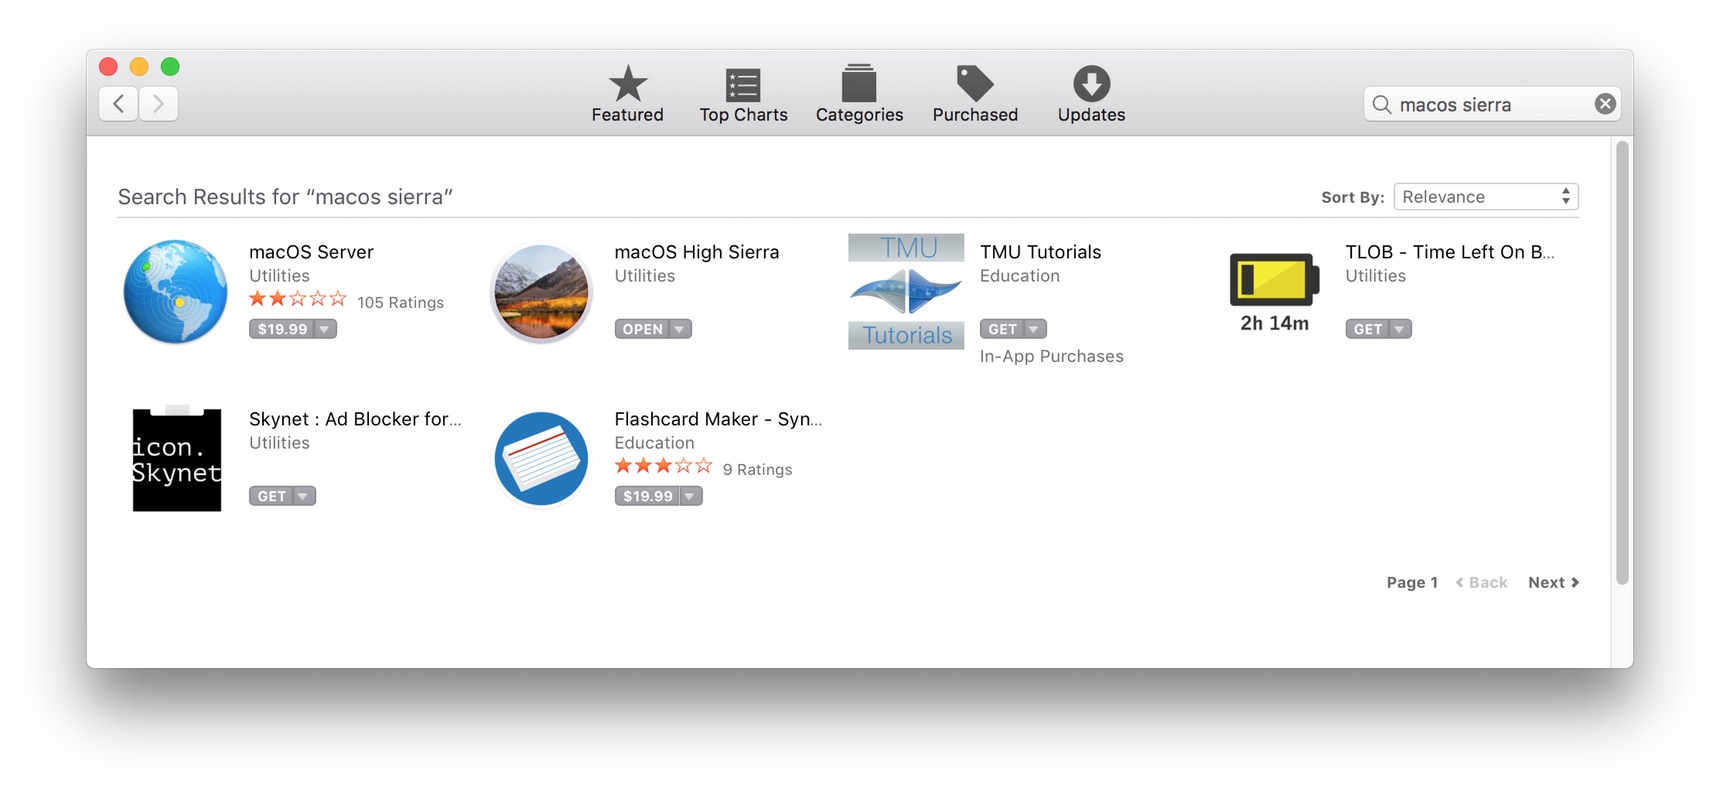
Next I tried searching the Mac App Store for Sierra, but that nets only Server and High Sierra, and a few apps that appear to have gotten away with using "Sierra" in their descriptions:
I then tried the Apple Developer site, but they don't offer Sierra for download either.
Somewhat stumped, I then started searching, and after way too many attempts, I finally landed on this useful page at Stack Exchange, which attempts to explain how to download all older versions of Mac OS X/macOS. Here's the relevant bit for Sierra:
For OS versions since Sierra.
Sierra itself has now vanished from everybody's Purchase History. However, Apple are keeping Sierra fully available, even though High Sierra is out. No Apple ID is required.
Given how much trouble I had finding this page, I thought I'd post it here for anyone looking for Sierra. Going forward, keep that Stack Exchange link handy, as it should be updated in the future as new releases come out.
Last fall, I finally made the move from iPhoto to Photos…months later, I still find myself frustrated by many things in the Photos' user interface.
Today's aggravation dealt with cleaning up a bunch of older photo albums—some I just wanted to delete, others I wanted to convert from Smart Albums into normal albums (because I wouldn't be adding any more photos that used the keywords in the Smart Album). That meant I wanted to delete a bunch of albums—well over 100.
Deleting an album in Photos can only be done from either the My Albums overview, where you can select more than one (though not across folders), or via the contextual menu in the sidebar.
The My Albums view wasn't going to work for me, as I needed to look at and work with many of the albums, across many folders. But after the sixth time of doing the "right click, select Delete Album, tab to Delete in the confirmation dialog, press Return" dance, I was sick of it. Time for another Keyboard Maestro macro.
This one is very simple—it just replicates the actions required to delete an album. With it in place, I click on the album I wish to delete, then press Control-D. It's still more mouse interaction than I'd prefer—why can't I select albums via the keyboard?—but it's oh so much faster than using the contextual menu.
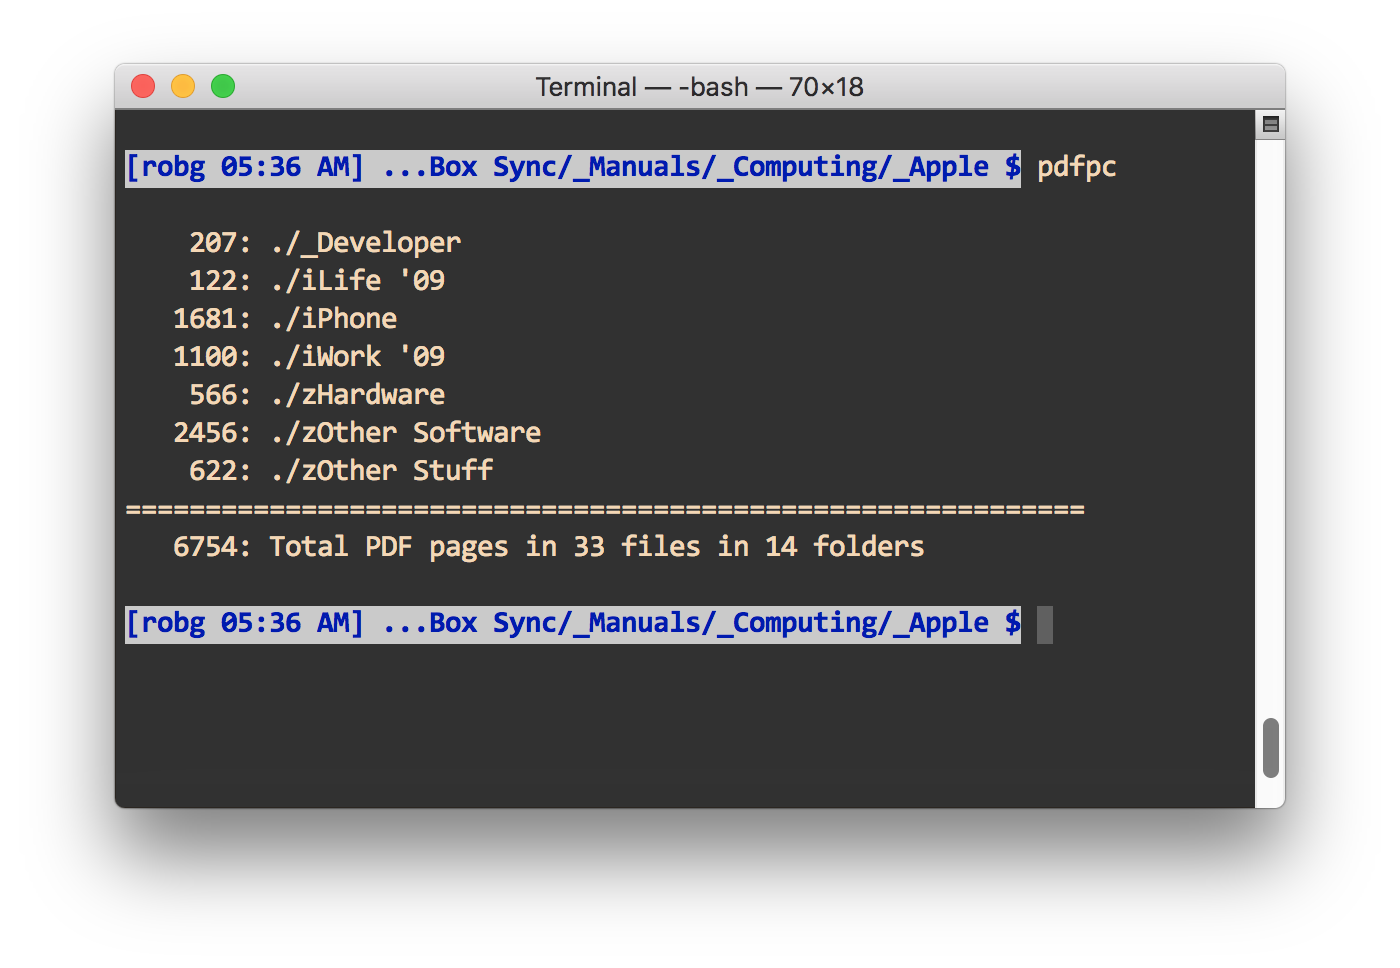
A couple of years back, I created a bash script to count PDF pages across subfolders. Here's how it looks when run on my folder of Apple manuals:
I use this script on the top-level folder where I save all my Fujitsu ScanSnap iX500 scans. Why? Partly because I'm a geek, and partly because it helps me identify folders I might not need to keep on their own—if there are only a few pages in a folder, I'll generally try to consolidate its contents into another lightly-used folder.
The script I originally wrote worked fine, and still works fine—sort of. When I originally wrote about it, I said…
I feared this would be incredibly slow, but it only took about 40 seconds to traverse a folder structure with about a gigabyte of PDFs in about 1,500 files spread across 160 subfolders, and totalling 5,306 PDF pages.
That was then, this is now: With 12,173 pages of PDFs spread across 4,475 files in 295 folders, the script takes over two minutes to run—155 seconds, to be precise. That's not anywhere near acceptable, so I set out to see if I could improve my script's performance.
In the end, I succeeded—though it was more of a "we succeeded" thing, as my friend James (who uses a very similar scan-and-file setup) and I went back-and-forth with changes over a couple days. The new script takes just over 10 seconds to count pages in the same set of files. (It's even more impressive if the files aren't so spread out—my eBooks/Manuals folder has over 12,000 pages, too, but in just 139 files in 43 folders…the script runs in just over a second.)
Where'd the speed boost come from? One simple change that seems obvious in hindsight, but I was amazed actually worked…
A while back on Twitter, I complained about always seeing the "What's New?" screen in Photos when I launched the app…
So Photos launches to the What's New screen every time I launch it…any way to get that to go away? I tried taking the tour, no joy. pic.twitter.com/ELWXzGexXV
This finally irked me enough that I went looking for an answer…and found one, on only the second entry in my search results.
As the linked answer explains, you can fix the problem by specifying that your Photos library is the System Photo Library, as seen here:
I hadn't specified that my Photos library was the actual System Photo Library, so that button was still active. Once I clicked it, the button grayed out, and on next launch, no more welcome screen!
I think you'll only run into this problem if you (1) migrated an iPhoto library, and (2) kept that iPhoto library on an external drive. In those cases, Photos doesn't set the library as the System Photo Library.
Update: With the passage of time—one calendar day, in this case—I can now say that this hint is wrong. Photos does not respect partial day values. Instead, any value less than one is rounded to zero, so all you can really do is create a Smart Album that finds imports you made during the current calendar day. That is, Date Added - is in the last - 0 - days. This is what I'm using now, as it's better than one day, which actually shows two days (today and yesterday), but it's not as nice as iPhoto's Last Import album.
I've left the hint up, because it's been linked to and tweeted a few times, but it's wrong. Sorry for the lack of testing before I posted it.
As noted in priorposts, I've recently moved to Photos from iPhoto. So far, it's been a mixed experience. There are some elements of Photos I like, but as of today, those things are outweighed by the things I don't like.
I've vented on a number of the things I dislike on Twitter, but wanted to expand on both the positives and the negatives in more detail. Hence, this "one week in" review (of sorts) of Photos, from the perspective of an experienced iPhoto user.
I've also included some tips for working with and migrating to Photos for those who haven't yet made the move from iPhoto. Finally, if you're still reading, I've listed the key features I'd really like to see come to Photos in a future update.
Note that I am not a great photographer, but I do take a lot of photos—I have over 40,000 photos and a couple thousand video clips in my database. To keep things organized, I use lots of keywords and Smart Albums, so much of my feedback on Photos is concerned with those areas of the program.
First off, my time with Photos hasn't all been bad; there are some things that I really like in Photos…
My migration from iPhoto to Photos continues, and today's snafu was my discovery that I couldn't rename files in Photos. This is something I've long done in iPhoto—not for every file, but for ones I'd like to group together using something other than Keywords.
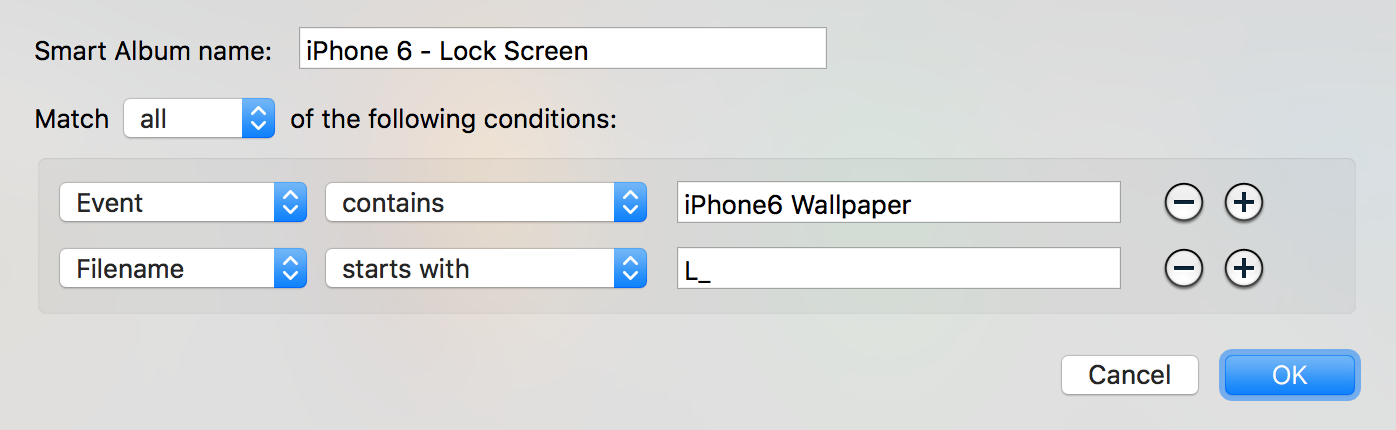
For example, I have a collection of iOS wallpapers, for both the home and lock screens. I name each with either "H_" or "L_" as the start of the filename, which let me create this Smart Album to see them all together:
The inability to rename files isn't critical, in particular because the Title field can be used for the same functionality. But I had a problem: When I migrated, Photos created Titles for some, but not all, of my custom-named images. In particular, it missed all of the iOS wallpapers. I'm not sure if this is because these aren't photos in the traditional sense—they're edited photos I export as PNGs. But whatever the reason, I had hundreds of images that needed a Title that was equal to their Filename.
AppleScript to the rescue…this simple bit of code acts on the selection in Photos, and sets the Title equal to each image's filename.
AppleScript
1
2
3
4
5
6
7
8
9
10
11
12
13
tellapplication"Photos"
activate
setmySelectionto(getselection)
ifmySelectionis{}then
error"Select photos before using script."
else
repeatwiththePhotoinmySelection
tellthePhoto
setthenametothefilename
endtell
endrepeat
endif
endtell
To use this bit of code, just select the photos you'd like to modify in Photos, then run the script. You can make it a bit easier by saving the script into your user's Library > Scripts > Applications > Photos folder (create as many of those as don't exist). It will then be available in the AppleScript menu in the menu bar, assuming you've enabled that in the AppleScript Editor's preferences.
This saved me literally hours of work, copying and pasting filenames to the Title field. (I was surprised this worked, but it did—you can't change the filename, but you can select and copy it.)
April 28 2019 Update:
In the comments, Daryle W. asked about using this script when there wasn't a modified filename—he'd like to use the filename, but drop the extension. I did a quick bit of searching, and came up with the following, which seemed to work in my limited testing. Please have a good backup before trying this, as it's not nearly as well-tested as my original version.
This should work for any filename extension; I tested with JPG and HEIC and it worked fine. (I originally tried this without using a new variable, but it didn't work—I wasn't able to use the filename in the set cutPosition... line, for example.)