Skip to content

Rob Griffiths

Capture a series of screenshots and create a movie

At my day job with Many Tricks, we recently updated our time tracking app Time Sink to version two, and an updated web page was part of the project. For the header area, I wanted to create a time-lapse movie showing the Time Sink Activity Report window changing over an extended period of time (90 minutes), but compressed into a short amount of real-world time (about 14 seconds).

Before the how-to, here's how the final project came out:

To create the time-lapse movie, I'd need a series of screenshots recorded at a fixed interval. I wanted to shoot only the content area of the report window, as I didn't need the "chrome" for the movie (it would just distract from the content). So using the built-in screenshot tool wouldn't work—I didn't want to have to crop 500+ images (even by script).

While I'm sure there are many utilities that can do this (and I'll see them shortly in the comments), a brief web search found nothing that was designed to capture areas of the screen at a set interval. Luckily for me, though, Keyboard Maestro has a screenshot action that can record an area of the screen, along with repeat and wait actions I could use to capture a series of stills.
[continue reading…]


Safari and the YouTube 4K video problem

When I posted my 787 takeoffs and landings video, I ran into a weird problem: When embedded here, the video would play in Safari at 4K (2160p), but when viewed on YouTube, the max resolution available was 1440p. After failing with web searches, I asked Twitter about it…

…but didn't hear anything back. I pretty much gave up on the issue until today, when I stumbled across this article, which describes the exact problem I'm having. The summary of the article describes both the problem and the apparent cause:

What appears to be Google's shift to the VP9 codec for delivering 4K video on the YouTube homepage is preventing Safari users from watching videos uploaded to the service since early December in full 4K resolution, but not from viewing webpage-embedded videos in the same resolution.

Bingo! Google seems to now be using the open and royalty-free VP9 codec for 4K videos viewed on its YouTube site, but reverts to the H264 codec when those same videos are embedded on other sites.

Note that this issue only affects videos uploaded after December 6, 2016:

Videos uploaded to the service prior to Dec. 6 in 4K resolution can still play back in full 4K resolution on Safari from the YouTube homepage.

I was curious about which macOS browsers this issue affects, so I thought I'd do a little experiment…

[continue reading…]


Easily insert special Mac characters using Keyboard Maestro

Note: I'm leaving this up for historical purposes, but there's a new special character palette in town, and the new one is vastly superior to this version. This hint might be useful for general Keyboard Maestro knowledge, but really, use the new version if you want a special character palette.

Between blog posts and documentation for Many Tricks, I find myself typing the Mac's "special character" symbols quite often: ⌘ (Command), ⌃ (Control), ⌥ (Option), ⇧ (Shift), and  (I think that's an Apple).

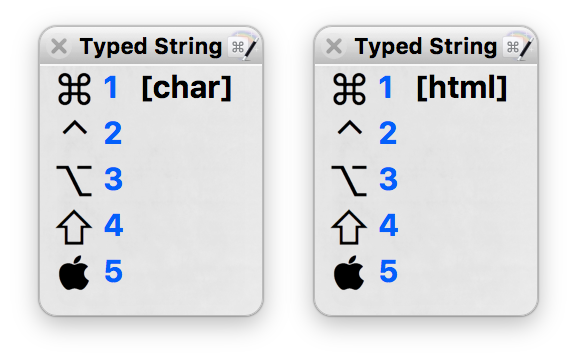
You can type some of these via keyboard shortcuts (the  is ⇧⌥K), or by using the Emoji & Symbols viewer. But I find both those methods clunky and slow; instead, I used Keyboard Maestro to create a couple of pop-up palettes that show all the characters:

I use two palettes because while I typically can paste the character itself, that doesn't work in some spots—like here in the WordPress' blog post editor, for instance. In those places, I need to use the HTML code for each character—so that cute little  appears when I insert . Ugh. Hence the character palette on the left and the HTML palette on the right.

When I want to insert a special character, I first type the activation keys for either the character (ccc) or HTML (hhh) palettes. When the palette appears, pressing one through five will insert the corresponding character or HTML code for that character. No keyboard shortcuts to memorize, no need to negotiate the Emoji & Symbols viewer. Just a few keystrokes, aided by a visual representation of each character, and I'm done.

As always, you can download these macros if you'd like to use/modify them for yourself.

[continue reading…]


See the actual strength of the iPhone’s cellular connection

This is a very old tip, but I'd never seen it before, so I figure it might be new to some others, too. My home has a relatively weak cell signal, varying between one and three dots on the iPhone's display. But sometimes, even when I have three dots, the quality of my calls seems spotty.

While looking for some tool to try to analyze the cell signal's actual strength in my home, I stumbled on this useful tip at Lifehacker: It's possible to make your phone display its actual signal strength in decibel-milliwatts, or dBm. Here's my phone, showing the stock display on the left, and the dBm value on the right:

And this explains a lot: While two dots of five seems like a decent connection, the actual value of -116dBm is bad. (Signal strength goes from a best of 0 to a worst of -140 or so.) How bad? According to this site, it's an unusable signal. So, yea, don't try to call my cell phone when I'm at home!

If you'd like to set your phone to display the actual signal strength (you can tap the indicator to flip between values and dots), read the above-linked article (or any of the thousands of other sites that have the same tip), or just read the rest of this post, where I've recreated the simple steps.

[continue reading…]


An even easier way to use Excel’s Paste Special dialog

I recently explained how to use the keyboard in Excel's Paste Special dialog box, and this is a great timesaver on its own. But I use Paste Special a lot, especially with Formats, Formulas, and Values, so I made those three even easier to use via the keyboard…

Each one has its own direct keyboard shortcut, courtesy of Keyboard Maestro. Here's how I set it up; these instructions should work (with some changes, of course) for any app that can script keystrokes.

First, I created these macros in an Excel group, so they're only active when Excel is frontmost (no need to create global hot keys that you only use in one program). The actual macros are pretty trivial:

  1. Send Command-Control-V to bring up the Paste Special dialog
  2. Pause just long enough for the dialog to appear onscreen
  3. Send the chosen shortcut key—T, F, or V in my vase
  4. Send the Return key to execute the action

Then I just assigned each one to the same key used within the dialog, but with Command and Option to make it usable from anywhere within Excel.

[continue reading…]


Use the keyboard in Excel’s Paste Special dialog box

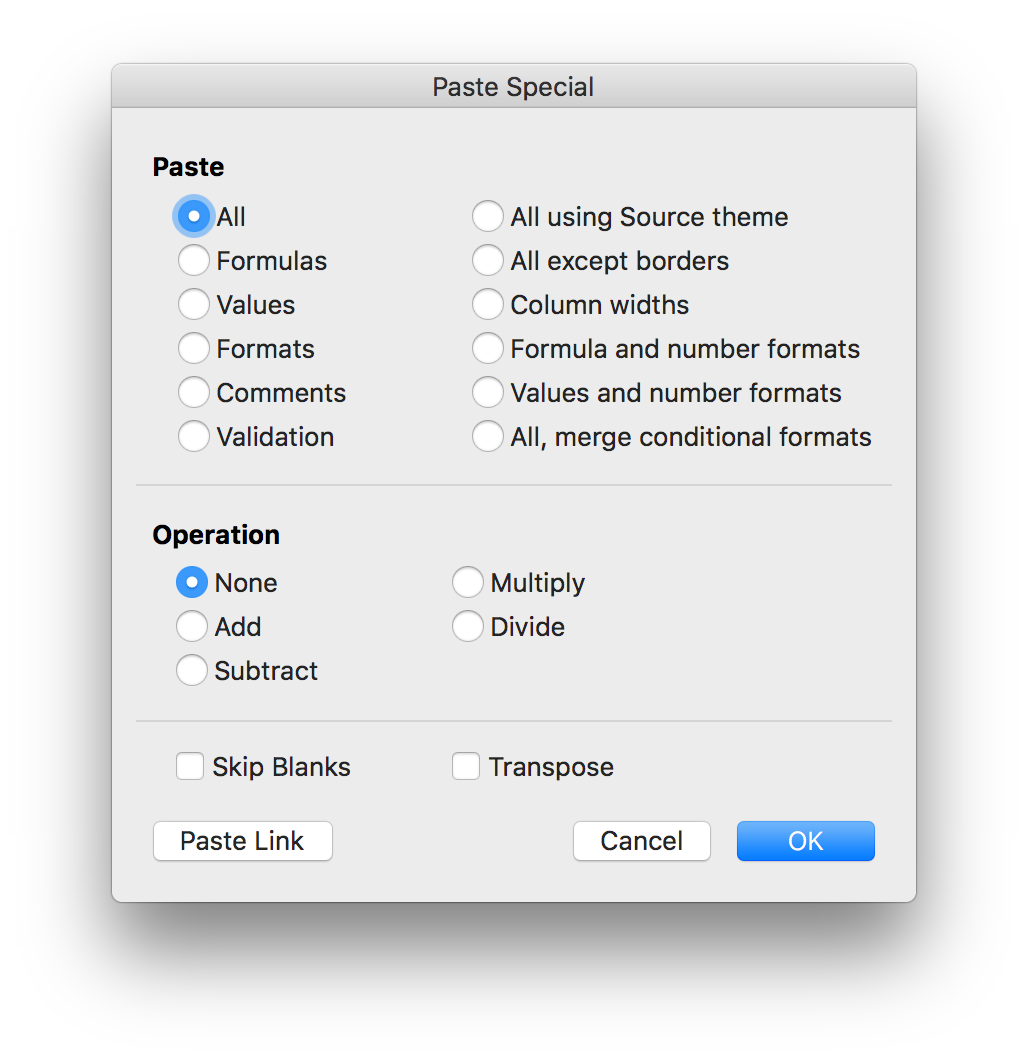
When I'm working in Excel, I spend a lot of time in the Paste Special dialog box—pasting formulas, pasting all but formats, pasting only formats, etc. You can call up the dialog with a keyboard shortcut (⌃⌘V), but it then looks like you're stuck using the mouse, because there aren't any keyboard shortcuts for the various actions. But really, there are…

(Note: This applies to the current version of Excel, i.e. the one in Office 365. Based on the comments, it apparently also works in Excel 2011 if you add the Command key.)

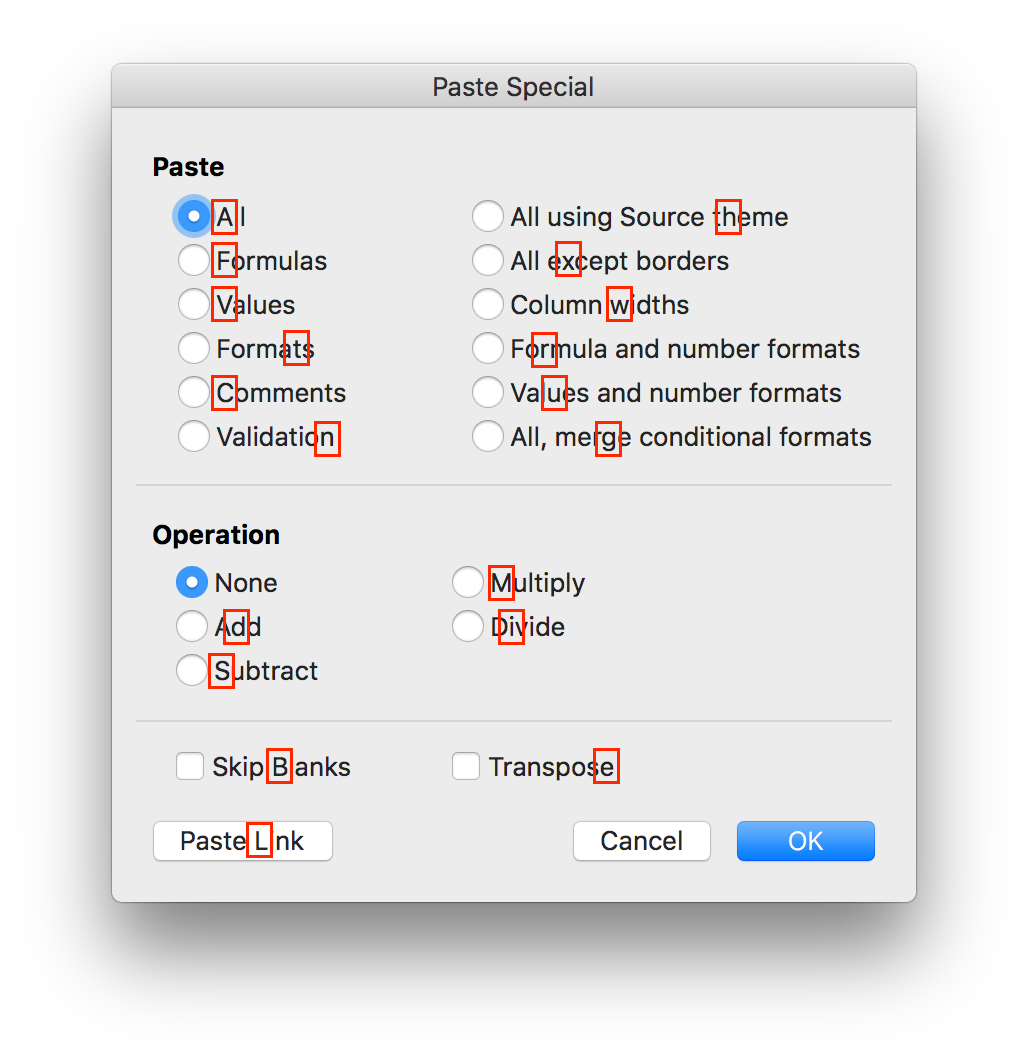
On Excel for Windows, one character in each option has an underline, indicating that option's keyboard shortcut. The good news is that these same shortcuts work on the Mac, even though they're not shown. (There is one apparent oversight: The O key should select Operation: None, but it doesn't seem to work on the Mac.)

Here are all the shortcuts, graphically:

Press the highlighted key, and that action will be selected; press Return to execute the chosen command, and you can use the Paste Special dialog without ever touching the mouse. (Note that the Paste Link action executes immediately when chosen, so it's a one-key operation.)

Because graphics are horrid for web searching, the text version of each shortcut, in alphabetical order, is shown below.

[continue reading…]


An alternative way to search Mail for senders and content

For better or worse—most might argue "worse"—I rely on the built-in macOS email client, annoyingly named Mail. (Why annoying? Try searching the web for help when you're having trouble with "Mail"…) I've tried nearly every third party replacement, but something (usually in the UI) always brings me back to Mail.

In any event, I have a huge database of messages that I've built up over the years, especially since starting at Many Tricks with Peter Maurer back in 2010. Often I want to find a message that's both from a particular person, and contains certain words. For example, I want to find all emails from Peter that contain the word "pricing."

The "correct" way to do this in Mail is to type From: in the search box, then start typing the name you want to match. As you type, a list of possible matches appears below the search box. Use the arrow keys (or reach for the mou…no, don't do that) to move down and select the right name from the list of matches, then press Return.

When you press Return with the desired name highlighted, the From: text in the search field turns into a token with the selected user's name, as seen at right. You can then continue typing the rest of your search terms; pricing in this case. Press Return again, and the search runs and returns the matches (17 messages in my example).
While this works fine, it's annoying and time consuming to interrupt the flow of typing a search by visually scanning a box, moving a selection, pressing Return, then starting to type again. So I thought I'd try the logical alternative—I just typed in my search query: from:peter maurer pricing. But this returned no matches.

On a lark, I tried reversing the order: pricing from:peter maurer.

Bingo! This works as expected, showing only messages from Peter that contain the word pricing. (Oddly, it finds two more matches than does the official method, and I cannot figure out why those messages are excluded from the other method's matches.)

[continue reading…]


Add Drafts to WordPress admin sidebar

One of the things that annoys me about WordPress' admin side is that to get to draft versions of posts, you have to first select Posts > All Posts, wait for that page to load, then select Drafts. The majority of the time, when I'm headed to my posts, I'm headed to the drafts section to work on an upcoming post.

This little modification adds a Drafts entry to the Posts sidebar item, as seen in this before-and-after view:

The change is relatively trivial, requiring only a simple edit to your theme's functions.php file. David Walsh explains it all in this thorough post. I've recreated the bit of code in the remainder of this post, just in case the linked site ever goes away. (It's all under the MIT License, so there are no restrictions on copying.)

But really, just go read David's post, he explains it very well. I've added this to the admin page on the three sites I run, because it's just so convenient.

[continue reading…]


Randomly merge lists in Excel

This morning, while working on a customer request, I had to create a list of words by randomly choosing words from two lists, and then mashing them together. This isn't something that I've ever done before, and I'm not sure how relevant it might be for others, but I'm documenting it here just in case someone is searching for such a solution.

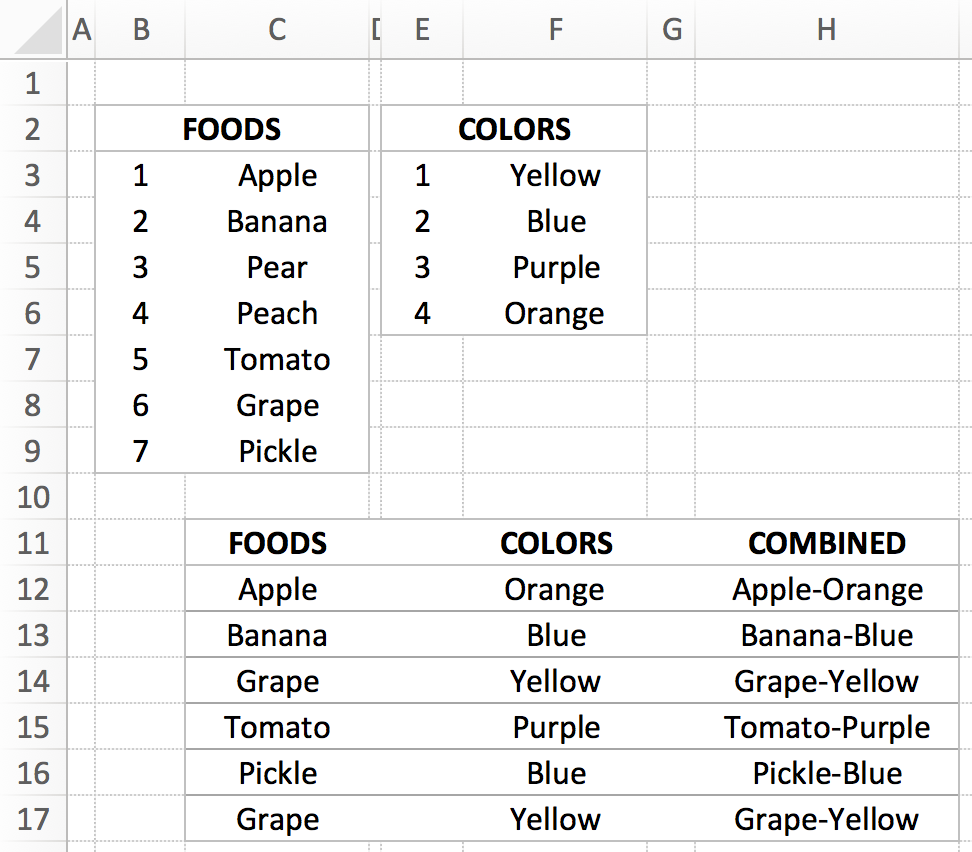
Here's how my little test spreadsheet looked when I was done with it:

I didn't realize it at the time, but this could be a "modern paint color" name generator…"Yes, I'd like two gallons of the Pickle-Purple, please." Anyway, the COMBINED column contains the final result, with the FOODS and COLORS columns showing randomly-selected entries from the two lists. Each time you recalculate the sheet, all the selections will change.

The key bit is the formula to grab a random entry from the list; here's what that looks like in cell C12 ("Apple"):

=VLOOKUP(RANDBETWEEN(B$3,B$9),B$3:C9,2)

It's just a basic VLOOKUP that uses RANDBETWEEN to grab a random row from the lookup table. Not rocket science, but nothing I'd tried before. (For this to work, your table entries need row numbers, obviously.) The COMBINED column is just a simple text formula, i.e. =C12&"-"&F12 to combine the two random values.

I also wasn't aware of the RANDBETWEEN function—it returns a whole number between the values you specify. That is so much easier than using RAND and then having to multiply and round off, etc.

Feel free to download the workbook if you'd like to take a look.


Book: “As You Wish: Inconceivable Tales…” by Cary Elwes

Like 95% of the audience and 97% of the critics, I'm a big fan of The Princess Bride. The movie turns 30 this year (special anniversary super-duper Blu-ray extended mega cut, please?), and it stands up well to the test of time. If you haven't seen it yet, well, see it. It's not only full of quotable quotes ("Inconceivable!"), the story is enjoyable, the acting campy and perfect, and certain characters are just incredibly memorable. Well worth the time.

But this post isn't about the movie. It's about a book about the making of the movie, written by Cary Elwes, who starred as Westley, aka The Man in Black. And in the interest of thoroughness, the book's full title isn't As You Wish, it's As You Wish: Inconceivable Tales from the Making of The Princess Bride.

The book is well written (with some credit to Joe Layden, noted as the "with" on the cover), and details Carey's experiences with the film starting with the original casting call (actually a note under his hotel room door) up through the release and some detail on the inept marketing behind the movie. It's a great read, and very interesting on its own.

But what really made the book for me were all the quotes that Cary secured from others involved in the production. These are present throughout the book, and you seldom need read more than a page before encountering one.

They aren't shown inline, which would interrupt the story flow. Instead, they're presented as asides, like this one:

Each appears near relevant content, so they're applicable to what you're reading. But by separating them, you can read them when you like. These snippets have some real gems, such as the one above, which explains how The Princess Bride book came to be. Since finishing the book, I've gone back through it, just to read all these asides again; they really are wonderful.

If you're a fan of The Princess Bride, Cary's book is well worth your time.