Skip to content

Unix

Install and configure Apache, PHP, and MySQL on macOS Sierra

Fair warning: Today's tip is over-the-top geeky.

After many years of not doing anything with web serving on my local Mac, I recently had a need to look at some mySQL/PHP-based web packages. While I could install these on robservatory as tests, I generally like to install things locally first, because I'll install a handful of packages until I find the one I like. But it'd been so long, I didn't have anything configured. (Remember when enabling Apache—i.e. web sharing—was a feature of the System Preferences' Sharing panel? Ah, good times!)

I could have opted to use the built-in Apache, but I wanted something that I could more easily keep up to date, and that, if I chose, would be easy to remove. The good news is that Homebrew has packages available for Apache, PHP, and MySQL. Homebrew installs everything in its own directory tree, and adding and removing packages is simple—exactly the setup I wanted.

So in theory, installation was as easy as three brew tap commands. The reality, though, is that the installation is a bit more complex. OK, it's a lot more complex. The good news is that, this being the age of the internet, help is but a search away. Or the advice of a friend away, which is what I used in this case.

A friend pointed me to this excellent installion guide that walks through the entire process, including installing two versions of PHP with the ability to switch between them on the fly.

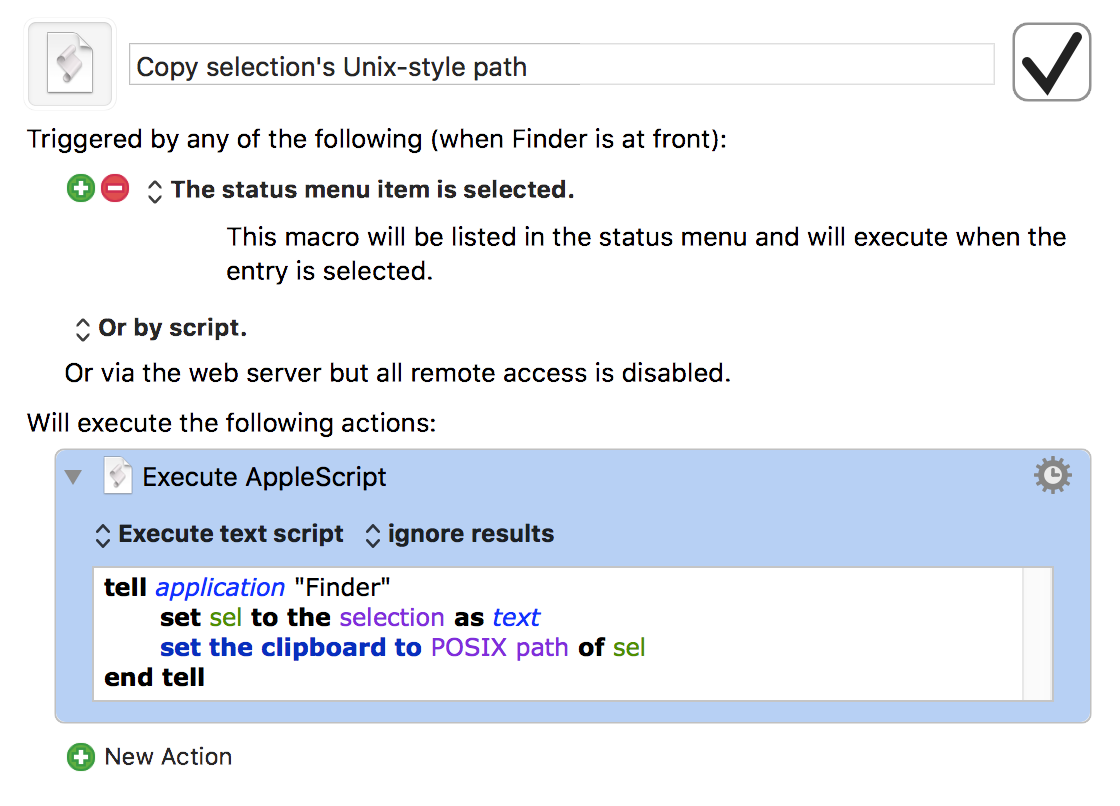
It was this on-the-fly switching, though, that gave me troubles: I couldn't get a site to load unless I specified "index.php" or "index.html" as part of the URL. (Apache is configured to grab those files automatically.) Solving that one took a bit of time…

[continue reading…]


Start Terminal sessions with a possibly-witty quote

Really long-time Unix users—as in mainframe-based Unix—are probably familiar with fortune. This silly little program grabs a random line from a collection of files holding quotes, sayings, jokes, etc. The Unix I used many decades ago would print an entry from fortune each time you started a new session. Here are some examples of what might greet me each time…

"It's a dog-eat-dog world out there, and I'm wearing Milkbone underware."
-- Norm, from _Cheers_

Mobius strippers never show you their back side.

All constants are variables.

Years ago, I had set up my Mac's Terminal to output a fortune each time I opened a new session (window). At some point, though, I forgot to set it up on a new system, so it was gone. While fortune isn't included in macOS' Unix core by default, there are many ways to get it back, and it's relatively simple to do so. Here's one way…

[continue reading…]


Easily create animated GIFs from video via ffmpeg

I recently explained how I captured a series of screenshots and turned them into a movie. While I was working on my tweet about the write-up, I thought an animated GIF of the final movie would be a nice way to show what it was I was trying to do. So that's what I wound up doing:

So how did I create the animated GIF from the movie file? I know there are any number of great apps that will do this (ScreenFlow, for one), but I had another thought: While working on the animated screenshot movie (which I created using ffmpeg), I had happened to read about ffmpeg's ability to create high quality animated GIFs, so I thought I'd give that a try.

[continue reading…]


Get more details from transcode-video

While working on my massive Blu-ray ripping comparison, I wanted more information about what some of the transcode-video presets were doing. That is, if you pick --target big, exactly what settings are being used to rip the video?

It turns out there's --dry-run option for transcode-video that will tell you exactly that. (I've added some line breaks for readability here.)

What's neat is that you can also use this to see what the default options are for transcode-video when you don't supply it with any options. Just use the --dry-run parameter option but leave off any of the presets (i.e. --target big), and the output will show you the defaults.

In addition, you can use it on already-ripped media to get their details as well, regardless as to how you ripped the movie.

In a related vein, I was having issues with the above rip, because I thought that the surround sound track wasn't being ripped. Again, thanks to Don, I learned about a second command line option for transcode-video that reveals exactly what's in a ripped video.

[continue reading…]


Semi-automatic Homebrew and video-transcode updates

As I've written about in the past, I use Don Melton's video transcoding tools to rip Blu-Ray discs. I also use Homebrew to install some of the transcode video dependencies, as well as other Unix tools.

Keeping these tools current isn't overly difficult; it only requires a few commands in Terminal:

$ brew update
$ brew upgrade
$ sudo gem update video_transcoding

My problem is that I often forget to do this, because—unlike most GUI Mac apps and the Mac App Store—there's no built-in "hey, there's an update!" system. Suddenly, two months and many revisions later, I finally remember (usually when I see a tweet about a new version of something.) So I thought I'd try to write my own simple update reminder.

I didn't really want a scheduled task, like a launchd agent—it's not like these tools need to stay current on a daily basis. (And one of them needs to run with admin privileges, which complicates things.) I just wanted something that would remind me if it'd been a while since I last checked for updates, and then install the updates if I wanted it to do so.

After mulling it over, I came up with a script that runs each time I open a Terminal window (which I do daily). The referenced script looks at the date on a check file, and asks me if I'd like to check for updates if that date is more than a week older than today's date. This is perfect for my needs: The reminder is automatic, but I can choose when to install the updates based on what I'm doing at the time. If it's been under a week since I last checked, nothing at all is different about my Terminal launch.

Read on for the script and implementation details. (Note: This is not written for a Terminal beginner, as it assumes some knowledge about how the shell works in macOS.)

[continue reading…]


Use sips to quickly, easily—and freely—convert image files

Quite often, I find myself with a number of images (screenshots, typically) that I'll want to convert from one format to another. If you search the Mac App Store, there are probably 300 apps that will let you do this; many are probably free. You could also use Automator, which has some good image conversion abilities, but can't (for example) specify the quality of a JPEG conversion.

But the best way I've ever found is to use a tool that's been included with every copy of macOS since the release of Mac OS X 10.3 (Panther) in October of 2003: A command line tool called sips. Yes, it requires using Terminal, but it's quite easy to use. sips can modify one file, or any number of files, converting from one format to another. You can also use sips to resize images, rotate images, and more.

Basic usage of sips is straightforward. (The following is written for Terminal neophytes, so apologies for any over-explaining). Assume you have an image named Beach party.tiff that you'd like to convert into a smaller JPEG, but with a relatively high quality setting. Here's how you'd do it using sips:

  1. Open Terminal, in Applications > Utilities.
  2. Type cd, then press the Space Bar, then drag in the folder that contains the image(s) to be converted. (Alternatively, you can use this tip to directly open the selected Finder folder in Terminal.)
  3. Type this, then press Return: sips -s format jpeg -s formatOptions 80 "Beach party.tiff" --out "Beach party.jpg"

When you press Return, sips will convert your image file—and it's really fast, even on larger files. The formatOptions item lets you set the quality of the JPEG in either percentage (as I used), or you can use words: low, normal, high, or best. Hopefully obviously, you specify the new filename after the --out string.

Note that the filename is enclosed in quotes. Those quotes are required, otherwise any spaces in your filenames will cause the command to break.

The real power of sips isn't in converting one file, though; it's in batch converting many files. Here's how to do that…

[continue reading…]


Put Unix path to selected Finder item on clipboard

Thanks to the commenters for pointing out the much easier way to do this: Select an item in Finder, then press Command-Option-C. All done. Leaving the hint here as an example of a Rube Goldberg machine.

In two recent geeky tips, I showed how you can open a Terminal window in the directory of the selected Finder item, and how you can view Unix man pages in Preview. To finish the trifecta of geekiness, today's tip lets you quickly place the Unix-style path to the selected Finder item on the clipboard. (It's actually a simplified version of the 'open this in Terminal' tip.)

The AppleScript that accomplishes this is quite simple:

If you run that in Script Editor, you'll see that your clipboard contains the path to whatever you had selected in Finder. But running the AppleScript in ScriptEditor isn't a great timesaver. Instead, put it into whatever tool you have that can run AppleScripts via hot key or menu bar entry or whatever.

In my case, I put it into a super-simple Keyboard Maestro macro. I've set it up to show in the Keyboard Maestro menu bar when Finder is active:

There are countless tools that can run AppleScripts in various ways, including our own Butler, LaunchBar if you save the script first, etc.


View Unix man (help) pages in Preview

Today's tip goes well with yesterday's tip, which explained how to open any Finder item's folder in Terminal via Keyboard Maestro. Once in Terminal (and sometimes even when not in Terminal), I'll often want to check out the man page (help) for a given command.

You can do this directly in Terminal with man [name of command], of course, but then it opens on top of whatever you were working on, and you have to read it in Terminal. You could use another tab or window, but you'd still be reading in Terminal. There are times, too, when I'm writing about the Unix side of macOS, so I'm not even in Terminal, but still want to view a man page.

My solution to this problem is two different ways of doing the same thing: I open man pages as nicely-formatted PDFs in Preview. The method I use to get to that point depends on if I'm working in Terminal or not.

Update: I've modified the script and macro so that they properly handles two-argument man commands, such as man 3 printf.

In Terminal

Based on an old Mac OS X Hints tip, I created a very simple shell script:

The key to this little script is the -t option on the man command. From the (hehe) man man help file, here's what that does:

  -t     Use /usr/bin/groff -Tps -mandoc -c to format the manual page,
         passing the  output to stdout. The default  output format  of
         /usr/bin/groff -Tps -mandoc -c is  Postscript, refer  to  the
         manual  page  of /usr/bin/groff -Tps -mandoc -c for  ways  to 
         pick an alternate format.

In other words, the -t converts the help page into a PostScript file, which is something that Preview can easily open (which is just what the last line of the script does).

I named this script preman, because it uses Preview to open man pages. Once saved, I made it executable (chmod 755 preman), and I can then open any man page in Preview by typing, for instance, preman bash.

The output is nicely formatted, and by opening the man page in Preview, my Terminal session is uninterrupted. A quick adjustment with Moom, where I have a saved layout to position Preview and Terminal, and I can scan the man page while working in Terminal.

But what about when I'm not in Terminal? For that, I basically implement the same shell script, but with it set up to run within a Keyboard Maestro macro.

[continue reading…]


Detailed instructions for installing the transcode-video tools

My method of ripping Blu-ray discs relies on Don Melton's video_transcoding tools. While these tools work great, they are command-line only (i.e. Terminal required). In my guide, I glossed over the installation bit, referring back to Don's basic guide. But for those new to Terminal, even Don's instructions may be too light on the details.

Hence this detailed installation guide for Don's video_transcoding tools. This guide walks a new user through every step of the process, hopefully getting even someone brand new to Terminal up and running with Don's tools. This will only be of interest if you're having trouble getting the video_transcoding tools installed. If that's you, though, hopefully this will be helpful.

The entire installation of the video_transcoding tool set and all its dependencies will take place in Terminal, which is the direct line to the Unix core of macOS. Open Terminal, which you'll find in /Applications > Utilities, and you'll be greeted by a window with some text; something like this:

This lovely interface is where you'll spend the next chunk of time, installing the video_transcoding tools, and all the programs it uses to get its work done.

Note that this guide is not a detailed introduction to Terminal or Unix. (There are many such guides on the net, and if you're interested, they're well worth reading.) This guide is focused solely on how to use Terminal to install the video_transcoding tools, not how to use Terminal on its own. So let's get started…

[continue reading…]


Revisiting ripping Blu-ray discs

A couple years back, I explained how I rip Blu-ray discs. A lot of time has passed, and I now use a slightly different procedure that results in much faster rips—with the caveat that the resulting file will be larger than the "slow" method, and is technically of slightly lower quality, though I can't visually distinguish the two.

The new method uses Don Melton's amazing video transcoding tools, a set of Unix programs that optimize video conversion in ways you cannot do (or easily do) in the Handbrake GUI. If you're new to Unix, but would still like to try these tools, I wrote a detailed set of instructions that should help get you up and running.

Using these Unix programs, you can rip a disc with various parameters, including one to optimize for speed (with good image quality) and another that tries to minimize the file size.

Here's a quick comparison of all three methods, as tested with the three-hour Hamlet Blu-ray. The 'Handbrake GUI' rip was done using, well, the Handbrake GUI as described in my original article. The second and third rows use Don's tools set to quick and veryquick modes, and the final row uses Don's tools set to optimize the file size.

MethodData CopiedConvert (hrs:mins)File Size
Handbrake GUI47.5GB3:526.8GB
transcode - quick40.1GB2:209.2GB
transcode - small40.1GB3:126.5GB

Tested on a late 2014 27" iMac with a 4GHz Core i7 and 24GB of RAM.

Using Don's tools in "quick" mode, you save time two ways: 7GB (15%) less data is copied to the hard drive, and the conversion process is over 90 minutes (38%) faster. The downside is that the final file size is 2.4GB (35%) larger. And that's what they call a tradeoff.

Using the "small" mode in Don's tools, you still save the 7GB (15%) of data copy, and still save 40 minutes (17%) over the original method. In addition, the file size is smaller than the Handbrake GUI version.

To summarize, regardless of whether you care more about file size or ripping speed, Don's tools provide an advantage over the Handbrake GUI: Either method is notably faster, and the small option generates smaller (or probably at worst, very similar) file sizes. (There's also a "big" option, if you don't mind somewhat larger files at a higher quality level.)

Keep reading to see some examples of the image quality of each method, and information on how to install and use Don's video transcoding tools.

[continue reading…]