Skip to content

Unix

Create Time Machine-like backups via rsync

Taking a break from the recent Frankenmac posts, here's a little trick for creating "Time Machine like" backups of anything you'd care to back up1I don't know how well this might work for Mac files, as opposed to Unix files. But Mac files can be saved to the real Time Machine.. In my case, it's the HTML files off of my web sites, both personal and work. I used to simply back these up, but then realized it'd be better to have versions rather than totally overwriting the backup each day (which is what I had been doing).

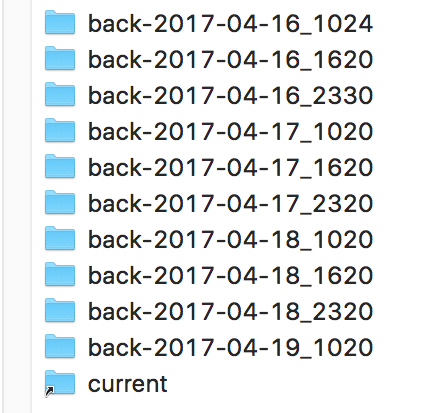
Once you've got it set up and working, you'll have a folder structure similar to the one at right, with one folder for each backup, and a "current" link that takes you to the newest backup.

I get zero credit for this one; my buddy James explained that he'd been using this method for a year without any troubles, and pointed me to this great guide2The original site that hosted this script is gone; I've linked to a copy I found on archive.org. Original URL:
https://blog.interlinked.org/tutorials/rsync_time_machine.html
that explains the process.

I used that guide and added the following to my backup script to create my own customized Time Machine for the files from here, robservatory.com:

/usr/local/bin/rsync -aP \
  --link-dest=/path/to/quasi/TM_backup/current user@host:/path/to/files/on/server/ \
  --exclude "errors.csv" \
  --delete --delete-excluded \
  /path/to/quasi/TM_backup/back-$newtime
rm -f /path/to/quasi/TM_backup/current
ln -s /path/to/quasi/TM_backup/back-$newtime /path/to/quasi/TM_backup/current

And that's all there is to it. Note that you may need a newer version of rsync than what comes with macOS now (2.6.9)—I use version 3.1.2 from Homebrew, so I can't say for sure that this script works with the stock version.

I've only been using this for a couple weeks, but it's working well for me so far.


Adjusting for the oddities of ctime

In the shell script I use to back up my web sites (I really should update that, they're much different now), I include a line that trims the backup folder of older compressed backups of the actual WordPress databases. That line used to look like this:

find path/to/sqlfiles/backups -ctime +5 -delete

I thought this should delete all backups in that folder that are at least five days old, via the ctime +5 bit.1Footnote: I know now I should have been using mtime, though it would have had the same issue I had with ctime. But it turns out I thought wrong. The above will delete all files that are at least six days old. Why? I don't know why it works this way, but it's mostly explained in the man page for find (my emphasis added):

-ctime n[smhdw] If no units are specified, this primary evaluates to true if the difference between the time of last change of file status information and the time find was started, rounded up to the next full 24-hour period, is n 24-hour periods. If units are specified, this primary evaluates to true if the difference between the time of last change of file status information and the time find was started is exactly n units. Please refer to the -atime primary description for information on supported time units.

To make find do what I wanted it to do, I just needed to change +5 to +5d. Simple enough…but while figuring this out, I stumbled across this page, which has an alternative solution with more flexibility:

find path/to/sqlfiles/backups -mmin +$((60*24*5)) -delete

The mmin parameter is much more precise than ctime:

-mmin n True if the difference between the file last modification time and the time find was started, rounded up to the next full minute, is n minutes.

By using mmin, I can be really precise. As shown, 60*24*5 gets me the same five-day interval as ctime +5d. (And yes, I could have used 7200 instead of 60*24*5, but I find it clearer to leave it in its expanded form.)

But I could instead delete backups that were older than 3.25 days (60*24*3.25 or 5040), or for any other arbitrary time period. I like the flexibility this offers over ctime, so I've switched my script over to this form.


Cancel shell script on remote connect failure

I use a shell script to back up this site (and a variant of the same script to back up the Many Tricks site). I've been using these scripts for over a decade (wow), and though they've evolved, they're still fundamentally the same. (I did switch from cron to launchd for launching them, however.)

While the script typically runs very nicely, I recently noticed that my last backup was from a few weeks ago—uh oh. It didn't take long to figure out what had gone wrong: My ISP changed the hostname of the machine my site runs on, and my script uses ssh, scp and rsync, which connect via the hostname. Unfortunately, the failure mode is silence, because the script runs via a scheduled task. The only way I knew it failed was when I went to check the backup folder. Obviously, something more automatic than that would be desirable.

After much web searching, I couldn't find anything that seeemed like it'd do what I want: An email (and onscreen alert) if my backup failed. I found lots of Unix solutions to send mail using sendmail, but I didn't really want to enable that on my Mac. So I futzed around and built a simple checker that will mail me when it can't reach my web host.

[continue reading…]


How to find modified preference values

My recent tip about using Keyboard Maestro to toggle the visiblity of hidden items in Finder (which turned out to be irrelevant for Sierra users; just hold ⌘⌥.) works by checking a hidden macOS preferences setting. In this case, I checked for the existence of the AppleShowAllFiles key, which let me toggle the visiblity of invisible files based on the result of the check.

Controlling a macro—or a shell script or AppleScript—by checking (visible or hidden) preference values can be very useful. But how do you find out the name of the preference you need to check, and in which domain (preferences file) you'll find it? Hidden prefs are actually easiiest, because the command you use to write them tells you both the preference name and its location. For the hidden files in Finder tip, for instance, the command is this:

defaults write com.apple.Finder AppleShowAllFiles YES

So to check that in a script, I just need to save the results of defaults read com.apple.Finder AppleShowAllFiles into a variable, and I can then take action based on the variable's value. But what about a normal pref, in an application (or in System Preferences)? Say you wanted to check whether Apple's Pages app was set to show its rulers in inches or centimeters…

Why would you want to know this setting? I don't know, I was just trying to come up with an example. Just go with it…

How do you find out the key name associated with that particular preference, and what file it's stored in? I use a couple of different methods.

[continue reading…]


Change shell scripts based on where they run

This is one of those "oh duh!" things that I wish I'd realized earlier. I have a few shell scripts that I'd like to keep on the Many Tricks cloud server, as I'd like to use them on multiple Macs.

But depending on which Mac is running the script, I might need to use unique code. The path to my Dropbox folder, for example, is different on my laptop and my iMac. So if I want to reference the path to my Dropbox folder, it needs to be different on each Mac. I couldn't figure out how to make that happen with just one script, so I'd been using near-identical versions on each Mac.

Then I remembered the hostname command, which returns the name of the machine running the command:

$ hostname
Robs-rMBP.local

And that was the tidbit of "duh!" knowledge I needed. With that, and the case statement, I can make my shell scripts use code based on which machine runs them. For instance, I can set unique paths for the script that grabs the latest versions of our apps from our server:

myhost=`hostname`
case $myhost in
  Robs-iMac.local) theHub=/path/to/apps/on/manytricks/cloud ;
                   theDest=/path/to/local/copy/of/apps ;;
 
  Robs-rMBP.local) theHub=/different/path/to/apps/on/manytricks/cloud ;
                   theDest=/other/path/to/local/copy/of/apps ;;

                *) echo "Sorry, unrecognized Mac." ;
                   exit ;;

  cp $theHub/$appname $theDest/$appname
  etc

Another nice thing about this is the script won't run on a Mac I haven't set up yet, thanks to the #) bit. And if I happen to rename one of my Macs, the script will also fail to run, letting me know I need to update the name in the script.

A simple tip, but one I'd managed to overlook for years. Now that I've written it up, that shouldn't happen again.


Install a cloud driver server of your very own

For many years, Peter and I have managed our shared Many Tricks files via Dropbox. To support Dropbox, we purchased an upgraded plan for $99 a year, which came with 1TB of space. We then used the same login to share the Dropbox folder. We didn't need anywhere near 1TB (we have about 4GB of shared files), but felt it was right to support Dropbox.

While this worked well, and we had no issue paying for it, we had a few concerns—about space, third-party involvement, and something possibly unique to my usage scenario. You can read the details in the remainder of this post, but to make a long story short, I went looking for a replacement. And I found one in Nextcloud. Nextcloud has a commercial product, but it's open source, so you can also install it on your own server, and via many hosting companies that have it preinstalled.

I was able to install it easily with our hosting provider; I had the basic install up and running in under 30 minutes. There are also native clients for Mac, as well as Windows, iOS, and Android. The Finder view with the Mac ap installed (it's an official Finder extension) is very similar to Dropbox or OneDrive or any other cloud client with a Mac app:

For us, Nextcloud has every feature we need for sharing our Many Tricks' files; read on for more detail on why we moved, install and admin, the Mac client, and some closing comments.

[continue reading…]


Edit long Terminal commands in a visual editor

Here's a quickie tip for those of us who occasionally string together complex commands at Terminal's prompt: You may want to add this simple line to your .profile (or whatever init file you use):

set -o vi

What does it do? It tells Unix/Terminal to set the input line editor to vi. When might this be useful? Let's say you've typed a long command, like the one to launch a background screen saver:

/System/Library/Frameworks/ScreenSaver.framework/Resources/ScreenSaverEngine.app/Contents/MacOS/ScreenSaverEngine -module "Arabesque" -background &

Before you hit Return, you notice a couple of typos early in the command. You could use cursor movement keys to move around, of course, but with the above command in place, just press Escape and hit v: The entered command will open for editing in vi. Make your changes, then do the usual :wq vi exit dance, and your edited command will then execute.

Note that if you edit a command but then don't save it (i.e. you press :q!, you may have to hit Return on the command line to get out of an odd "waiting for v to edit" mode. (At least that's the only way I found to return to normal typing.)


Open Unix man pages in their own Terminal window

A while back, I wrote about opening Unix man pages in Preview, and this is still my preferred method of browsing man pages. However, there may be times where Preview is overkill, and you want to stay in Terminal, maybe for a short help file such as that for ln. But opening a new window by hand is a bit of a pain, and tabs won't work because you can't see both the window and the man page at the same time.

While browsing the old Mac OS X Hints site, I found this nice solution: Open man pages in a new Terminal window, one that's set up just for reading such pages. It looks something like this (though I've customized my setup; keep reading)…

Adding a few lines to your shell's startup file makes opening these 'in their own window' man pages as easy as opening 'regular' man pages.

[continue reading…]


The little I know about regex…and where to learn more

First off, regex is shorthand for a regular expression. And what, exactly, is a regular expression? According to the linked Wikipedia page, a regular expression is…

…in theoretical computer science and formal language theory, a sequence of characters that define a search pattern. Usually this pattern is then used by string searching algorithms for "find" or "find and replace" operations on strings.

That's a mouthful, but what it means is that you can write some really bizarre looking code that will transform text from one form to another form. And if you know just a bit of regex, and where to go to look up what you don't know, then you can use regex to do many useful things.

For example, consider this filename on a scanned-to-PDF receipt:

The Party Place [party supplies] - 02-06-2017

Perhaps you'd prefer it if the date came first, in year-month-day order, so that your receipts were ordered by date, like this:

2017-02-06 - The Party Place [party supplies]

Sure, you could manually rename this one file, but what if you have 500 receipts that you need to rename? Enter regular expressions—they'll let you do this text manipulation, and many more. What follows is a very brief summary of my knowledge of regex, along with pointers to sites where I go when (very often) the problem I need to solve is beyond my regex skill level.

[continue reading…]


Create a workload for your CPUs

Over the weekend, I was testing how some of our apps work when the CPUs are busy. One way to load the CPUs is to rip a Blu-ray disc, but I was looking for a more controllable CPU load.

A quick search through the Mac OS X Hints archive (use this tip to search the site) found the answer from 15 years ago: Just say yes in Terminal to generate sizable CPU loads…

More specifically, use this command in Terminal:

yes > /dev/null &

If there's an award for strangest Unix utility, yes might just be the winner. All it does is output y (or whatever you list after the y; the man page suggests an expletive) until you kill the task.

The above command sends the output (via the > redirect) to the null device, which discards it. The ampersand sends the job to the background, so you get your Terminal prompt back.

You can run this command multiple times, each loading the CPU even more heavily (the screenshot shows three yes tasks running). Keep an eye on Activity Monitor to see just how much CPU it takes—as shown above, it does a great job at loading the CPU.

You can kill the tasks by issuing the command killall yes in Terminal, or by quitting Terminal—you'll be told that quitting will terminate the tasks.