Skip to content

Mac OS X Hints

Easily insert special Mac characters using Keyboard Maestro

Note: I'm leaving this up for historical purposes, but there's a new special character palette in town, and the new one is vastly superior to this version. This hint might be useful for general Keyboard Maestro knowledge, but really, use the new version if you want a special character palette.

Between blog posts and documentation for Many Tricks, I find myself typing the Mac's "special character" symbols quite often: ⌘ (Command), ⌃ (Control), ⌥ (Option), ⇧ (Shift), and  (I think that's an Apple).

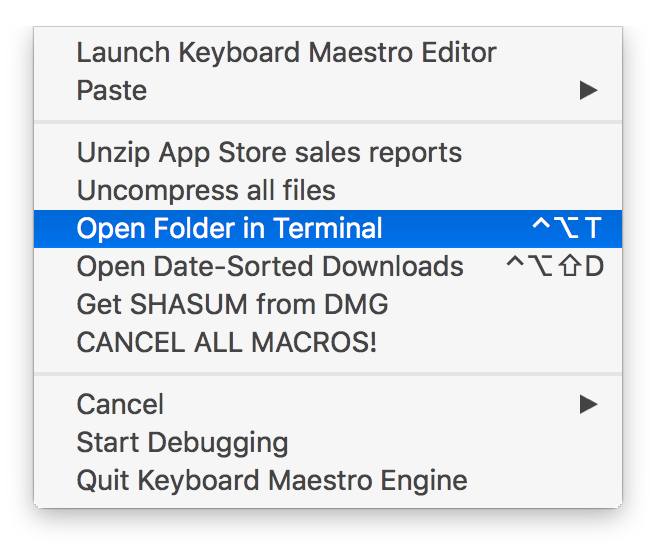
You can type some of these via keyboard shortcuts (the  is ⇧⌥K), or by using the Emoji & Symbols viewer. But I find both those methods clunky and slow; instead, I used Keyboard Maestro to create a couple of pop-up palettes that show all the characters:

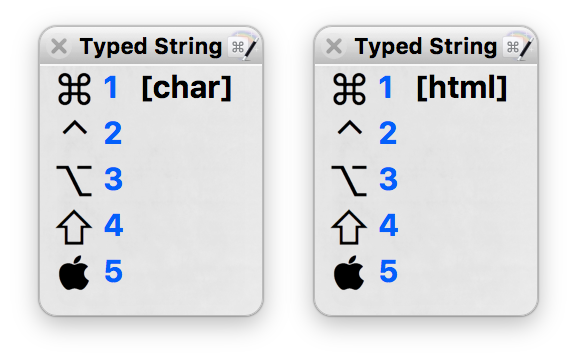
I use two palettes because while I typically can paste the character itself, that doesn't work in some spots—like here in the WordPress' blog post editor, for instance. In those places, I need to use the HTML code for each character—so that cute little  appears when I insert . Ugh. Hence the character palette on the left and the HTML palette on the right.

When I want to insert a special character, I first type the activation keys for either the character (ccc) or HTML (hhh) palettes. When the palette appears, pressing one through five will insert the corresponding character or HTML code for that character. No keyboard shortcuts to memorize, no need to negotiate the Emoji & Symbols viewer. Just a few keystrokes, aided by a visual representation of each character, and I'm done.

As always, you can download these macros if you'd like to use/modify them for yourself.

[continue reading…]


See the actual strength of the iPhone’s cellular connection

This is a very old tip, but I'd never seen it before, so I figure it might be new to some others, too. My home has a relatively weak cell signal, varying between one and three dots on the iPhone's display. But sometimes, even when I have three dots, the quality of my calls seems spotty.

While looking for some tool to try to analyze the cell signal's actual strength in my home, I stumbled on this useful tip at Lifehacker: It's possible to make your phone display its actual signal strength in decibel-milliwatts, or dBm. Here's my phone, showing the stock display on the left, and the dBm value on the right:

And this explains a lot: While two dots of five seems like a decent connection, the actual value of -116dBm is bad. (Signal strength goes from a best of 0 to a worst of -140 or so.) How bad? According to this site, it's an unusable signal. So, yea, don't try to call my cell phone when I'm at home!

If you'd like to set your phone to display the actual signal strength (you can tap the indicator to flip between values and dots), read the above-linked article (or any of the thousands of other sites that have the same tip), or just read the rest of this post, where I've recreated the simple steps.

[continue reading…]


An even easier way to use Excel’s Paste Special dialog

I recently explained how to use the keyboard in Excel's Paste Special dialog box, and this is a great timesaver on its own. But I use Paste Special a lot, especially with Formats, Formulas, and Values, so I made those three even easier to use via the keyboard…

Each one has its own direct keyboard shortcut, courtesy of Keyboard Maestro. Here's how I set it up; these instructions should work (with some changes, of course) for any app that can script keystrokes.

First, I created these macros in an Excel group, so they're only active when Excel is frontmost (no need to create global hot keys that you only use in one program). The actual macros are pretty trivial:

  1. Send Command-Control-V to bring up the Paste Special dialog
  2. Pause just long enough for the dialog to appear onscreen
  3. Send the chosen shortcut key—T, F, or V in my vase
  4. Send the Return key to execute the action

Then I just assigned each one to the same key used within the dialog, but with Command and Option to make it usable from anywhere within Excel.

[continue reading…]


Use the keyboard in Excel’s Paste Special dialog box

When I'm working in Excel, I spend a lot of time in the Paste Special dialog box—pasting formulas, pasting all but formats, pasting only formats, etc. You can call up the dialog with a keyboard shortcut (⌃⌘V), but it then looks like you're stuck using the mouse, because there aren't any keyboard shortcuts for the various actions. But really, there are…

(Note: This applies to the current version of Excel, i.e. the one in Office 365. Based on the comments, it apparently also works in Excel 2011 if you add the Command key.)

On Excel for Windows, one character in each option has an underline, indicating that option's keyboard shortcut. The good news is that these same shortcuts work on the Mac, even though they're not shown. (There is one apparent oversight: The O key should select Operation: None, but it doesn't seem to work on the Mac.)

Here are all the shortcuts, graphically:

Press the highlighted key, and that action will be selected; press Return to execute the chosen command, and you can use the Paste Special dialog without ever touching the mouse. (Note that the Paste Link action executes immediately when chosen, so it's a one-key operation.)

Because graphics are horrid for web searching, the text version of each shortcut, in alphabetical order, is shown below.

[continue reading…]


An alternative way to search Mail for senders and content

For better or worse—most might argue "worse"—I rely on the built-in macOS email client, annoyingly named Mail. (Why annoying? Try searching the web for help when you're having trouble with "Mail"…) I've tried nearly every third party replacement, but something (usually in the UI) always brings me back to Mail.

In any event, I have a huge database of messages that I've built up over the years, especially since starting at Many Tricks with Peter Maurer back in 2010. Often I want to find a message that's both from a particular person, and contains certain words. For example, I want to find all emails from Peter that contain the word "pricing."

The "correct" way to do this in Mail is to type From: in the search box, then start typing the name you want to match. As you type, a list of possible matches appears below the search box. Use the arrow keys (or reach for the mou…no, don't do that) to move down and select the right name from the list of matches, then press Return.

When you press Return with the desired name highlighted, the From: text in the search field turns into a token with the selected user's name, as seen at right. You can then continue typing the rest of your search terms; pricing in this case. Press Return again, and the search runs and returns the matches (17 messages in my example).

While this works fine, it's annoying and time consuming to interrupt the flow of typing a search by visually scanning a box, moving a selection, pressing Return, then starting to type again. So I thought I'd try the logical alternative—I just typed in my search query: from:peter maurer pricing. But this returned no matches.

On a lark, I tried reversing the order: pricing from:peter maurer.

Bingo! This works as expected, showing only messages from Peter that contain the word pricing. (Oddly, it finds two more matches than does the official method, and I cannot figure out why those messages are excluded from the other method's matches.)

[continue reading…]


Randomly merge lists in Excel

This morning, while working on a customer request, I had to create a list of words by randomly choosing words from two lists, and then mashing them together. This isn't something that I've ever done before, and I'm not sure how relevant it might be for others, but I'm documenting it here just in case someone is searching for such a solution.

Here's how my little test spreadsheet looked when I was done with it:

I didn't realize it at the time, but this could be a "modern paint color" name generator…"Yes, I'd like two gallons of the Pickle-Purple, please." Anyway, the COMBINED column contains the final result, with the FOODS and COLORS columns showing randomly-selected entries from the two lists. Each time you recalculate the sheet, all the selections will change.

The key bit is the formula to grab a random entry from the list; here's what that looks like in cell C12 ("Apple"):

=VLOOKUP(RANDBETWEEN(B$3,B$9),B$3:C9,2)

It's just a basic VLOOKUP that uses RANDBETWEEN to grab a random row from the lookup table. Not rocket science, but nothing I'd tried before. (For this to work, your table entries need row numbers, obviously.) The COMBINED column is just a simple text formula, i.e. =C12&"-"&F12 to combine the two random values.

I also wasn't aware of the RANDBETWEEN function—it returns a whole number between the values you specify. That is so much easier than using RAND and then having to multiply and round off, etc.

Feel free to download the workbook if you'd like to take a look.


Put Unix path to selected Finder item on clipboard

Thanks to the commenters for pointing out the much easier way to do this: Select an item in Finder, then press Command-Option-C. All done. Leaving the hint here as an example of a Rube Goldberg machine.

In two recent geeky tips, I showed how you can open a Terminal window in the directory of the selected Finder item, and how you can view Unix man pages in Preview. To finish the trifecta of geekiness, today's tip lets you quickly place the Unix-style path to the selected Finder item on the clipboard. (It's actually a simplified version of the 'open this in Terminal' tip.)

The AppleScript that accomplishes this is quite simple:

If you run that in Script Editor, you'll see that your clipboard contains the path to whatever you had selected in Finder. But running the AppleScript in ScriptEditor isn't a great timesaver. Instead, put it into whatever tool you have that can run AppleScripts via hot key or menu bar entry or whatever.

In my case, I put it into a super-simple Keyboard Maestro macro. I've set it up to show in the Keyboard Maestro menu bar when Finder is active:

There are countless tools that can run AppleScripts in various ways, including our own Butler, LaunchBar if you save the script first, etc.


View Unix man (help) pages in Preview

Today's tip goes well with yesterday's tip, which explained how to open any Finder item's folder in Terminal via Keyboard Maestro. Once in Terminal (and sometimes even when not in Terminal), I'll often want to check out the man page (help) for a given command.

You can do this directly in Terminal with man [name of command], of course, but then it opens on top of whatever you were working on, and you have to read it in Terminal. You could use another tab or window, but you'd still be reading in Terminal. There are times, too, when I'm writing about the Unix side of macOS, so I'm not even in Terminal, but still want to view a man page.

My solution to this problem is two different ways of doing the same thing: I open man pages as nicely-formatted PDFs in Preview. The method I use to get to that point depends on if I'm working in Terminal or not.

Update: I've modified the script and macro so that they properly handles two-argument man commands, such as man 3 printf.

In Terminal

Based on an old Mac OS X Hints tip, I created a very simple shell script:

The key to this little script is the -t option on the man command. From the (hehe) man man help file, here's what that does:

  -t     Use /usr/bin/groff -Tps -mandoc -c to format the manual page,
         passing the  output to stdout. The default  output format  of
         /usr/bin/groff -Tps -mandoc -c is  Postscript, refer  to  the
         manual  page  of /usr/bin/groff -Tps -mandoc -c for  ways  to 
         pick an alternate format.

In other words, the -t converts the help page into a PostScript file, which is something that Preview can easily open (which is just what the last line of the script does).

I named this script preman, because it uses Preview to open man pages. Once saved, I made it executable (chmod 755 preman), and I can then open any man page in Preview by typing, for instance, preman bash.

The output is nicely formatted, and by opening the man page in Preview, my Terminal session is uninterrupted. A quick adjustment with Moom, where I have a saved layout to position Preview and Terminal, and I can scan the man page while working in Terminal.

But what about when I'm not in Terminal? For that, I basically implement the same shell script, but with it set up to run within a Keyboard Maestro macro.

[continue reading…]


Open Terminal in selected Finder folder

Today's tip is just a re-implementation of a really old Mac OS X Hints AppleScript that lets you open a Terminal window with the working directory set to (i.e. cd'd into) the selected Finder folder.

This makes it really easy to jump into Terminal to do something from Finder, without having to do any mousing and minimal typing. What's new is that I've used Keyboard Maestro to turn the AppleScript into a macro that runs only in Finder, where it's available via hot key or menu bar trigger.

Here's the complete macro; download it now to look at and/or use as you wish. [Note: If you use iTerm2 instead of Terminal, you'll want to download this version instead. My good friend James, who runs Out of Control, did so. He tells me it works great.]

The name of the macro may look a bit odd—the 03) controls the sort order in the Keyboard Maestro menu bar item, and does not display when the menu is activated:

Keyboard Maestro also helpfully displays the assigned keyboard shortcut in the menu bar item, in case I've forgotten it.

[continue reading…]


Speed up your Mac via hidden prefs

Over my many years of running Mac OS X Hints, a huge number of defaults write hints were published.

For those who aren't aware, defaults write is a Terminal command that can be used to modify applications' settings. While you can use these commands to modify settings that are present in an app's Preferences panel, the more-common use of this command is to set non-visible (hidden) prefs that you won't find in the GUI.

Here are three of my favorites—three that not only perceptually but actually increase the speed of your interactions with your Mac. I still, to this day, execute these commands on any new Mac I set up.

Don't worry if you'd prefer to stay away from Terminal: I'll also show how to use the long-lived1The first reference to TinkerTool that I could find in the Mac OS X Hints archive was in March 2001. TinkerTool to set each of these options using a (relatively easy if crowded) GUI interface.

Tip 1: Change the sheet animation speed

Sheets are the attached windows that roll down from (and up into) the title bar of windows, such as the Save dialog in most macOS applications. The animation of these sheets, while visually appealing, does take some time.

Using this tip, you can basically eliminate the animation, greatly speeding the appearance and disappearance of sheets. Given how pervasive sheets are, this tip can save a lot of time each day. While the other tips offer actual speed improvements, they're nothing like the change you get by changing the sheet animation speed.

As a test, I opened and closed a Save sheet in TextEdit five times, both before and after applying this tip:

If you're scoring at home, that's a 47% reduction in the time required for just five cycles of a Save sheet.

[continue reading…]