Skip to content

Apple Universe

Top-level category for all Apple, Mac, and OS X related topics.

Color and ‘human readable’ file sizes in Terminal

These are two very old tips, but I'd forgotten about them until recently, when I sent someone a screenshot and they said "Hey, how'd you do that?"

Do what, exactly? This…

The most-obvious thing in that shot is the colored filenames. But notice, too, the file sizes are in a human-readable form. Both of these changes are pretty simple, though you could spend hours playing with colors.

Human-readable output

To get human readable output—not just from ls but also in du, which shows disk space usage—just include an h with the ls command: ls -alh. Instead of raw bytes, the values are converted and marked with trailing B, K, M, etc.

Because I never use ls in its short form, I actually added a line to my .profile (which loads whenever you open a Terminal session) to make this automatic:

alias ls='ls -alh'

You could do the same thing with du, but I rarely use that command, so I didn't bother.

[continue reading…]


Browsers, caches and web page changes

Browsers cache data whenever you load a page. In general, this is a good thing—you'll save data transfer (very important on mobile), and increase speed on any connection if the browser can use data that it's already cached.

But there's one place I hate browser cache: When creating or editing web pages. I'll edit a file, save the changes, upload the new file, load the page…and nothing. So I edit again, repeat, still nothing. Only then do I remember the cache. Argh!

Thankfully, there are ways around (most) cache issues. I do most of my web development in Chrome and Safari; here are the simple tips I use to manage cache in those browsers when developing.

Safari

  • Enable the Developer menu (Prefs > Advanced > Show Develop menu in menu bar).

  • Once enabled, use the Developer menu to easily empty the cache via the Empty Caches menu item, which is bound to the keyboard via ⌘⌥E.

  • Also in the Developer menu, you can completely disable the cache with the Disable Caches menu item. This is what I do when developing—just remember to enable them again when you're done, or you'll find browsing quite slow.

  • To force a single page to completely reload, hold down the Option key and click on the reload icon in the URL bar.

[continue reading…]


Zoom zoom zoom

Today's tip is simple, yet for me, critical—it's one of the first things I do when I set up a new Mac or user on an existing Mac, as it solves a vexing issue: Small fonts that can't be modified within an app's preferences. As my eyes get older, these small fonts get more and more annoying.

Thankfully, there's a fix in the Accessibility section of System Preferences, specifically on the Zoom tab: Easily zoom the screen via keyboard or gesture shortcut. Here's the setup screen:

You can choose to use keyboard shortcuts to zoom (top section of the full screenshot), or (my preference) a scroll gesture with a modifier key. There are also some useful options in the "Zoom style" section.

[continue reading…]


Microsoft’s public-by-default file sharing site

This morning on Twitter, I saw that @rosyna had retweeted this tweet from @GossiTheDog:

https://twitter.com/gossithedog/status/845446263244050434

That seemed insanely scary, so I did a quick search on docs.com for password 1I am not revealing anything secret here; the original tweet went to thousands of people, and many have already noted the number of shared password files.. The results were quite shocking—hundreds of files containing full login information to major sites—Apple, AT&T, Facebook, Gmail, Linkedin, Netflix, PayPal, Twitter, etc.

It seems crazy to think that these users are intentionally sharing this information with the world. I wanted to see how it was happening, so I logged into docs.com with my Office365 account to see. I created a simple file to upload as a test. After uploading, you have to set a bunch of options before you save the file; one of the settings is the Visibility, and this is the default setting:

Yes, docs.com defaults any uploaded file to world-visible, "giving it a larger audience." Yikes!

[continue reading…]


Use macOS VMs in VMware Fusion in retina mode

I use VMware Fusion often—I have virtual machines that span Mac OS X 10.6 to macOS 10.12.4 beta. I use the more-recent of these for supporting our customers on older versions of the OS, and keep the really old versions just for nostalgia purposes. (I have a bunch of non-macOS virtual machines, too, but they're not relevant to this tidbit.)

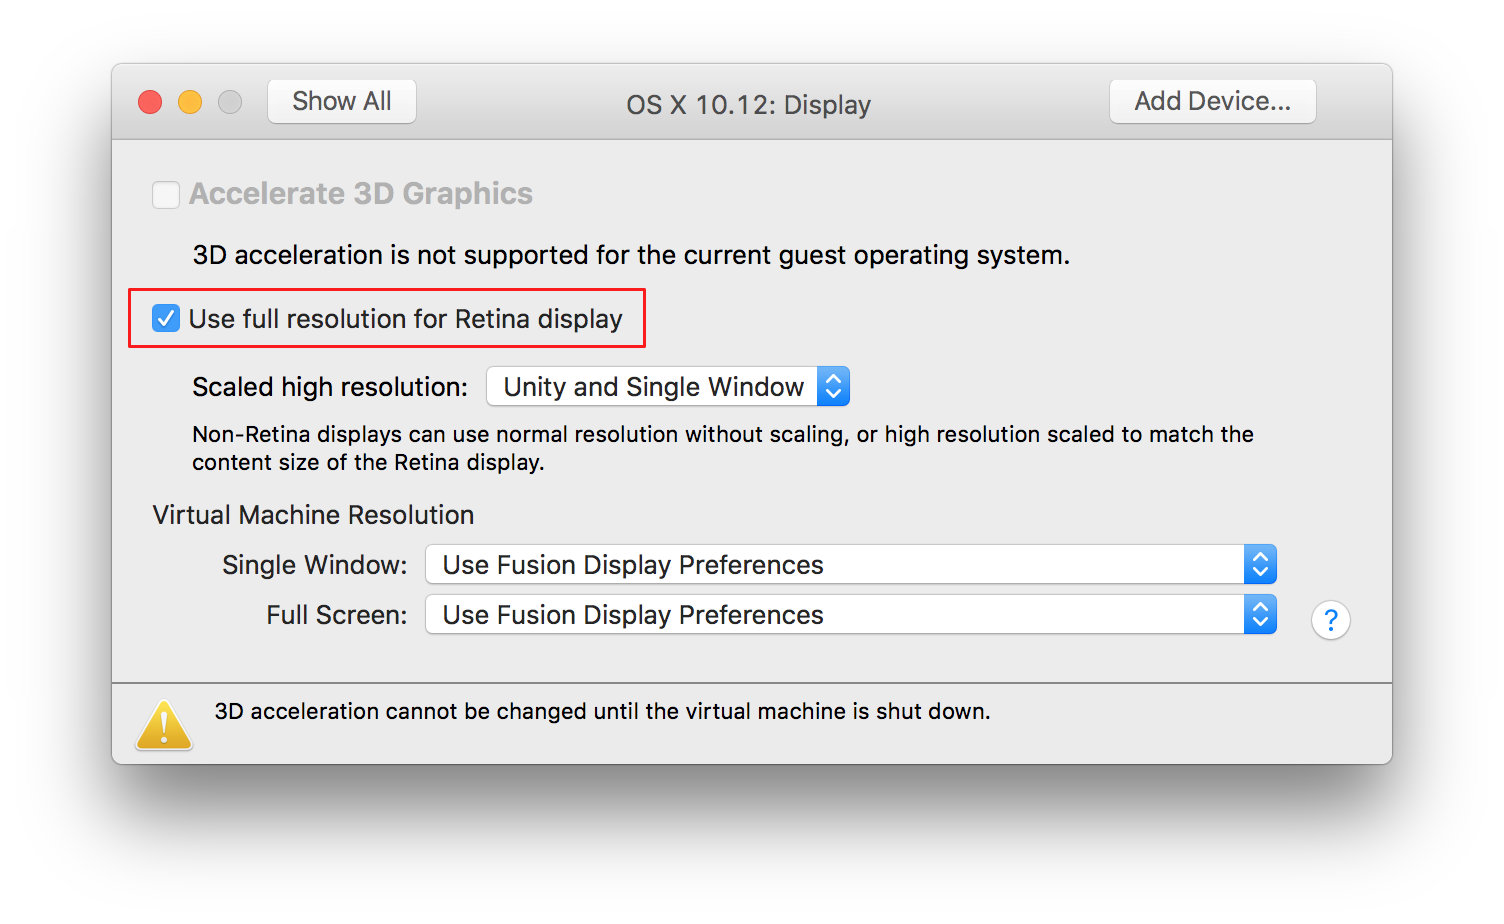
In all the time I've been using Fusion on my retina Macs, though, I've never enabled this setting…

…well, I enabled it once, but turned it off, because the end result was too small to see: In Retina mode, every pixel is an actual pixel, not a doubled pixel. On my 27" iMac, that meant the macOS VM thought it was running at (for example) 2560x1600 instead of a retina resolution of 1280x800. VMware even warns you of this in their Knowledge Base:

Mac OS X running in a virtual machine is limited to an approximate resolution of 2560 x 1600, and treats the display as a standard DPI device. This makes the text and icons to appear small in the OS X interface.

However, today I stumbled across this solution from Patrick Bougie—and it's brilliant in its simplicity. Patrick's post has all the details; I'll reproduce them here in abbreviated form, just in case his page ever vanishes.

[continue reading…]


Edit long Terminal commands in a visual editor

Here's a quickie tip for those of us who occasionally string together complex commands at Terminal's prompt: You may want to add this simple line to your .profile (or whatever init file you use):

set -o vi

What does it do? It tells Unix/Terminal to set the input line editor to vi. When might this be useful? Let's say you've typed a long command, like the one to launch a background screen saver:

/System/Library/Frameworks/ScreenSaver.framework/Resources/ScreenSaverEngine.app/Contents/MacOS/ScreenSaverEngine -module "Arabesque" -background &

Before you hit Return, you notice a couple of typos early in the command. You could use cursor movement keys to move around, of course, but with the above command in place, just press Escape and hit v: The entered command will open for editing in vi. Make your changes, then do the usual :wq vi exit dance, and your edited command will then execute.

Note that if you edit a command but then don't save it (i.e. you press :q!, you may have to hit Return on the command line to get out of an odd "waiting for v to edit" mode. (At least that's the only way I found to return to normal typing.)


April Fool’s Day: Ten simple Mac pranks—part 2 of 2

As promised, this collection of five more April Fool's Day pranks completes the set of 10 that began with these five pranks. As with the first group of pranks, this is still applicable…

Note: None of these pranks are destructive in any way, but please make sure you're close by to "solve the problem" before your target's frustration boils over.

And now, on to the second five pranks…

6 - Create strange keyboard shortcuts

Again in System Preferences, you can have a lot of fun with the Text tab on the Keyboard panel. Set up replacements that do all sorts of weird stuff:

  • Make them think they're just missing their keys, i.e. replace the with tje (you must use at least two keys in the original).
  • Mess with their grammar thoughts by replacing to with too, their with they're, etc.
  • Screw up letter case; replace the with tHe, she with shE, etc.
  • Completely change words, for instance, replace weight with w-you sure it's e before i?-ght or me with me, the brilliant one.
  • If you have some time, add the words from a full pirate talk dictionary. Hello becomes Ahoy there!, etc.
  • Change l to 1, o to 0, etc.


You get the idea.

7 - Run the screen saver in the background

Did you know you can run the screen saver in the background? I explain how in this tip. I'm not sure this has much practical value, but it's certainly fitting for April Fool's Day. Here's how it looks in action, from the original post:

After executing the command, press ⌃L in Terminal (to clear the screen). Then, because you have to leave Terminal running to make this work, minimize the Terminal window to the Dock, then hide the app via ⌘H. Even if your victim finds the Terminal window, they won't know how to stop the screensaver unless they're familiar with background tasks in Unix. (Or until they quit Terminal, which will terminate the screen saver.)

[continue reading…]


April Fool’s Day: Ten simple Mac pranks—part 1 of 2

With April Fool's Day upcoming, here are some relatively-painless jokes to pull on your Mac-using friends. All of these pranks require direct unrestricted access to your target's Mac, and many further require that System Preferences isn't locked down (i.e. not set to require a password before changing any values).

Note: None of these pranks are destructive in any way, but please make sure you're close by to "solve the problem" before your target's frustration boils over.

The pranks aren't in any particular order, though they do sort of progress from easiest (to implement and to detect) to hardest.

1 - Make the Mac take a daytime nap

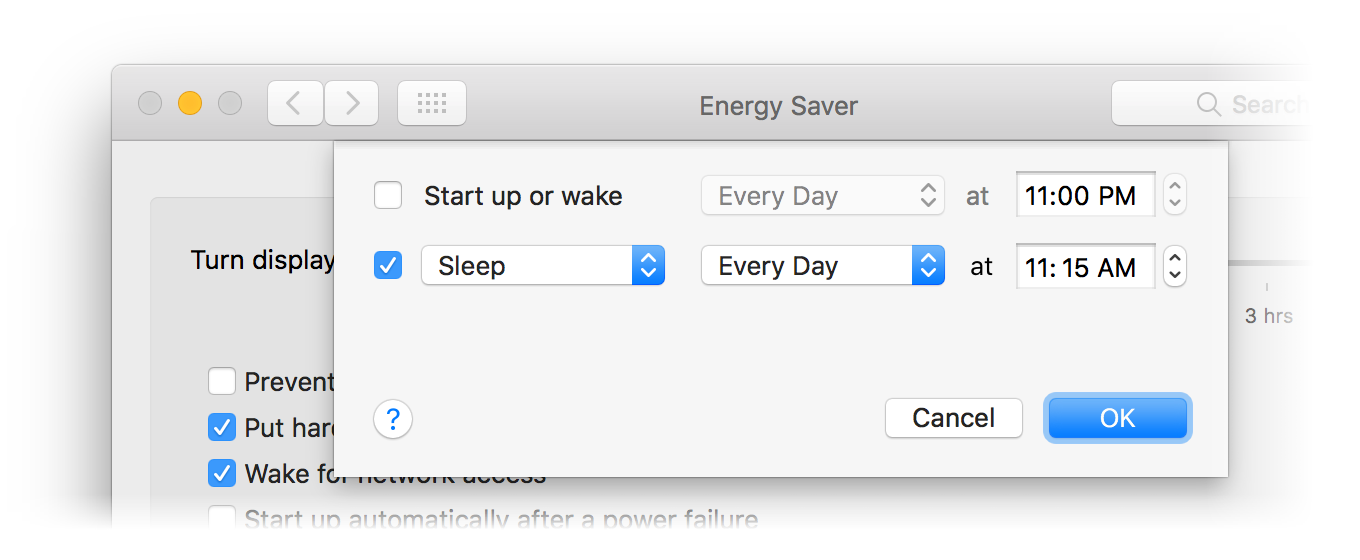
Head to System Preferences > Energy Saver, then click Schedule. Set the target's Mac to go to sleep in the middle of the day…

If they're working at the time, they'll get a pop-up dialog, so the Mac probably won't go to sleep. But they may think it was a quirk, until the same thing happens the next day.

2 - Change the desktop picture—often

The simple version of this one is to go to System Preferences > Desktop & Screen Saver > Desktop, click the Change Picture button, then use the pop-up menu to set it to five seconds.

This one won't fool most Mac users for too long, so you might as well have some fun with it: Instead of just changing the interval, copy a folder full of your own images, and then use the sidebar in the Desktop tab to choose that folder of images.

What kind of images? Well, nothing too bad, of course, but maybe fill it pictures of your target's least-favorite sports team. Or their college's rival school. Or screens of motivational sayings. Bright neon-colored backgrounds—whatever.

[continue reading…]


A pricing quirk in Apple’s current non-Pro iPad lineup

With today's announcement of a new version of the non-Pro 9.7" iPad, Apple has created a (perhaps temporary, perhaps intentional?) pricing oddity in its iPad lineup.

Consider the new non-Pro iPad: This 9.7" model has a current-generation A9 processor, with either 32GB ($329 wifi) or 128GB ($429 wifi) of storage. This is a $70 reduction in the entry price point for the full sized iPad, which is great news.

This model is thicker and heavier than the Pro line, but unless you need Pencil and/or Keyboard Case support, its performance with the A9 chip should be more than good enough for 99% of potential iPad users.

Now consider the iPad mini 4. This 7.9" iPad has the older—and much slower—A8 processor, and comes only in the jumbo 128GB ($399 wifi) storage configuration. Great news on the storage, bad news on the CPU. The screen tech is older than that of the new iPad as well.

Assume you're iPad shopping outside the Pro line, and you want a 128GB model for maximum storage space. For $399, you can get the iPad mini 4. But for only $30 more, you can get a full-size iPad with a newer CPU and a "bright" retina panel. The A9 will crush the A8 in performance, and the display will be notably nicer.

Unless you really want/need the small form factor, the full-size iPad seems like a no brainer. I would guess that either there's a new mini coming out in the near future, or we'll see some sort of pricing movement on the current mini, because it doesn't make sense where it's priced against the new non-Pro iPad.

Or does it—does Apple not want to sell many minis, and this $30 difference to the full-size model will help them accomplish that goal? I honestly don't know, but things definitely look weird right now when you compare the mini to the new non-Pro iPad.


An odd fix for ‘jpeg’ vs ‘jpg’ filename extensions

I recently reinstalled macOS Sierra, due to my annoying Bluetooth issues. I hadn't noticed any side effects of the reinstall until I went to save a JPEG image from Acorn.

On save, I noticed that the image's extension was .jpeg rather than what I thought was the usual .jpg. As both of my other Macs save with the .jpg extension, I figured something was messed up on the iMac. So I (of course) tweeted about the issue. A while later, Shawn King replied with this seemingly odd suggestion:

So I tried it, and sure enough, changing the screen capture file format via defaults write com.apple.screencapture type jpg and then restarting the SystemUIServer with killall SystemUIServer changed my default JPEG extension in every app to .jpg.

What's really strange is that I then switched the screenshot format back to png, and the .jpg extension remained. I even went so far as to delete the pref (defaults delete com.apple.screencapture), and still, the extension remains .jpg. So whatever change occurred when switching the default screenshot format, it appears to be permanent.

I tried the same trick for the .tiff extension (which I rarely use, so it doesn't bother me as much), and it sort of worked: Captured screenshots got a .tif extension, but images saved from apps still got the four-letter .tiff extension. Weird.

If anyone knows exactly what's going on with the .jpeg vs. .jpg extension, I'd love to hear the explanation.