Skip to content

Mac OS X Hints

Create an iTunes song info window using Keyboard Maestro

For those who aren't aware, Keyboard Maestro is a macro-creation tool, designed to help you automate routine tasks. But its powers let you do some really cool stuff, not all of which could be classified as automation. Such is the case with this project: Creating an iTunes song info pop-up window.

There are lots of apps out there—including Many Tricks own Butler—that can do this for you, and my Keyboard Maestro version is worse than most of those in many respects. However, I wanted to teach myself more about Keyboard Maestro, and this seemed like a good project with which to do so.

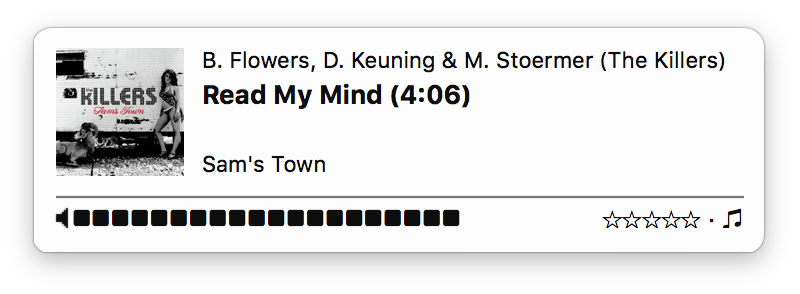
I use Buter's iTunes pop-up info window, which looks like this:

I wasn't really interested in the rating or volume controls (though they should be doable), but I wanted to see if I could get the album art and song info in a window via Keyboard Maestro. After some struggles, here's what I came up with in Keyboard Maestro:

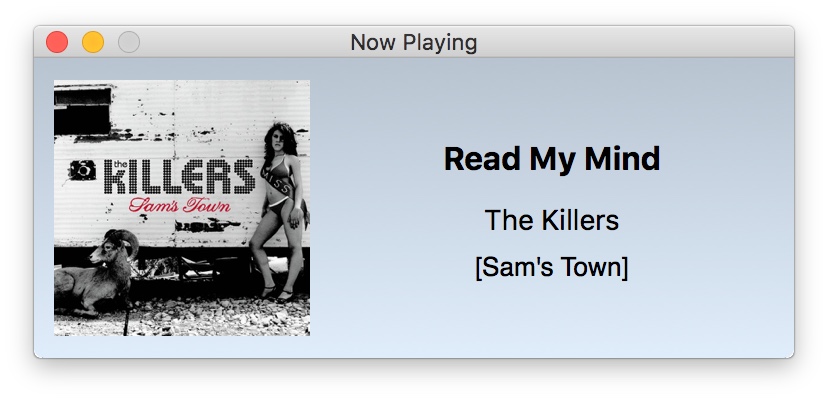
My window is larger by design, so I can have somewhat more visible album art (aging eyes). And I can't decide on a background color or gradient, so it keeps changing—this was the look when I snapped the screenshot, but it's since changed again.

Read on if you'd like to know more about Keyboard Maestro, and how I used it to create this iTunes info window. (Note that this write-up assume some familiarity with Keyboard Maestro, though I try to explain each step in the process.)

[continue reading…]


Detailed instructions for installing the transcode-video tools

My method of ripping Blu-ray discs relies on Don Melton's video_transcoding tools. While these tools work great, they are command-line only (i.e. Terminal required). In my guide, I glossed over the installation bit, referring back to Don's basic guide. But for those new to Terminal, even Don's instructions may be too light on the details.

Hence this detailed installation guide for Don's video_transcoding tools. This guide walks a new user through every step of the process, hopefully getting even someone brand new to Terminal up and running with Don's tools. This will only be of interest if you're having trouble getting the video_transcoding tools installed. If that's you, though, hopefully this will be helpful.

The entire installation of the video_transcoding tool set and all its dependencies will take place in Terminal, which is the direct line to the Unix core of macOS. Open Terminal, which you'll find in /Applications > Utilities, and you'll be greeted by a window with some text; something like this:

This lovely interface is where you'll spend the next chunk of time, installing the video_transcoding tools, and all the programs it uses to get its work done.

Note that this guide is not a detailed introduction to Terminal or Unix. (There are many such guides on the net, and if you're interested, they're well worth reading.) This guide is focused solely on how to use Terminal to install the video_transcoding tools, not how to use Terminal on its own. So let's get started…

[continue reading…]


Remap non-modifiable keyboard shortcuts in any app

Ever run into a program that has some pre-defined keyboard shortcuts you don't like? In most cases, they're associated with a menu item, which means you can use macOS' built-in keyboard shortcuts function to fix them. (In System Preferences > Keyboard > Shortcuts > App Shortcuts.)

But what if the shortcut isn't associated with any menu item? Such is the case in Excel 365, which replaced a couple easy-to-type shortcuts (⌃I and ⌃K for inserting and deleting rows and columns) with much harder to type versions: ⇧⌃= and ⌃-. If there's no corresponding entry in the app's menus, it seems impossible to remap the shortcuts—unless the app itself offers that feature, which Excel did in prior versions.

The good news is that it is possible to remap any keyboard shortcut in any app, as long as you're willing to add one more program to the mix: Some sort of macro app. My example uses Keyboard Maestro, but any app that can send a key sequence in response to another key sequence will do the trick.

[continue reading…]


Quickly expand compressed files in Finder

In this post, I lamented on the incredible slowdown seen when expanding many compressed files in Finder. To save a trip back to that article, here's the tldr; version:

Expand 24 .gz filesFinder:
12.8 seconds
Terminal:
.013 seconds
Terminal is 984.6x faster than Finder

With a bit of work, though, you can harness the power of Unix in Finder, and get both the GUI and the speed when expanding files. There are many ways to do this, including third-party apps such as The Unarchiver. You could also write an Automator Service to do the work for you. But I chose to write a Keyboard Maestro macro, because I could make the macro a menu bar option that only shows when Finder is frontmost:

As seen, I actually have two expanders, one that expands just the Apple sales reports mentioned in my original post, and the other that will handle any mix of compressed files. (Yes, the 'all files' macro could also handle the Apple sales reports, but because of how it has to run for multiple file types, it's marginally slower than the dedicated macro.)

These macros both work in the same way—they call on Unix apps to do the expansion, bypassing Apple's slow GUI expander (which is called Archive Utility). If you're curious how they work, and/or would like to download them for your own use, keep reading.

[continue reading…]


Replace the departed free iTunes Radio with free iTunes radio

In case you missed the news, Apple has now officially ended the free streaming of iTunes Radio. To listen to these stations now, you have to subscribe to Apple Music, which isn't something I want to use. (If they offered a "use but don't integrate into library," I'd subscribe in a heartbeat…but they don't.)

There are any number of other radio services out there - Pandora, Spotify, etc. But I wanted something that existed in iTunes, as I didn't want to have to run another app, nor (shudder) use my browser as a radio station front end. Then I remembered that iTunes has a huge—as in tens of thousands—assortment of Internet Radio stations.

I hadn't looked at internet radio in a long time, as I'd been quite happy with my selection of iTunes Radio stations. But Apple's move inspired me to take another look, and so far, I like what I've found. If you'd like to explore the world of Internet Radio in iTunes, here are a few tips to ease the exploration.

[continue reading…]


Total PDF pages in subfolders across folder structure

Last week, I wrote a script that ran through a folder structure and output the page count of every PDF in all folders and sub-folders, and also spit out a grand total.

While this worked well, what I really wanted was a script that just totaled PDF pages by sub-folder, without seeing all the file-by-file detail. After trying to retrofit the first script, I realized that was a waste of time, and started over from scratch.

The resulting script works just as I'd like it to, traversing a folder structure and showing PDF page counts by folder:

$ countpdfbydir
    47: ./_Legal
     2: ./_Medical-Dental
    15: ./_Medical-Dental/Kids
    11: ./_Medical-Dental/Marian
     2: ./_Medical-Dental/Rob
    35: ./_Personal Documents/Kids
    87: ./_Personal Documents/Marian
    28: ./_Personal Documents/Rob
    10: ./_Personal Documents/Rob/Golf
    12: ./_Personal Documents/Rob/Travel
-------------------------------------------------------------------
   249: Total PDF Pages

It took a few revisions, but I like this version; it even does some simplistic padding to keep the figures lined up in the output.

[continue reading…]


Count pages in all PDFs within a folder structure

Please see this newer post, with a new script that provides subtotals by subfolder, which is what I really wanted when I wrote this one.

Recently I've been trying to go paperless (well, mostly paperless) via a Fujitsu ScanSanp ix500. (I'll have more to say about the scanner in a future post).

One way to go paperless is to just go from now forward—start scanning stuff and don't worry about history. I decided that I'd go the other route, and work through our old paper files: some would be scanned and kept, much would just be recycled. The process went really quickly, compared to what I had expected. It helps that the Fujitsu is a wicked-fast document scanner!

But I was curious about how much I was scanning, in terms of total PDF pages—not files, but counting the pages in the files. Spotlight to the rescue; the field kMDItemNumberOfPages returns the number of pages in a document, and it seemed accurate in testing via mdls:

$ mdls /path/to/somefile.pdf | grep kMDItemNumberOfPages
kMDItemNumberOfPages = 4

So I set out to write a script to traverse my "Scans" folder, and return the total number of PDF pages.

[continue reading…]


On the vagaries of saving from Mail

As I suspect is true of many of you, I buy a fair bit of stuff from Apple, whether in a physical Apple Store or in the various online stores. I receive electronic receipts for all these purchases, which look something like this (but with all the personal info filled in, obviously):

Until yesterday, I have just filed all these receipts in their own folder in Mail (in the On My Mac section, so they're stored locally). But in the process of going paperless, I wanted to move them directly to my hard drive, so I could store them in a more-organized manner, and keep them alongside my other receipts. That meant saving the messages from Mail to the disk.

I had only two objectives when saving:

  1. Maintain the formatting and images in the original receipt
  2. Have the message content indexed by Spotlight

You'd think this would be a simple proposition, but you'd think wrong…the above two criteria are basically mutually exclusive with Mail's Save As feature. Read on for the details, and my eventually-discovered workaround (and labor-saving shortcut).

[continue reading…]


Use a mouse and keyboard…and a trackpad

When Apple released its new accessories, I thought it might be time to revisit my input setup. For a few years, I've been using the original Magic Trackpad and the Logitech Wireless Solar Keyboard.

While this setup has worked well for me, I missed the precision of a mouse (so much so that I kept a corded one nearby, and plugged it in when I needed to do such work). So I thought I'd check out Apple's new gear, with the thought of either upgrading to the new Magic Trackpad, or perhaps moving to the new Magic Mouse as my pointing device, and maybe replacing the Logitech with the new Apple keyboard.

Unfortunately, the local Apple Store only had the mouse in stock, not the keyboard or trackpad. Unable to compare the pointing devices, I just bought the mouse. After setting it up, I loved the added precision it provided over the trackpad. But if I was going to be using a mouse regularly, I wanted to narrow the reach from keyboard to mouse, so I pulled out my old Apple wireless keyboard, which is about six inches narrower than the Logitech.

This setup seemed really good, except that I'd be giving up a lot of features by removing the trackpad: I use it with BetterTouchTool and our own Butler (as well as Keymo and Moom) to execute all sorts of gesture-related actions.

[continue reading…]


Use Intel’s Power Gadget to keep an eye on your CPU

If you're the type who likes to keep an eye on your system, you may be familiar with tools such as Activity Montior's CPU meters, or iStat Menus, which displays a ton of system info via its menubar icon. Neither of these tools, however, really show you what the CPU itself is up to—and that's where an Intel-provided tool enters the scene.

The Intel® Power Gadget shows you exactly what your CPU is up to: how much power it's using, what speed it's running at, and its temperature. As seen in the image at right (click for larger), it graphs these three values over time.

The data you're seeing there is from my 4GHz Retina iMac, and the screenshot was grabbed while it wasn't doing much in particular. What really stands out to me is how often my 4GHz CPU is running at something closer to 3GHz; if the CPU isn't being called on for its full power, I'm assuming it slows itself down to reduce power usage.

But as soon as you do something that demands the CPU's full power, the napping stops. Here's a brief movie I created showing the CPU tracking when I started ripping a Blu-Ray:

The machine is basically idle at first, then I start the rip after 15 seconds or so. As soon as the hard work starts, the power and temperature charts shoot upwards, and over time, the CPU speed pegs right around 4GHz; the naps are gone.

I'm not sure how much real-world use this tool has, but from a geeky perspective, it's pretty cool being able to see exactly what your CPU is up to at any point in time. (You can even send the data to a log file, in case you really want to study power, speed, and temperature over an extended time period.)