Skip to content

Mac OS X Hints

See how long an app has been running

For a recent customer support question, I needed to know how long our app Witch had been running. There are probably many ways to find this out, but I couldn't think of one. A quick web search found the solution, via ps and the etime flag.

You need the process ID (pid), which you can find via ps ax | grep [a]ppname.1That [s]quare brackets around the first letter are there so grep won't find itself—and thus list itself in the output. In my case, Witch runs a background task called witchdaemon, so I did it this way…

$ ps -ax | grep [w]itchd
  774 ??        26:40.73 /Users/robg/Library/PreferencePanes...[trimmed]

With the pid, the command to find that process' uptime is:

$ ps -o etime= -p "774"
11-03:17:12

The elapsed time readout is in the form of dd-hh:mm:ss, so Witch had been running for 11 days and a few hours and minutes. Note that you can combine these steps, getting the process ID and using it in the ps command all at once:

ps -o etime= -p "`ps -ax | grep [a]ppname | cut -d ' ' -f 1`"

It's messy looking, but this form saves time and typing.

June 2018 Addendum: If you add the lstart flag, you can see the exact start date and time for the process. For example:

$ ps -o lstart= -o etime= -p "16866"
Tue Jun  5 05:49:19 2018     09-06:11:25


Two ways to navigate column-view folders in Finder

If you use a column-view Finder window, and prefer to use keyboard navigation, here's a trick you may not be aware of—even though this dates back to the original release of Mac OS X. If I hadn't started the Mac OS X Hints site, I doubt I would've known this…

To drill down into Finder folders via the keyboard, you use the Right (down) and Left (up) Arrow keys-don't worry, that's not the tip, because that's totally completely obvious. The tip is this: After navigating into a given subfolder (and optionally selecting an item in that folder), the Shift-Tab key combo will navigate back up, but leave your "path" to the subfolder visible. Think of this like a "breadcrumb" trail that shows your navigation. (By comparison, if you use the Left Arrow, Finder "closes" each folder as you exit it, leaving you with nothing selected once you reach the top.)

One you've used Shift-Tab to navigate all the way back out, pressing Tab will navigate back down the highlighted path. Alternatively, pressing the Right Arrow key will jump immediately to the rightmost-selected item.

Update

As of Mojave (or maybe High Sierra), Apple changed the behavior of the Right Arrow after you back navigate with Shift Tab: It no longer jumps back to the end of the trail, instead it just works like a usual Right Arrow and selects the first item in the next column over.

I did some experimenting though, and found that Control-Tab will jump to the end of the breadcrumb trail.

Here's how that all looks in action—first is the normal arrow key navigation, then navigation using Shift-Tab and Tab.

You may not need/want the breadcrumb path all the time, but when you do, just remember to Shift-Tab your way out of the current folder. Using the arrow keys and the Tab/Shift-Tab keys together provides two complementary methods to navigate your column-view Finder windows.


How to not accidentally delete all your rsync backups

With my Time Machine-like rsync backups running well, I decided it was time to migrate over the cleanup portion of my old script—namely, the bit that removes older backups. Soon after I added this bit to my new script, though, I had a surprise: All of my backups, save the most recent, vanished.

In investigating why this happened, I stumbled across two rsync/macOS behaviors that I wasn't aware of…and if you're using rsync for backup, they may be of interest to you, too.

[continue reading…]


Cancel shell script on remote connect failure

I use a shell script to back up this site (and a variant of the same script to back up the Many Tricks site). I've been using these scripts for over a decade (wow), and though they've evolved, they're still fundamentally the same. (I did switch from cron to launchd for launching them, however.)

While the script typically runs very nicely, I recently noticed that my last backup was from a few weeks ago—uh oh. It didn't take long to figure out what had gone wrong: My ISP changed the hostname of the machine my site runs on, and my script uses ssh, scp and rsync, which connect via the hostname. Unfortunately, the failure mode is silence, because the script runs via a scheduled task. The only way I knew it failed was when I went to check the backup folder. Obviously, something more automatic than that would be desirable.

After much web searching, I couldn't find anything that seeemed like it'd do what I want: An email (and onscreen alert) if my backup failed. I found lots of Unix solutions to send mail using sendmail, but I didn't really want to enable that on my Mac. So I futzed around and built a simple checker that will mail me when it can't reach my web host.

[continue reading…]


Zoom zoom zoom

Today's tip is simple, yet for me, critical—it's one of the first things I do when I set up a new Mac or user on an existing Mac, as it solves a vexing issue: Small fonts that can't be modified within an app's preferences. As my eyes get older, these small fonts get more and more annoying.

Thankfully, there's a fix in the Accessibility section of System Preferences, specifically on the Zoom tab: Easily zoom the screen via keyboard or gesture shortcut. Here's the setup screen:

You can choose to use keyboard shortcuts to zoom (top section of the full screenshot), or (my preference) a scroll gesture with a modifier key. There are also some useful options in the "Zoom style" section.

[continue reading…]


Change the look of inactive Terminal windows

I tweeted this recently…

Things I did not know (or perhaps remember): Terminal lets you set the opacity and blur of inactive windows. (Profiles > Text > Background)

…but because I often forget about those things—the ephemeral nature of tweets being what it is—I figured I should post it here, too.

I have no idea when the feature appeared, but I only discovered it on February 27th, when I tweeted about it. You'll find the window at right in Terminal's preferences, on the Profiles tab—look in the Text section for a selected window, then click the color tile under Background. Check the box to set opacity and blur for inactive windows, and you're done.

As I use a dark background in Terminal, I like this feature a lot. I've now got it set up to go transparent and fuzzy when inactive—this makes it basically vanish, so the dark background no longer grabs my eye.

At some point, I'll dig through my virtual machines and figure out when this was added…who knows, maybe it's been there for forever. In any event, I'm glad I stumbled across it the other day.


Transport the cursor to the center of frontmost window

My home workspace is a 27" Retina 5K iMac (2560x1440) paired with a vertical 4K display (scaled to view 1440x2560). While I love this setup in general, there's one time it's annoying: When I need to move the cursor between displays, and it's located far away from its destination.

There are many ways to solve this problem, including our own Keymo, which I still use when I want to teleport a drag across displays. But what I really wanted was a fast way to move the cursor to the other display when I switched to a window on the other display—because generally, if I've activated the window, I'm probably going to use the mouse in that window at some point.

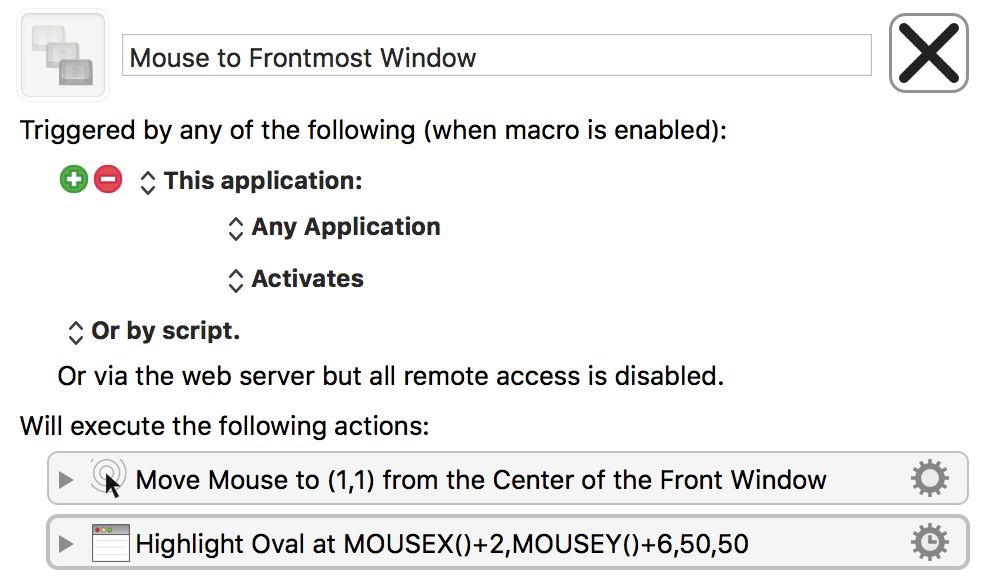
Using Keyboard Maestro, it's possible to create a macro to make this happen automatically:

This macro will activate every time you switch applications, and then move the mouse to the center of that newly-frontmost window and highlight its location with a quick circle. Having tested this, however, I can say it's a non-ideal solution: Most of the time when I switch an app, I do not want the cursor to move. I found it more annoying—much more annoying—than useful.

As useless as the above macro is, with one minor change it quickly became one of my most-used macros…

[continue reading…]


Prevent silly mistakes by modifying keyboard shortcuts

A tweet I sent last night triggered my memory of this very-useful tip that I've gotten worse about remembering to implement over the years. First, the tweet…

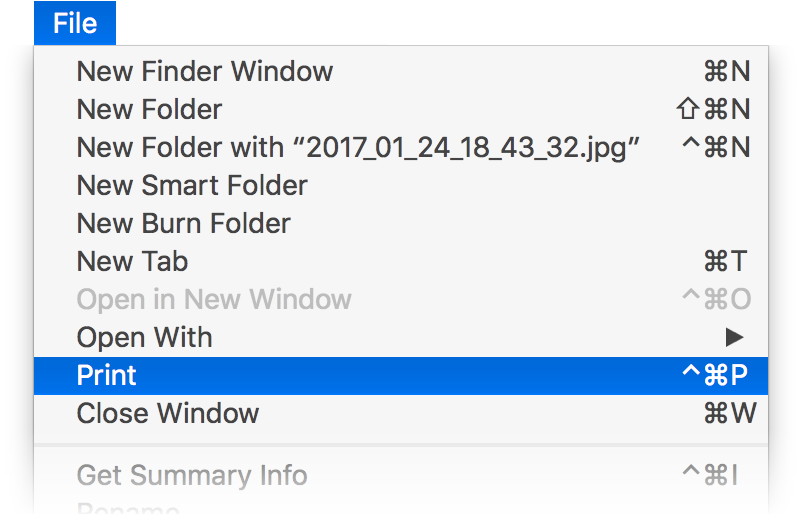
The issue, of course, is the macOS ships with ⌘O (Open) and ⌘P (Print) as pre-assigned keyboard shortcuts in Finder. Select a bunch of files to open, reach for the O and miss by just a touch, and you've started a dozen print jobs. Whoops!

Years ago on macosxhints.com, there was one of those "duh!" tips with an easy solution to this (and other similar) issues: Reassign the stock keyboard shortcuts. Here's a "fixed" Print shortcut in Finder, for example:

And with that simple change, no more accidental print jobs.

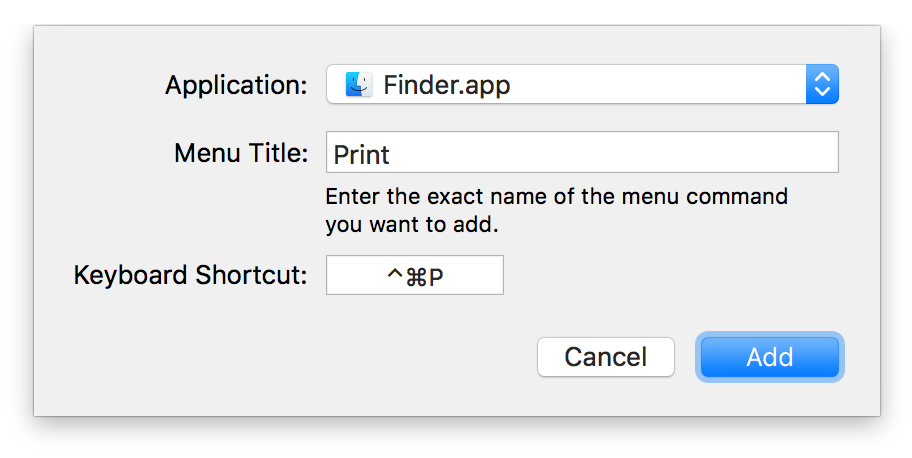
Changing the shortcuts is easy; start by opening System Preferences > Keyboard, then going to the Shortcuts tab. Scroll to the bottom of the left-hand pane, select App Shortcuts, then click the plus sign. You can then select an app—or all apps—from the first pop-up menu, enter the menu item to change/assign in the first input box, and type the shortcut to use in the third:

You can do this for as many of the stock shortcuts as you wish…and obviously, you can add some that you feel Apple left out. Read on to see what I change in the Shortcuts section—not just for applications, but in all of the sections (Launchpad & Dock, Mission Control, etc.)

[continue reading…]


Use the keyboard in Excel’s Paste Special dialog box

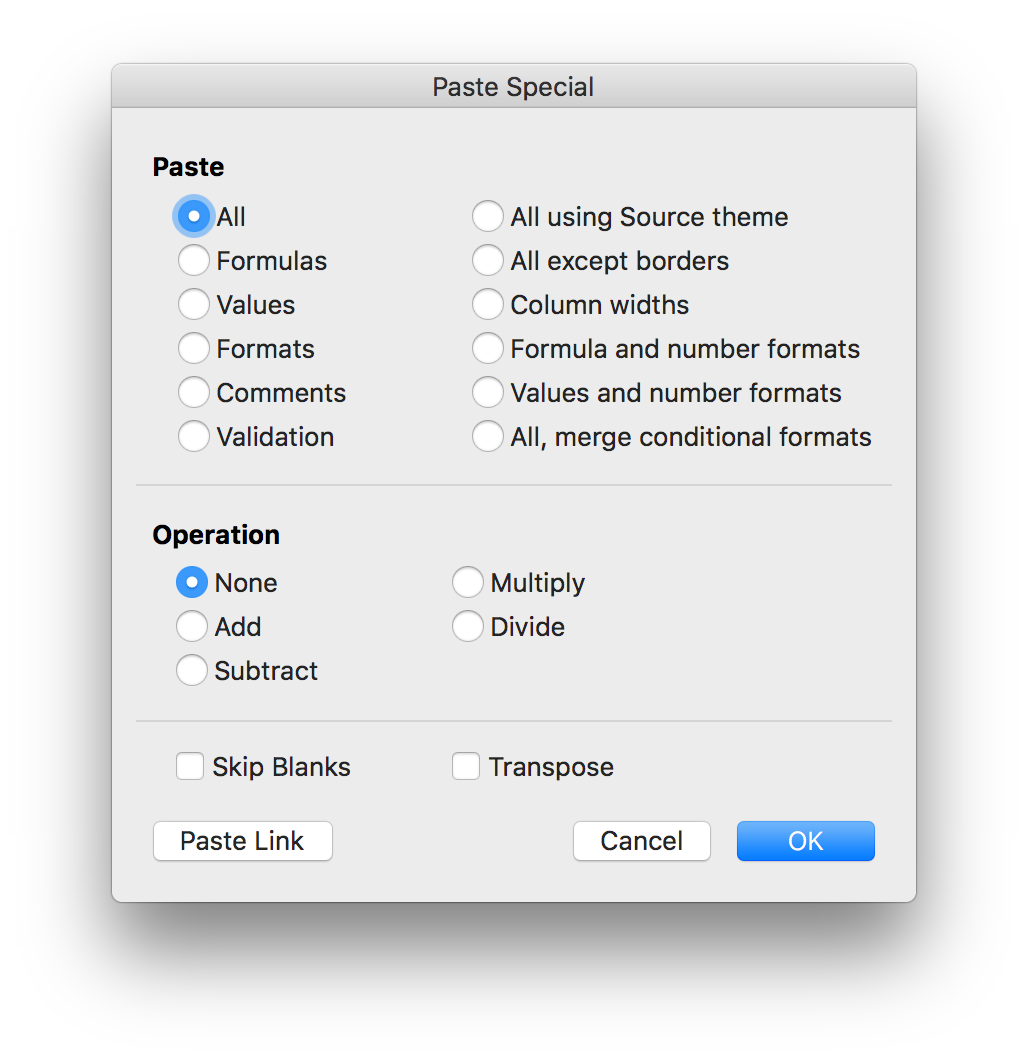
When I'm working in Excel, I spend a lot of time in the Paste Special dialog box—pasting formulas, pasting all but formats, pasting only formats, etc. You can call up the dialog with a keyboard shortcut (⌃⌘V), but it then looks like you're stuck using the mouse, because there aren't any keyboard shortcuts for the various actions. But really, there are…

(Note: This applies to the current version of Excel, i.e. the one in Office 365. Based on the comments, it apparently also works in Excel 2011 if you add the Command key.)

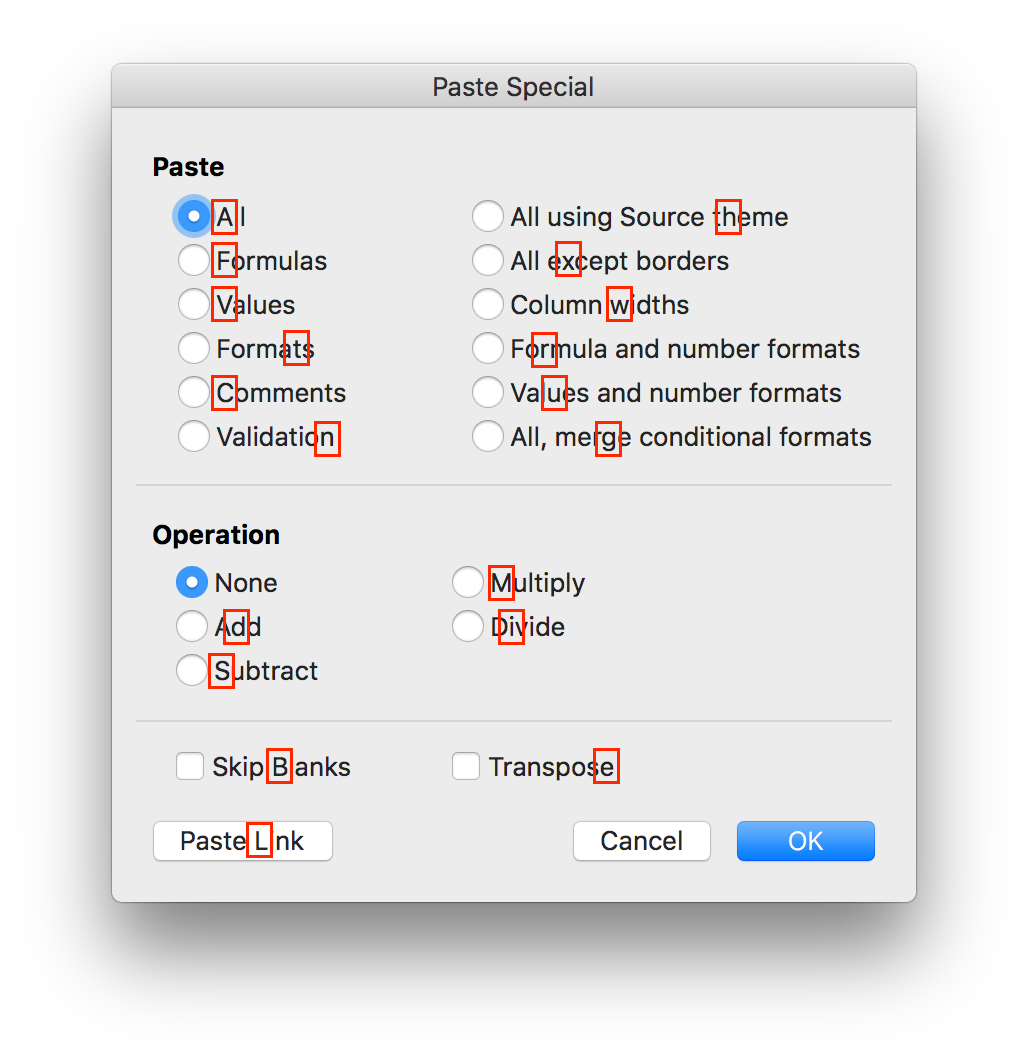
On Excel for Windows, one character in each option has an underline, indicating that option's keyboard shortcut. The good news is that these same shortcuts work on the Mac, even though they're not shown. (There is one apparent oversight: The O key should select Operation: None, but it doesn't seem to work on the Mac.)

Here are all the shortcuts, graphically:

Press the highlighted key, and that action will be selected; press Return to execute the chosen command, and you can use the Paste Special dialog without ever touching the mouse. (Note that the Paste Link action executes immediately when chosen, so it's a one-key operation.)

Because graphics are horrid for web searching, the text version of each shortcut, in alphabetical order, is shown below.

[continue reading…]


Put Unix path to selected Finder item on clipboard

Thanks to the commenters for pointing out the much easier way to do this: Select an item in Finder, then press Command-Option-C. All done. Leaving the hint here as an example of a Rube Goldberg machine.

In two recent geeky tips, I showed how you can open a Terminal window in the directory of the selected Finder item, and how you can view Unix man pages in Preview. To finish the trifecta of geekiness, today's tip lets you quickly place the Unix-style path to the selected Finder item on the clipboard. (It's actually a simplified version of the 'open this in Terminal' tip.)

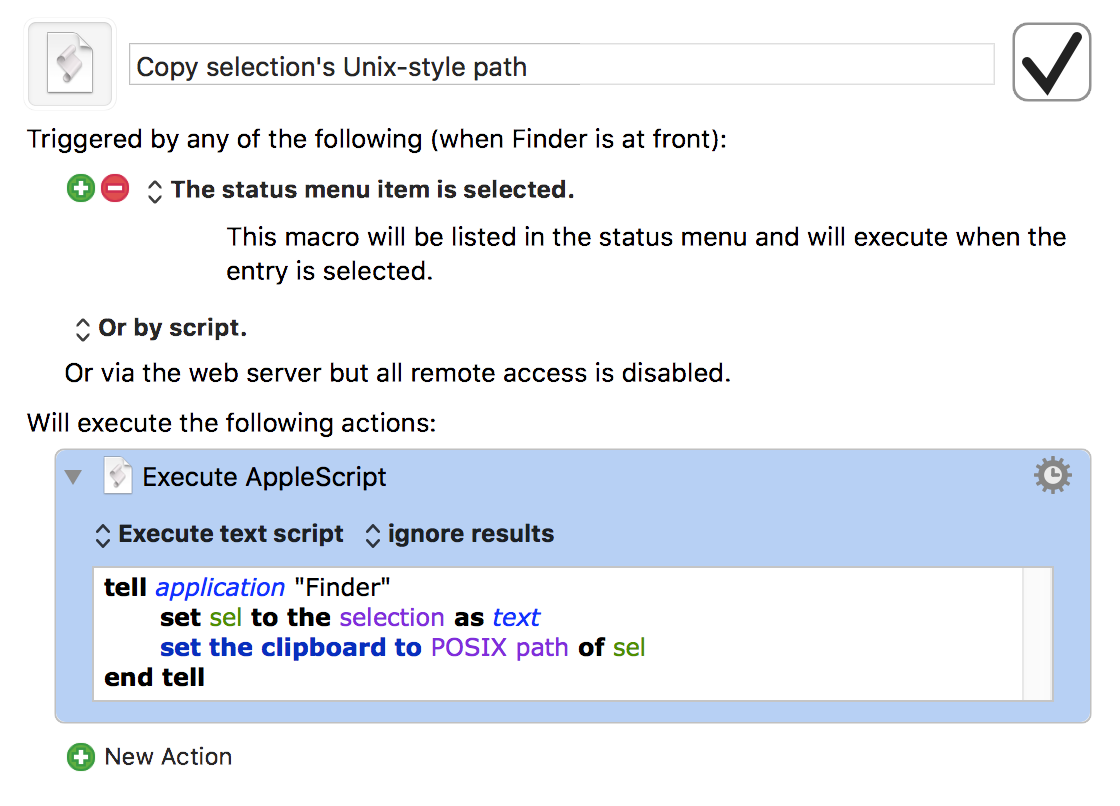
The AppleScript that accomplishes this is quite simple:

If you run that in Script Editor, you'll see that your clipboard contains the path to whatever you had selected in Finder. But running the AppleScript in ScriptEditor isn't a great timesaver. Instead, put it into whatever tool you have that can run AppleScripts via hot key or menu bar entry or whatever.

In my case, I put it into a super-simple Keyboard Maestro macro. I've set it up to show in the Keyboard Maestro menu bar when Finder is active:

There are countless tools that can run AppleScripts in various ways, including our own Butler, LaunchBar if you save the script first, etc.