Skip to content

Terminal

Use macOS VMs in VMware Fusion in retina mode

I use VMware Fusion often—I have virtual machines that span Mac OS X 10.6 to macOS 10.12.4 beta. I use the more-recent of these for supporting our customers on older versions of the OS, and keep the really old versions just for nostalgia purposes. (I have a bunch of non-macOS virtual machines, too, but they're not relevant to this tidbit.)

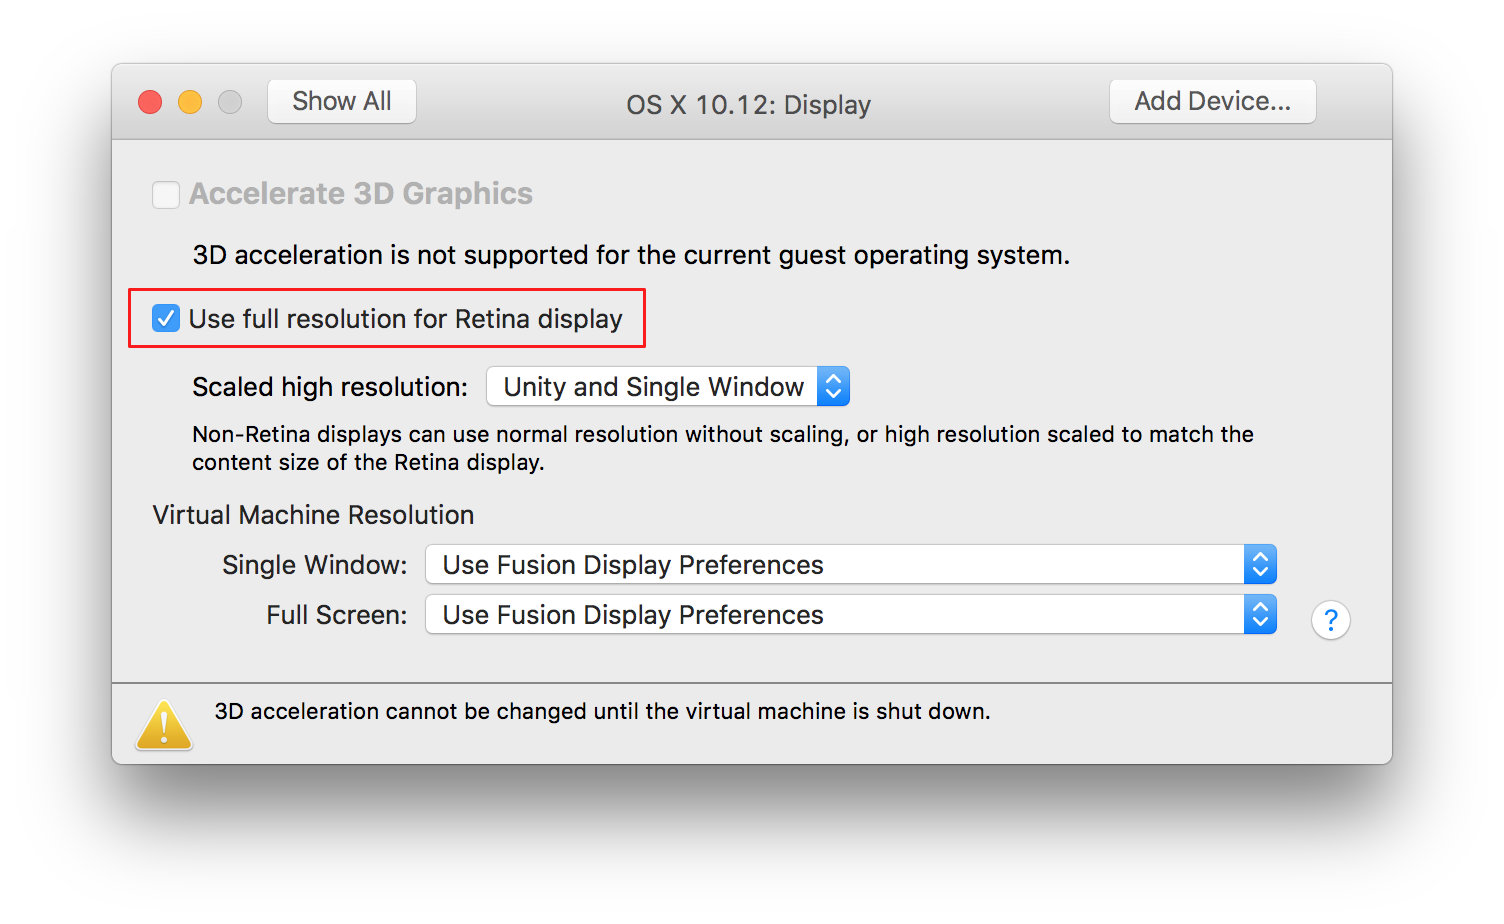
In all the time I've been using Fusion on my retina Macs, though, I've never enabled this setting…

…well, I enabled it once, but turned it off, because the end result was too small to see: In Retina mode, every pixel is an actual pixel, not a doubled pixel. On my 27" iMac, that meant the macOS VM thought it was running at (for example) 2560x1600 instead of a retina resolution of 1280x800. VMware even warns you of this in their Knowledge Base:

Mac OS X running in a virtual machine is limited to an approximate resolution of 2560 x 1600, and treats the display as a standard DPI device. This makes the text and icons to appear small in the OS X interface.

However, today I stumbled across this solution from Patrick Bougie—and it's brilliant in its simplicity. Patrick's post has all the details; I'll reproduce them here in abbreviated form, just in case his page ever vanishes.

[continue reading…]


Edit long Terminal commands in a visual editor

Here's a quickie tip for those of us who occasionally string together complex commands at Terminal's prompt: You may want to add this simple line to your .profile (or whatever init file you use):

set -o vi

What does it do? It tells Unix/Terminal to set the input line editor to vi. When might this be useful? Let's say you've typed a long command, like the one to launch a background screen saver:

/System/Library/Frameworks/ScreenSaver.framework/Resources/ScreenSaverEngine.app/Contents/MacOS/ScreenSaverEngine -module "Arabesque" -background &

Before you hit Return, you notice a couple of typos early in the command. You could use cursor movement keys to move around, of course, but with the above command in place, just press Escape and hit v: The entered command will open for editing in vi. Make your changes, then do the usual :wq vi exit dance, and your edited command will then execute.

Note that if you edit a command but then don't save it (i.e. you press :q!, you may have to hit Return on the command line to get out of an odd "waiting for v to edit" mode. (At least that's the only way I found to return to normal typing.)


An odd fix for ‘jpeg’ vs ‘jpg’ filename extensions

I recently reinstalled macOS Sierra, due to my annoying Bluetooth issues. I hadn't noticed any side effects of the reinstall until I went to save a JPEG image from Acorn.

On save, I noticed that the image's extension was .jpeg rather than what I thought was the usual .jpg. As both of my other Macs save with the .jpg extension, I figured something was messed up on the iMac. So I (of course) tweeted about the issue. A while later, Shawn King replied with this seemingly odd suggestion:

So I tried it, and sure enough, changing the screen capture file format via defaults write com.apple.screencapture type jpg and then restarting the SystemUIServer with killall SystemUIServer changed my default JPEG extension in every app to .jpg.

What's really strange is that I then switched the screenshot format back to png, and the .jpg extension remained. I even went so far as to delete the pref (defaults delete com.apple.screencapture), and still, the extension remains .jpg. So whatever change occurred when switching the default screenshot format, it appears to be permanent.

I tried the same trick for the .tiff extension (which I rarely use, so it doesn't bother me as much), and it sort of worked: Captured screenshots got a .tif extension, but images saved from apps still got the four-letter .tiff extension. Weird.

If anyone knows exactly what's going on with the .jpeg vs. .jpg extension, I'd love to hear the explanation.


Watch a screen saver in the background

Another oldie but goodie, and it's best demonstrated by example:

Yes, that's a screen saver running in the background, behind whatever work you're doing. And if nothing else, it's a great example of the progress of our CPUs and GPUs since 2002. In the original hint, I noted:

On my G4/733 with the GeForce3, this is simply amazing. The new "flurry" screensaver is running right now on the destop at 1600x1200 in thousands, iTunes is playing, the ink recognition floater is open, and yet the CPU utilization is averaging at or below 50% of thereabouts

Today, I'm testing it on a 5K iMac (5120x2880) with a second connected 4K (3840x2160) display—a total of 23,040,000 pixels, or 12 times as many pixels as in 2002—with Flurry running on both screens, and the CPU usage is somewhere around 10% to 15%. (Flurry does send the iMac's fans into a tizzy, though.) Other screen savers are even less intensive, and don't send my iMac's fans into high gear.

I can't imagine actually working this way for very long, but it is kind of interesting. Here's how to start (and more importantly, perhaps, stop) a background screen saver.

[continue reading…]


A unique way to see the weather

Ever wanted a "light" weather check web site, free of ads and other visual clutter? One that you could maybe even use from Terminal? Then you want wttr.in.

Sure, you can use it from your browser, i.e. see the weather in Boston or Montreal, by just appending the zip/postal code of interest to the URL, i.e. http://wttr.in/95014. If you omit the location, wttr.in will get the location based on your IP address—for me, that's never anywhere near correct when I'm at home, though.

What's really neat is you can use it in Terminal, too, via curl:

$ curl wttr.in/80301

The output is graphical, but done so with text characters (click for zoomed version):

At a glance, you get a few days' worth of conditions, including temperature range, wind speed, visibility, and precipitation. There's even animation—check somewhere with thunderstorms, and you'll see flashing lightning bolts.

There's a help page that explains lots of other options, like forcing metric or US units, and looking at weather by airport code.


Install and use a non-GUI connection speed test tool

Yesterday on Twitter, Dave Hamilton tweeted…

What is this speedtest exactly? And what is brew, you may also be wondering? You may also be wondering why, if you have brew, Dave's command doesn't work…that's because it's actually brew install speedtest_cli…but I'm getting ahead of myself.

speedtest is a command line interface (i.e. Unix app run from Terminal) to the connection speed tests at Speedtest.net—you get the results without the fancy animated graphics. And Brew is "the missing package manager for macOS." In other words, it's an app to help you install (and uninstall) other apps.

Here's how speedtest looks in its default mode—note that I've sped things up greatly for the GIF…

Much nicer to me, though, is the simplified version:

$ speedtest_cli --simple
Ping: 9.482 ms
Download: 94.23 Mbit/s
Upload: 68.66 Mbit/s

No animated dots, just three lines with the results. As you might expect if you read here regularly, I also wrote a Keyboard Maestro macro (of course I did!) that makes it really easy to run the simple version of the test, and does some editing of the output to simplify the display:

If you'd like to install speedtest (and maybe add the macro)—even if you don't want to install Brew to do so—keep reading…

[continue reading…]


Change the look of inactive Terminal windows

I tweeted this recently…

Things I did not know (or perhaps remember): Terminal lets you set the opacity and blur of inactive windows. (Profiles > Text > Background)

…but because I often forget about those things—the ephemeral nature of tweets being what it is—I figured I should post it here, too.

I have no idea when the feature appeared, but I only discovered it on February 27th, when I tweeted about it. You'll find the window at right in Terminal's preferences, on the Profiles tab—look in the Text section for a selected window, then click the color tile under Background. Check the box to set opacity and blur for inactive windows, and you're done.

As I use a dark background in Terminal, I like this feature a lot. I've now got it set up to go transparent and fuzzy when inactive—this makes it basically vanish, so the dark background no longer grabs my eye.

At some point, I'll dig through my virtual machines and figure out when this was added…who knows, maybe it's been there for forever. In any event, I'm glad I stumbled across it the other day.


Prevent BBEdit from importing ‘find’ strings

I use Bare Bones' BBEdit for most of my text editing, but there's one thing it does that drives me crazy: It will replace your "find" search terms with something you've used elsewhere. It goes like this…

  1. Set up a complex find/replace that you need to do a number of times in BBEdit.
  2. Do some finding and replacing, then switch over to another app to do some other stuff, including copying and searching.
  3. Switch back to BBEdit, open the Find dialog…and discover that the Find box now contains the text you used for searching in the other app.

Argh! Thankfully BBEdit saves previous queries, so it's a click to get it back. But I finally got mad enough to search for a better solution, and found it on a previously unknown to me expert preferences page on Bare Bones' site.

There's lots of good stuff on that page, but this section is the one of interest for the "Find" problem:

Like many Mac OS X applications, BBEdit supports the “Find Scrap”, a feature of the OS that enables sharing of the “search for” string between applications. Some applications put inappropriate content (such as Web search strings) on the Find Scrap, which can cause the “search for” string in BBEdit’s Find dialog to be replaced when you didn’t expect it.

Bingo! Quit BBEdit, open Terminal, paste this line, hit Return, and relaunch BBEdit:

defaults write com.barebones.bbedit FindDialog_UsesFindScrap -bool NO

No longer will your expertly-constructed Find string be replaced by interlopers from the outside world.


Open Unix man pages in their own Terminal window

A while back, I wrote about opening Unix man pages in Preview, and this is still my preferred method of browsing man pages. However, there may be times where Preview is overkill, and you want to stay in Terminal, maybe for a short help file such as that for ln. But opening a new window by hand is a bit of a pain, and tabs won't work because you can't see both the window and the man page at the same time.

While browsing the old Mac OS X Hints site, I found this nice solution: Open man pages in a new Terminal window, one that's set up just for reading such pages. It looks something like this (though I've customized my setup; keep reading)…

Adding a few lines to your shell's startup file makes opening these 'in their own window' man pages as easy as opening 'regular' man pages.

[continue reading…]


The little I know about regex…and where to learn more

First off, regex is shorthand for a regular expression. And what, exactly, is a regular expression? According to the linked Wikipedia page, a regular expression is…

…in theoretical computer science and formal language theory, a sequence of characters that define a search pattern. Usually this pattern is then used by string searching algorithms for "find" or "find and replace" operations on strings.

That's a mouthful, but what it means is that you can write some really bizarre looking code that will transform text from one form to another form. And if you know just a bit of regex, and where to go to look up what you don't know, then you can use regex to do many useful things.

For example, consider this filename on a scanned-to-PDF receipt:

The Party Place [party supplies] - 02-06-2017

Perhaps you'd prefer it if the date came first, in year-month-day order, so that your receipts were ordered by date, like this:

2017-02-06 - The Party Place [party supplies]

Sure, you could manually rename this one file, but what if you have 500 receipts that you need to rename? Enter regular expressions—they'll let you do this text manipulation, and many more. What follows is a very brief summary of my knowledge of regex, along with pointers to sites where I go when (very often) the problem I need to solve is beyond my regex skill level.

[continue reading…]