Skip to content

Terminal

Selective pruning of old rsync backups

In yesterday's post, I described a couple rsync oddities, and how they'd led me to this modified command for pruning old (older than four days) backups:

find /path/to/backups/ -d 1 -type d -Bmin +$((60*4*24)) -maxdepth 1 -exec rm -r {} +

After getting this working, though, I wondered if it'd be possible to keep my backups from the first day of each month, even while clearing out the other dates. After some digging in the rsync man page, and testing in Terminal, it appears it's possible, with some help from regex.

My backup folders are named with a trailing date and time stamp, like this:

back-2017-05-01_2230
back-2017-05-02_0534
back-2017-05-02_1002

To keep any backups made on the first of any month, for my folder naming schema, the modified find command would look like this:

find /path/to/backups/ -d 1 -type d -Bmin +$((60*4*24)) -maxdepth 1 -not -regex ".*-01_.*" -exec rm -r {} +

The new bits, -not -regex ".*-01_.*" basically say "find only files that do not contain anything surrounding a string that is 'hyphen 01 underscore.' And because only backups made on the first of the month will contain that pattern, they're the only ones that will be left out of the purge.

This may be of interest to maybe two people out there; I'm documenting it so I remember how it works!


How to not accidentally delete all your rsync backups

With my Time Machine-like rsync backups running well, I decided it was time to migrate over the cleanup portion of my old script—namely, the bit that removes older backups. Soon after I added this bit to my new script, though, I had a surprise: All of my backups, save the most recent, vanished.

In investigating why this happened, I stumbled across two rsync/macOS behaviors that I wasn't aware of…and if you're using rsync for backup, they may be of interest to you, too.

[continue reading…]


How to burn an ISO file to a USB stick

I wanted to install Linux on a hard drive in Frankenmac, as Clover is a multi-boot utility—it lets you choose from any OS it sees during power up. (I'll add Windows, too, eventually.) To do this, you need to get Linux onto a USB stick. I've done this in the past, and my vague recollection of the process was download the ISO, convert to an image file, write image file to USB stick. However, as it'd been a few years, I went searching for references to make sure I had all the commands correct.

I found a lot of pages with a general summary of the process, and few with the specific steps. I tried one of those, but my USB stick didn't work. The other specific pages contained the same basic process, so I was stuck. Until I found this page, which contained a critical step I was missing: Formatting the USB stick before copying the image file.

For future reference, here's the precise process to follow if you want to burn an ISO file onto a USB stick…

[continue reading…]


How to install ruby gems in Terminal

In yesterday's tip, See sensor stats in Terminal, I implied that installation of the iStats ruby gem was a simple one-line command. As a commenter pointed out, that's only true if you already have the prerequisites installed. The prerequisites in this case are the Xcode command line tools. Thankfully, you can install those without installing the full 5GB Xcode development environment.

(Rather than starting from scratch, I'm just going to borrow this bit from my detailed instructions for installing the transcode-video tools, because the Xcode command line tools are required there, too.)

Here's how to install the command line tools. Open Terminal, paste the following line, and press Return:

xcode-select --install

When you hit Return, you'll see a single line in response to your command:

$ xcode-select --install
xcode-select: note: install requested for command line developer tools

At this point, macOS will pop up a dialog, which is somewhat surprising as you're working in the decidedly non-GUI Terminal:

Do not click Get Xcode, unless you want to wait while 5GB of data downloads and installs on your Mac. Instead, click the Install button, which will display an onscreen license agreement. Click Agree, then let the install finish—it'll only take a couple of minutes.

If you're curious as to what just happened, the installer created a folder structure in the top-level Library folder (/Library > Developer > CommandLineTools), and installed a slew of programs in the usr folder within the CommandLineTools folder.

[continue reading…]


See sensor stats in Terminal

Someone—perhaps it was Kirk—pointed me at this nifty Ruby gem to read and display your Mac's sensors in Terminal: iStats -- not to be confused with iStat Menus, a GUI tool that does similar things.

Installation is sinmple, via sudo gem install iStats. After a few minutes, iStats will be ready to use. In its simplest form, call istats by itself with no parameters. Normally I'd list the Terminal output here, but istats (by default, can be disabled) presents informatiomn with neat little inline bar graphs, so here's a screenshot:

This tool is especially useful on a laptop, as it provides an easy-to-read battery summary.

[continue reading…]


Create Time Machine-like backups via rsync

Taking a break from the recent Frankenmac posts, here's a little trick for creating "Time Machine like" backups of anything you'd care to back up1I don't know how well this might work for Mac files, as opposed to Unix files. But Mac files can be saved to the real Time Machine.. In my case, it's the HTML files off of my web sites, both personal and work. I used to simply back these up, but then realized it'd be better to have versions rather than totally overwriting the backup each day (which is what I had been doing).

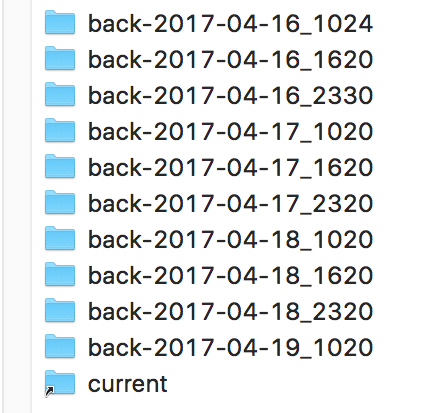
Once you've got it set up and working, you'll have a folder structure similar to the one at right, with one folder for each backup, and a "current" link that takes you to the newest backup.

I get zero credit for this one; my buddy James explained that he'd been using this method for a year without any troubles, and pointed me to this great guide2The original site that hosted this script is gone; I've linked to a copy I found on archive.org. Original URL:
https://blog.interlinked.org/tutorials/rsync_time_machine.html
that explains the process.

I used that guide and added the following to my backup script to create my own customized Time Machine for the files from here, robservatory.com:

/usr/local/bin/rsync -aP \
  --link-dest=/path/to/quasi/TM_backup/current user@host:/path/to/files/on/server/ \
  --exclude "errors.csv" \
  --delete --delete-excluded \
  /path/to/quasi/TM_backup/back-$newtime
rm -f /path/to/quasi/TM_backup/current
ln -s /path/to/quasi/TM_backup/back-$newtime /path/to/quasi/TM_backup/current

And that's all there is to it. Note that you may need a newer version of rsync than what comes with macOS now (2.6.9)—I use version 3.1.2 from Homebrew, so I can't say for sure that this script works with the stock version.

I've only been using this for a couple weeks, but it's working well for me so far.


Adjusting for the oddities of ctime

In the shell script I use to back up my web sites (I really should update that, they're much different now), I include a line that trims the backup folder of older compressed backups of the actual WordPress databases. That line used to look like this:

find path/to/sqlfiles/backups -ctime +5 -delete

I thought this should delete all backups in that folder that are at least five days old, via the ctime +5 bit.1Footnote: I know now I should have been using mtime, though it would have had the same issue I had with ctime. But it turns out I thought wrong. The above will delete all files that are at least six days old. Why? I don't know why it works this way, but it's mostly explained in the man page for find (my emphasis added):

-ctime n[smhdw] If no units are specified, this primary evaluates to true if the difference between the time of last change of file status information and the time find was started, rounded up to the next full 24-hour period, is n 24-hour periods. If units are specified, this primary evaluates to true if the difference between the time of last change of file status information and the time find was started is exactly n units. Please refer to the -atime primary description for information on supported time units.

To make find do what I wanted it to do, I just needed to change +5 to +5d. Simple enough…but while figuring this out, I stumbled across this page, which has an alternative solution with more flexibility:

find path/to/sqlfiles/backups -mmin +$((60*24*5)) -delete

The mmin parameter is much more precise than ctime:

-mmin n True if the difference between the file last modification time and the time find was started, rounded up to the next full minute, is n minutes.

By using mmin, I can be really precise. As shown, 60*24*5 gets me the same five-day interval as ctime +5d. (And yes, I could have used 7200 instead of 60*24*5, but I find it clearer to leave it in its expanded form.)

But I could instead delete backups that were older than 3.25 days (60*24*3.25 or 5040), or for any other arbitrary time period. I like the flexibility this offers over ctime, so I've switched my script over to this form.


Cancel shell script on remote connect failure

I use a shell script to back up this site (and a variant of the same script to back up the Many Tricks site). I've been using these scripts for over a decade (wow), and though they've evolved, they're still fundamentally the same. (I did switch from cron to launchd for launching them, however.)

While the script typically runs very nicely, I recently noticed that my last backup was from a few weeks ago—uh oh. It didn't take long to figure out what had gone wrong: My ISP changed the hostname of the machine my site runs on, and my script uses ssh, scp and rsync, which connect via the hostname. Unfortunately, the failure mode is silence, because the script runs via a scheduled task. The only way I knew it failed was when I went to check the backup folder. Obviously, something more automatic than that would be desirable.

After much web searching, I couldn't find anything that seeemed like it'd do what I want: An email (and onscreen alert) if my backup failed. I found lots of Unix solutions to send mail using sendmail, but I didn't really want to enable that on my Mac. So I futzed around and built a simple checker that will mail me when it can't reach my web host.

[continue reading…]


How to find modified preference values

My recent tip about using Keyboard Maestro to toggle the visiblity of hidden items in Finder (which turned out to be irrelevant for Sierra users; just hold ⌘⌥.) works by checking a hidden macOS preferences setting. In this case, I checked for the existence of the AppleShowAllFiles key, which let me toggle the visiblity of invisible files based on the result of the check.

Controlling a macro—or a shell script or AppleScript—by checking (visible or hidden) preference values can be very useful. But how do you find out the name of the preference you need to check, and in which domain (preferences file) you'll find it? Hidden prefs are actually easiiest, because the command you use to write them tells you both the preference name and its location. For the hidden files in Finder tip, for instance, the command is this:

defaults write com.apple.Finder AppleShowAllFiles YES

So to check that in a script, I just need to save the results of defaults read com.apple.Finder AppleShowAllFiles into a variable, and I can then take action based on the variable's value. But what about a normal pref, in an application (or in System Preferences)? Say you wanted to check whether Apple's Pages app was set to show its rulers in inches or centimeters…

Why would you want to know this setting? I don't know, I was just trying to come up with an example. Just go with it…

How do you find out the key name associated with that particular preference, and what file it's stored in? I use a couple of different methods.

[continue reading…]


Color and ‘human readable’ file sizes in Terminal

These are two very old tips, but I'd forgotten about them until recently, when I sent someone a screenshot and they said "Hey, how'd you do that?"

Do what, exactly? This…

The most-obvious thing in that shot is the colored filenames. But notice, too, the file sizes are in a human-readable form. Both of these changes are pretty simple, though you could spend hours playing with colors.

Human-readable output

To get human readable output—not just from ls but also in du, which shows disk space usage—just include an h with the ls command: ls -alh. Instead of raw bytes, the values are converted and marked with trailing B, K, M, etc.

Because I never use ls in its short form, I actually added a line to my .profile (which loads whenever you open a Terminal session) to make this automatic:

alias ls='ls -alh'

You could do the same thing with du, but I rarely use that command, so I didn't bother.

[continue reading…]