Skip to content

See sensor stats in Terminal

Someone—perhaps it was Kirk—pointed me at this nifty Ruby gem to read and display your Mac's sensors in Terminal: iStats -- not to be confused with iStat Menus, a GUI tool that does similar things.

Installation is sinmple, via sudo gem install iStats. After a few minutes, iStats will be ready to use. In its simplest form, call istats by itself with no parameters. Normally I'd list the Terminal output here, but istats (by default, can be disabled) presents informatiomn with neat little inline bar graphs, so here's a screenshot:

This tool is especially useful on a laptop, as it provides an easy-to-read battery summary.

[continue reading…]


Frankenmac 2017: Troubleshooting tips

Earlier today, I managed to kill Frankenmac…again. Technically, it's "again again," because I also did so over the weekend. The weekend death was a black screen, same as the first, but this time, I managed to find the solution.

Today's death looked more serious—Frankenmac would reboot itself about a second after I started the boot sequence. I tried my backup drive, and it didn't work either—despite the fact that I tested it over the weekend. I couldn't boot in single user mode or safe mode from either drive. I could, though, boot into single user mode from the original USB stick I made for the install.

From there, with some help, I eventually got things working again. If you choose to build one of these things, you may find yourself with a similarly-dead machine at some point in time. Worst case, you should also be able to boot in single user mode from the USB stick, but then what? Here are a few tips on things you can do while booted in single user mode that might help debug the problem.

[continue reading…]


Frankenmac 2017: The devil is in the details

  • macOS

My Frankenmac project has reached the point where all the easy stuff is done, and only the hard stuff remains. To put it another way, the machine is 95% functional, but that last 5% is going to require more effort than anything thus far, I believe. Today, a look at what was easy (relatively speaking) and what's going to be hard.

The easy stuff

Going from nothing to a basically functional Mac was all relatively easy, save for a few moments of self-induced pain. To me, these were the easy parts of the project.

  • Buying the right hardware: Compared to nine years ago, when I last built a hackintosh, this part has gotten much simpler. If you stick to the hardware on the tonymacx86.com Buyer's Guide, you'll have the right hardware for the job.
  • Building the machine: If you've built a PC before, this step is pretty simple. You'll need to watch out for some gotchas, especially if you're trying to use a nine-year-old case and power supply, but it's still pretty simple.
  • Installing macOS: Nine years ago, I remember this step taking me a long time. Today, thanks to programs like UniBeast, Clover, and MultiBeast, it's relatively straightforward. You'll want to follow the guide closely, and you may hit an odd issue or two—USB ownership in my case—but getting macOS running was still relatively easy.
  • Using an upgraded video card: Thanks to NVidia's release of Pascal drivers for the Mac, getting my GTX 1080 video card running was a breeze.
  • Sleep/wake: I didn't have to do anything here; it just worked.
  • Handoff and Continuity: With the proper Fenvi card, this should just work…and it did for me.

At this point, I had (and still have) a machine that will boot MacOS and run just like an actual Mac—for most things. It's the "not most" parts that constitute the hard stuff…

[continue reading…]


Frankenmac 2017: How to back up a hackintosh

After last week's temporary death of Frankenmac, I decided it was important to back up the machine—even though I haven't yet migrated my data to it. Having a backup would let me quickly recover from any future self-induced stupidity. Backing up a hackintosh is generally the same as backing up a regular Mac, with one key exception: Making sure you back up the EFI partition, which is where are the special bits are stored to make your hackintosh boot.

Here's what I did to make sure I had a bootable backup of Frankenmac…

[continue reading…]


Easily compare Intel CPUs across generations

As part of my research into Frankenmac, my homebuilt Mac clone, I stumbled across this page at Intel that lets you easily compare CPUs across generations. Just click the Processors button, then choose a family (Desktop), then choose a CPU family (7th Generation Intel Core i7).

Click directly on a processor's name to go to its data sheet, or click the Compare box to add it to a comparison. Select as many as you like; the final layout includes horizontal scrolling to display those that don't fit onscreen at first.

I found this site useful when selecting a CPU for Frankenmac. Comparing the 6th and 7th generation Core i7, for example, the 7th generation has a slightly faster clock speed, faster RAM, and support for Intel Optane memory, whatever that might be. Based on these mild differences, and on Apple not yet shipping a Mac with the 7th generation chip in it, I chose the 6th generation Core i7 for Frankenmac.


Easy Unix date formatting

I use the date function quite often in scripts, mainly to append date/time stamps to filenames. For example, something like this…

newtime=`date +%Y-%m-%d_%H%M`
cp somefile $newtime-some_other_file

That particular format is the one I use most often, with the full date followed by the hours and minutes in 24 hour format: 2017-04-12_2315, for example. I use this one so that filenames wind up sorted by date order in Finder views.

Once I move beyond that format, though, the vagaries of date string formatting leave me dazed. Enter strftime.net, where you can build any date string you like using a point-and-click editor with real-time previews:

It doesn't get much easier than that.


Create Time Machine-like backups via rsync

Taking a break from the recent Frankenmac posts, here's a little trick for creating "Time Machine like" backups of anything you'd care to back up1I don't know how well this might work for Mac files, as opposed to Unix files. But Mac files can be saved to the real Time Machine.. In my case, it's the HTML files off of my web sites, both personal and work. I used to simply back these up, but then realized it'd be better to have versions rather than totally overwriting the backup each day (which is what I had been doing).

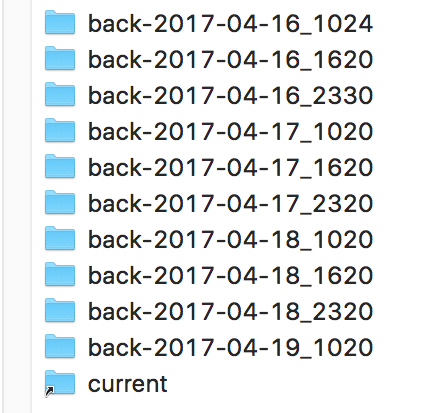
Once you've got it set up and working, you'll have a folder structure similar to the one at right, with one folder for each backup, and a "current" link that takes you to the newest backup.

I get zero credit for this one; my buddy James explained that he'd been using this method for a year without any troubles, and pointed me to this great guide2The original site that hosted this script is gone; I've linked to a copy I found on archive.org. Original URL:
https://blog.interlinked.org/tutorials/rsync_time_machine.html
that explains the process.

I used that guide and added the following to my backup script to create my own customized Time Machine for the files from here, robservatory.com:

/usr/local/bin/rsync -aP \
  --link-dest=/path/to/quasi/TM_backup/current user@host:/path/to/files/on/server/ \
  --exclude "errors.csv" \
  --delete --delete-excluded \
  /path/to/quasi/TM_backup/back-$newtime
rm -f /path/to/quasi/TM_backup/current
ln -s /path/to/quasi/TM_backup/back-$newtime /path/to/quasi/TM_backup/current

And that's all there is to it. Note that you may need a newer version of rsync than what comes with macOS now (2.6.9)—I use version 3.1.2 from Homebrew, so I can't say for sure that this script works with the stock version.

I've only been using this for a couple weeks, but it's working well for me so far.


Frankenmac 2017: It’s (temporarily) dead, Jim

My purpose in writing this series of posts is to share everything about the hackintosh process, as experienced by a somewhat technical user who has built a number of PCs, and one prior hackintosh. That means sharing the good (the PC booted!), the bad (graphics card roadblock), and the ugly (today's story).

The ugly is this: Frankenmac is presently dead.

4pm Update: Frankenmac has returned to life. How? I'm not entirely positive, but I think it was a system date/time issue. I booted into single user mode (which worked) and noticed a lot of the system-installed files had dates of 1969 or 2037. Typing date at the command prompt returned some date in 2040. Yikes! I rebooted, set the date and time in the BIOS, reformatted the drive (for the sixth time), installed macOS, waited for the reboot…and it worked!

I was trying to get audio working after sleep (one of the last remaining little things to fix), and managed to get the machine in a state where it'd only boot to a black screen. No amount of web searching found a workable solution, so I thought I'd just start over. To do that, I needed to format the internal drive (using my iMac's disk dock). Disk Utility isn't enough, though, as the hidden EFI partition also needs to be removed, and you can't do that in Disk Utility. (You could, via a hidden debug menu, before Apple neutered Disk Utility in OS X 10.11.)

Some web digging found the solution: Write zeros to the boot sector with this command:

sudo dd if=/dev/zero of=/dev/disk1 bs=1024 count=1024

Very important: Don't do this unless you're absolutely positive you know what you're doing! You'll wipe a disk in a hurry, and there's no recourse. Also, see the comments for a much better way!

After zeroing the disk, I ran the installer again, and that's where things went south: The installer finishes, but upon reboot, when I tell the machine to boot from the internal drive, it starts the boot process, then reboots again.

And that's where things sit. So for now, Frankenmac is tabled while I seek the advice of experts.


Frankenmac 2017: From BIOS to installed macOS

Today, a look at how my Frankenmac went from the basic hardware BIOS setup screen to a usable (though not yet fully complete or natively bootable) macOS machine. If you're just tuning in, you may want to catch up…

  • The Beginnings: Resources, parts list, and ordering. (Steps 1 - 3)
  • The build: Turning the parts into something that powers on…but that's about it. (Steps 4 - 5)
  • The roadblock: A new graphics card and an old case and old power supply do not mix.
  • Transplanted: Frankenmac moves into a new home, with a new power supply, to get around the roadblock.
  • The parts list: A constantly-updated list of the parts I used and the cost of each part.

Now that Frankenmac is functional in its new home—roadblock averted—it's time to explain how I got to that point from the BIOS boot screen of step five a few days back. It's a tale filled with drama, dread, doubt, defiance, and in the end, domination. Well, OK, it's pretty much none of that, but I had a string of "D words" in my head, and had to use them somewhere…

[continue reading…]


Frankenmac 2017: Transplanted

After hitting a roadblock with the graphics card connector in Frankenmac's many-years-old case, yesterday I picked up a new case and power supply, and set out to transfer the machine to its new home.

The power supply

First, the boring stuff: The power supply I chose is a Thermaltake Toughpower 750W 80 Plus Gold. It works well, and (other than the CPU and motherboard power cables) is modular, so you only add the cables you need.

Very strangely (to me, anyway) is that Thermaltake packages its power cables in a nylon bag, as shown in the image at right. I'm not sure why—do people wander around with PC power supply cables often enough to require a sturdy carrying case? Very odd. Anyway, the power supply is nice and quiet, installed easily, and seems to do its job. But power supplies are boring…

[continue reading…]