Skip to content

macOS

Open URLs in either frontmost or default browser

Between Many Tricks and this blog, I spend a lot of time in browsers. Most of the time, I use Safari, but I do occasionally work in Chrome and Firefox, too—most often to check how a page looks or functions.

I keep my "permanent" bookmarks in Safari, and don't presently use any sort of cross-browser sync. (I used to use one, but had a lot of trouble with duplicates, so I stopped.)

I wanted a way to open a limited number of URLs in either Safari (if that's what I was in, or if I wasn't in a browser), or in the frontmost browser, if that browser were frontmost. I could just create the subset as bookmarks in each browser, but if I wanted to add or remove a page from the list, I'd have to do so multiple times.

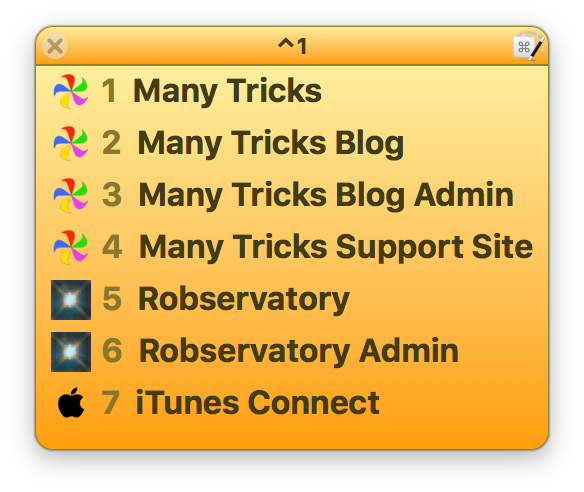
In the end, I came up with a set of Keyboard Maestro macros that do exactly what I want. I access my short list of multi-browser URLs via Keyboard Maestro's pop-up palette, as seen at right.

This appears when I press ⌃1; after that, a single digit opens the desired URL. But how does it know whether to open the URL in Safari or one of the other browsers? It takes one helper macro, then one macro for each URL that I want to open in this manner.

[continue reading…]


One possible solution to macOS Sierra Bluetooth issues

A while back, I wrote about some very annoying Bluetooth issues in macOS Sierra: My headphones would pop and crackle when I moved my mouse around, and the mouse, keyboard, and/or trackpad would randomly disconnect and reconnect.

The other night, due to some stupidity on my part1I installed an app I suspected might have infected my Mac. It was a false alarm., I felt it was time to reinstall macOS Sierra. I logged into my other admin account, launched the Mac App Store, and then reinstalled macOS Sierra2There are other ways to reinstall, i.e. from the recovery partition; they're detailed on the support page..

The nice thing about the reinstall is that it's nothing like a reinstall from days of yore—you're not starting from scratch, so you won't have to reinstall everything when done. Apple makes this clear on the support page:

You can install macOS over the same version or earlier version, without removing your data. You don’t need to remove or disable the existing system first.

I say this with crossed fingers, but it seems that this reinstallation has potentially solved my Bluetooth issues. For the last two days, I've used my Bluetooth headphones without any static issues at all. In addition, none of my Bluetooth devices have disconnected. There is one comment from slajax on the original article that states this didn't work for them:

I’ve been having the same issue but with the gen 1 track pad and keyboard. I reinstalled the OS, PRAM etc replaced them with the gen 2 key board and track pad and also had the apple store replace the bluetooth antenna but still having the same issue.

If you've reached the breaking point with your macOS Sierra/Bluetooth issues, it might be worth the 30 minutes or so a reinstall takes. But please, if you go this route, make sure you have a good backup first, just in case. And if it works for you, please post in the comments (either here or on the original post), so that others might see, too. I promise to do the same if my now-working Bluetooth turns out to again be not-working Bluetooth.


Make your macOS Dock suck

Now, some may not like the Dock and say it already sucks. But I'm actually referring to a really old hint that ran on Mac OS X 10.0's release date—March 24, 2001.

The hint explained that the Dock has three minimization modes available; back then, you had no choice of which to use. Now we have a choice between two: Genie (the default) and Scale, selectable on the Dock System Preferences panel. If you'd like to see the hidden third mode, Suck, issue these two commands in Terminal:

defaults write com.apple.Dock mineffect suck
killall Dock

Your Dock will restart, and when you minimize a window, it will be sucked into the Dock. The best way to compare these three animations is by watching them in slow motion—hold down Shift1That's called a hidden hint—hold Shift to see any macOS animation in slow motion. while clicking the yellow button on any window. Or just watch this video…

I personally use Scale, though I am surprised that Suck has survived intact over all the intervening years.


Install and use a non-GUI connection speed test tool

Yesterday on Twitter, Dave Hamilton tweeted…

What is this speedtest exactly? And what is brew, you may also be wondering? You may also be wondering why, if you have brew, Dave's command doesn't work…that's because it's actually brew install speedtest_cli…but I'm getting ahead of myself.

speedtest is a command line interface (i.e. Unix app run from Terminal) to the connection speed tests at Speedtest.net—you get the results without the fancy animated graphics. And Brew is "the missing package manager for macOS." In other words, it's an app to help you install (and uninstall) other apps.

Here's how speedtest looks in its default mode—note that I've sped things up greatly for the GIF…

Much nicer to me, though, is the simplified version:

$ speedtest_cli --simple
Ping: 9.482 ms
Download: 94.23 Mbit/s
Upload: 68.66 Mbit/s

No animated dots, just three lines with the results. As you might expect if you read here regularly, I also wrote a Keyboard Maestro macro (of course I did!) that makes it really easy to run the simple version of the test, and does some editing of the output to simplify the display:

If you'd like to install speedtest (and maybe add the macro)—even if you don't want to install Brew to do so—keep reading…

[continue reading…]


Control inline video—and more—in Safari

This is another oldie but goodie from Mac OS X Hints, explaining how to enable the Debug menu in Safari. To do that, quit Safari, open Terminal, paste the following line, and press Return:

defaults write com.apple.Safari IncludeInternalDebugMenu 1

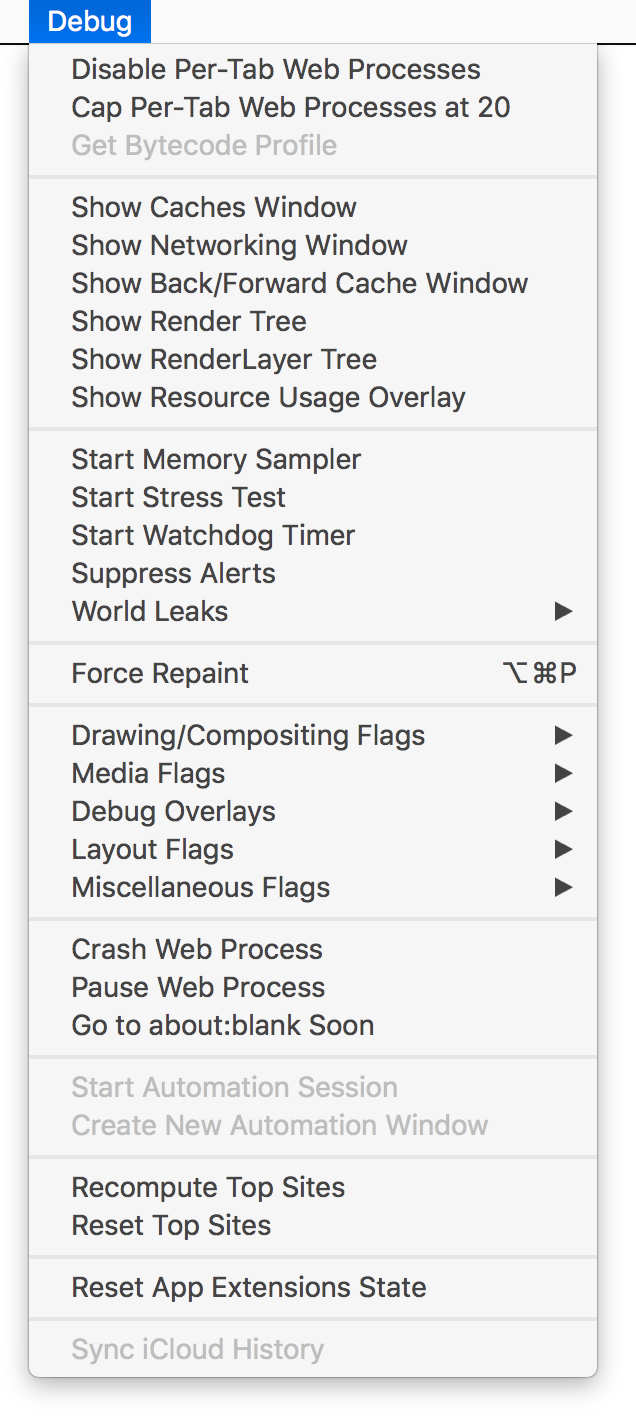
When you relaunch Safari, you'll have a (really long) Debug menu on the far right of Safari's menus. And just why might you want a Debug menu in Safari? Kirk McElhearn offers up one good reason:

Auto-play videos suck. They use bandwidth, and their annoying sounds get in the way when you’re listening to music and open a web page. …

But you can stop auto-play videos from playing on a Mac. If you use Chrome or Firefox, it’s pretty simple, and the plugins below work both on macOS and Windows; if you use Safari, it’s a bit more complex, but it’s not that hard.

In Safari, they key is the Debug menu, as Kirk points out. Go to Media Flags and select (activate) Disallow Inline Video, and that should be the end of auto-playing video. See Kirk's blog post for ways to do the same in Firefox and Chrome.

Beyond auto-play video, though, there's lots to geek out about in the Debug menu…

[continue reading…]


How I organize my Keyboard Maestro macros

This post was originally published in Decwember of 2016. I took it down to replace one section (using repeats) with another (using groups), and to expand some other areas.

I've been using Keyboard Maestro (or KM for short) a lot lately, i.e. Create an iTunes song info window or A much improved special character palette, or a slew of others.

As my collection of macros has grown, and some of those macros have gotten more complex, I've been using a few of KM's features to help keep my macros organized, and make it easier to debug them while I'm working on them. Some of these are obvious, some maybe not so obvious, so I thought I'd share what I'm doing.

[continue reading…]


Capturing macOS screenshots and onscreen objects

I capture a lot of screenshots—both for this blog, and for our Many Tricks' help files and web pages. Depending on the project, I may need a full screen, a portion of a screen, a window, an object, or some combination of the above. As such, I use a few different ways of capturing screenshots.

First up are the built-in macOS screenshot tools, which you'll find on the Keyboard System Preferences panel, in the Shortcuts tab:

These four commands let you capture full screens or windows, directly to files or to the clipboard. And, for many users, these may be all you need. If that's you, great! (You may want to assign some easier-to-type shortcuts, as these—especially the clipboard variants—require some advanced finger gymnastics.)

I use some of these built-in tools, along with a key third-party app, to handle all my image capture needs.

[continue reading…]


Change the look of inactive Terminal windows

I tweeted this recently…

Things I did not know (or perhaps remember): Terminal lets you set the opacity and blur of inactive windows. (Profiles > Text > Background)

…but because I often forget about those things—the ephemeral nature of tweets being what it is—I figured I should post it here, too.

I have no idea when the feature appeared, but I only discovered it on February 27th, when I tweeted about it. You'll find the window at right in Terminal's preferences, on the Profiles tab—look in the Text section for a selected window, then click the color tile under Background. Check the box to set opacity and blur for inactive windows, and you're done.

As I use a dark background in Terminal, I like this feature a lot. I've now got it set up to go transparent and fuzzy when inactive—this makes it basically vanish, so the dark background no longer grabs my eye.

At some point, I'll dig through my virtual machines and figure out when this was added…who knows, maybe it's been there for forever. In any event, I'm glad I stumbled across it the other day.


Prevent BBEdit from importing ‘find’ strings

I use Bare Bones' BBEdit for most of my text editing, but there's one thing it does that drives me crazy: It will replace your "find" search terms with something you've used elsewhere. It goes like this…

  1. Set up a complex find/replace that you need to do a number of times in BBEdit.
  2. Do some finding and replacing, then switch over to another app to do some other stuff, including copying and searching.
  3. Switch back to BBEdit, open the Find dialog…and discover that the Find box now contains the text you used for searching in the other app.

Argh! Thankfully BBEdit saves previous queries, so it's a click to get it back. But I finally got mad enough to search for a better solution, and found it on a previously unknown to me expert preferences page on Bare Bones' site.

There's lots of good stuff on that page, but this section is the one of interest for the "Find" problem:

Like many Mac OS X applications, BBEdit supports the “Find Scrap”, a feature of the OS that enables sharing of the “search for” string between applications. Some applications put inappropriate content (such as Web search strings) on the Find Scrap, which can cause the “search for” string in BBEdit’s Find dialog to be replaced when you didn’t expect it.

Bingo! Quit BBEdit, open Terminal, paste this line, hit Return, and relaunch BBEdit:

defaults write com.barebones.bbedit FindDialog_UsesFindScrap -bool NO

No longer will your expertly-constructed Find string be replaced by interlopers from the outside world.


Fix Messages’ broken bundled AppleScripts

While playing around with Messages this morning, I noticed that it ships with a feature that, if used, throws an error. Steps to reproduce:

  1. Open Messages' preferences.

  2. Set the Applescript handler pop-up to any of the listed scripts:

  3. Close preferences, and try to send a message to anyone.

  4. Revel in the brokenness.

I especially like the execution error: No error message…it's that rare non-error that tosses up an error dialog!

In any event, I think it's shameful that Apple ships the app with a feature—plainly obvious in prefs—that breaks when used. Yes, I know AppleScript is probably dying, but that doesn't excuse shipping the app with a clearly-broken feature; if it doesn't work, just remove it. Apparently this has been an issue since Yosemite's release in October of 2014!

With all that said, fixing this is incredibly easy—it took me about 30 seconds of "work" to find and fix the problem. If you'd like to use the bundled AppleScripts in Messages—either as is, or in some modified form—here's what you need to do

[continue reading…]