I wanted to embed an animated GIF in my post about changing the iOS Settings screen. However, because the GIF was about 4MB in size, I didn't want it to auto-load—and in general, I find auto-playing GIFs annoying. I wanted something that would stop and start on click, like this (wonderfully subtle) example GIF…

So I did what any WordPress user would do in such a situation: I went looking for a WordPress plug-in that offered control over GIFs.
I initially found WP GIF Player and GIF Animation Preview. Both did what I wanted, mostly, but they added a bunch of their own HTML and CSS, and/or relied on the WordPress media library (which I don't use). After testing both, I just couldn't get them to work with the GIF and the size/position that I wanted to use. Perhaps there are others that would work, but I got frustrated and gave up searching.
While searching, I had also stumbled across a bit of JavaScript that seemed to do what I wanted, but I ran into some trouble getting it to work. I asked my friend James for assistance, and he and I started on what we thought was a little side project to modify that code.
In the end, it took way more of our time, especially James' time, than we expected. But the finished code works very nicely, and doesn't interfere with whatever styling or positioning or sizing you want to use on your animated GIF. The above example GIF is being controlled by the script James created, in fact.
The "start" and "stop" text, along with the fade animation (move your mouse in and out of the image area while the GIF is playing) are fully customizable in CSS (well, with two tiny text changes in the JavaScript), so you're not stuck with what you see here.
To use this code on your own WordPress site, you'll need a few things…
- The JavaScript code, obviously—keep reading for that.
- Some new CSS classes—keep reading for those, too.
- An animated GIF.
- A still image, usually the first frame of the animated GIF, to display while the GIF isn't animating.
- The JavaScript AutoLoader plug-in. This plug-in lets you insert custom JavaScript into your site without worrying about themes or enqueueing scripts or any other such details. (There are other plug-ins that do this, I'm sure; I just like the simplicity of this one, and how it works.)
The very first thing you need to know is that your filenames matter…
Important: For this to work on your site, your animated GIF and still image must share the same base name, with only the extension varying—TalkingCat.gif and TalkingCat.jpg, for example. This is due to how the JavaScript works; it simply swaps the GIF with the still, and assumes the names are identical in order to do that.
With that out of the way, the first thing you should do is install and activate the JavaScript AutoLoader plug-in, as nothing will work if you can't load the JavaScript.
After the plug-in is installed and active, you need to decide where you want your custom JavaScripts to reside. The plug-in will look for JavaScript in three locations: In the theme directory, the child-theme directory (if applicable), or (my preference) the general WordPress directory. I prefer to use the general directory so that I can change my theme without fear of breaking something if I forget to migrate a script.
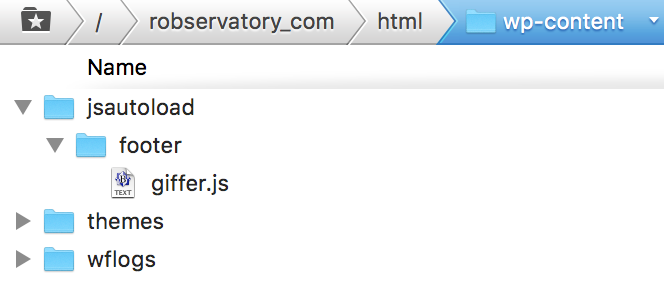
The plug-in works by automatically loading anything whose name ends in .js inside a jsautoload folder in one of its watched locations. You can further control script loading order by adding a footer folder inside that top-level folder. Any scripts in that folder will be loaded in your site's footer, i.e. after everything else on the page.
That's exactly what you need to do with this script, because it scans the page to find images, so it has to load after the page has loaded. I named my script giffer.js, and here's where it's stored on my site:
After you've saved your script, you can make sure the plug-in sees it by going to the Active plug-ins page in the WordPress admin panel, finding JavaScript AutoLoader in the list, then clicking the circled question mark; this will bring up a status page, like this:

As long as you see that the JavaScript is currently loaded via the footer, you're good to go. Oh wait, there's nothing to load, because you don't have the code yet.
Here's the code. Paste into your favorite text editor, save with a name you find fitting (make sure it ends in .js), then upload to the right spot on your server.
1 2 3 4 5 6 7 8 9 10 11 12 13 14 15 16 17 18 19 20 21 22 23 24 25 26 | (function() { const images = document.querySelectorAll('img[data-animation="gif"]'); [].forEach.call(images,function(image) { image.addEventListener('click', toggleImage); image.insertAdjacentHTML('afterend', '<div class="GIFstopped"><span>Play GIF</span></div>'); }); function toggleImage() { var myImage = this; var ext2 = myImage.getAttribute('data-animation'); var ext1 = myImage.src.substr((~-myImage.src.lastIndexOf(".") >>> 0) + 2); if (ext2 == "gif") { toggleItem(myImage, ext1, ext2, 'GIFplaying', 'Click to stop'); } else { toggleItem(myImage, ext1, ext2, 'GIFstopped', 'Play GIF'); } } function toggleItem(myImage, ext1, ext2, className, text) { var myText = myImage.nextElementSibling; myImage.src = myImage.src.replace('.'+ext1, '.'+ext2); myImage.setAttribute('data-animation', ext1); myText.className = className; myText.innerHTML = text; } })(); |
I'm not going to attempt to explain all of this, because honestly, I only understand about 75% of it. But the script is driven by a special tag (more on that below) on the still image you use as your animated GIF's placeholder. When the script finds the tag, it swaps the still for the animated GIF, then modifies the tag so that the next click reverses the process.
(That outer function... wrapper around the whole thing restricts any variables we use to our script only. This is known as local scope, and it means that our variables can't interfere with another script that might use the same variable names. Given the number of JavaScripts that WordPress uses, that's a good thing.)
The beauty of this script is that it requires zero editing: It will automatically find all marked animated GIFs on your page, and give them the play/pause treatment. It will even determine the right filename extension on the still (that's that weird line with the ~-myImage.src.lastIndexOf bit in the middle), so you can use JPG or JPEG or PNG or tiff or whatever you prefer.
The only editing you need to do is if you want to customize the "start" and "stop" text that appears on the GIF. If you do, just change the two instances of Play GIF and the one instance of Click to stop to whatever you'd like them to be.
There are a number of new CSS classes used to manage the animated GIF; add these to your theme's CSS file.
1 2 3 4 5 6 7 8 9 10 11 12 13 14 15 16 17 18 19 20 21 22 23 24 25 26 27 28 29 30 31 32 33 34 35 36 37 38 39 40 41 42 43 44 45 46 47 48 | /* Animated GIF controls */ .GIFarea { position: relative; margin-left:auto; margin-right:auto; } .GIFarea div { font-size: smaller; font-weight: 700; padding: 5px; pointer-events: none; } .GIFplaying { position: absolute; top: 7px; right: 7px; background-color: red; color: white; visibility: hidden; opacity: 0; transition: opacity 1s, visibility 1s; } .GIFarea .GIFplaying { visibility: hidden; opacity: 0; transition: opacity 1s, visibility 1s; transition-delay: 0s; } .GIFarea:hover .GIFplaying { visibility: visible; opacity: 100; transition: opacity 1s, visibility 1s; transition-delay: .5s; } .GIFstopped { position: absolute; background-color: green; color: white; top:50%; left: 50%; transform: translate(-50%, -50%); } |
There's a lot here, but much of it is just for the animation of the "stop playing" text.
GIFarea is applied to each div that contains an animated GIF (see below for more on implementation). GIFarea div affects the styling of the text areas, as they're within a div in GIFarea. GIFplaying, GIFarea .GIFplaying, and the related hover class area all used to control the appearance, animation, and location of the "click to stop" text. Finally, GIFstopped controls the appearance the "Click to play" text.
All of these classes can be customized to suit your needs—just don't change the GIFplaying and GIFstopped class names, as they're hardcoded in the JavaScript.
Once you have the code, the CSS, and the plug-in (all one-time tasks), the actual implementation is incredibly easy. All it takes is one div wrapper around the img tag holding your still image. As an example, for the "blowing grass" GIF above, here's a simplified view of the entire code:
<div class="GIFarea" style="max-width:540px; max-height:304px;">
    <img src="//robservatory.com/postimages/_onetime/reeds.jpg" data-animation="gif" style="width:100%;max-height:304px;display:block;">
</div>
The simplification was just the removal of some style formatting I'd applied—you can view the source to see the original version. There are really only two critical bits:
- An outer div with the GIFarea class assigned. This wraps the still image placeholder/animated GIF. Note the inclusion of max-width and max-height style tags, to help the GIF scale with viewport size.
- Within the img tag, you must include this parameter: data-animation="gif". In addition, include the style tag as shown, edited to match the height specified in the div tag (again, to help with responsiveness).
That second item is the key: That parameter is what the JavaScript looks for to determine if a given image is supposed to be an animated GIF or not. Because of this, you can use non-animated GIFs—or animated GIFs that you don't want controlled by the script—simply by leaving out this tag. But if you want the script to control a given animated GIF, its img tag must have that parameter.
And that's really all there is to it. I used a ton of words to describe what's a fairly simple process, but I wanted (if nothing else) to document it for myself for the future! If you do try this and have any questions, just let me know. And to wrap up, showing more than one animated GIF on one page, I leave you with this…

I found the above GIF on the A Timid Mule wikipedia space, where it's posted under a Creative Commons license. You can view the license and many other images by visiting their page.
Note: Updated on March 27 2017 to change a line that was causing this to fail in IE11. Specifically, we used to loop with this statement:
images.forEach(function(image) {That has been replaced with this loop statement:
[].forEach.call(images,function(image) {So why didn't the first one work? The forEach method is designed to work on arrays, but we use a querySelectorAll, which returns a NodeList and not an array—and not all browsers support forEach on a NodeList. The revised version works perfectly on IE11, and still works on the other major browsers.
Thanks to user Royal Ghost for noting that our solution didn't work on IE11. (We're Mac folks, so we don't often use/test in IE.)
Thank you for this article. Sadly it doesn't works with IE11. IE drop error "Object doesn't support property or method 'forEach'" ->images.forEach(function(image)
Thanks for that heads-up -- it's fixed now, and should work on IE11. I added a note at the end explaining what was wrong, and what we changed (one line).
-rob.
Thank you Rob for this quick fix! Works like a charm.
Hi Rob, this is an incredible tutorial! I can't believe you made it so easy for me to get "pauseable" GIFs on my site. It's something I've wanted for years and I was able to set this up in about 20 minutes. You are incredible!!!
Thanks! Glad you found it useful, and I'll pass your kind words on to James, who did much of the work on the JavaScript.
-rob.
Comments are closed.