A while back, I created a pop-up character palette using Keyboard Maestro to allow easy insertion of the Mac's special characters (like , ⌘, ⌥, etc.). While this worked fine, I discovered a few major shortcomings:
- I couldn't create more than one character without calling up the palette again.
- I had to decide in advance if I wanted HTML entities or the actual characters.
- Two palettes (HTML or character) meant two keyboard shortcuts to remember.
- Adding characters to the palette was a real pain, because they had to be done twice.
- I was out of digits for shortcuts, so I was going to have to change the palette structure.
- It was slow: From calling up the palette to identifying which icon I wanted to use to selecting that icon, and then doing it all again for a second character was just really slow.
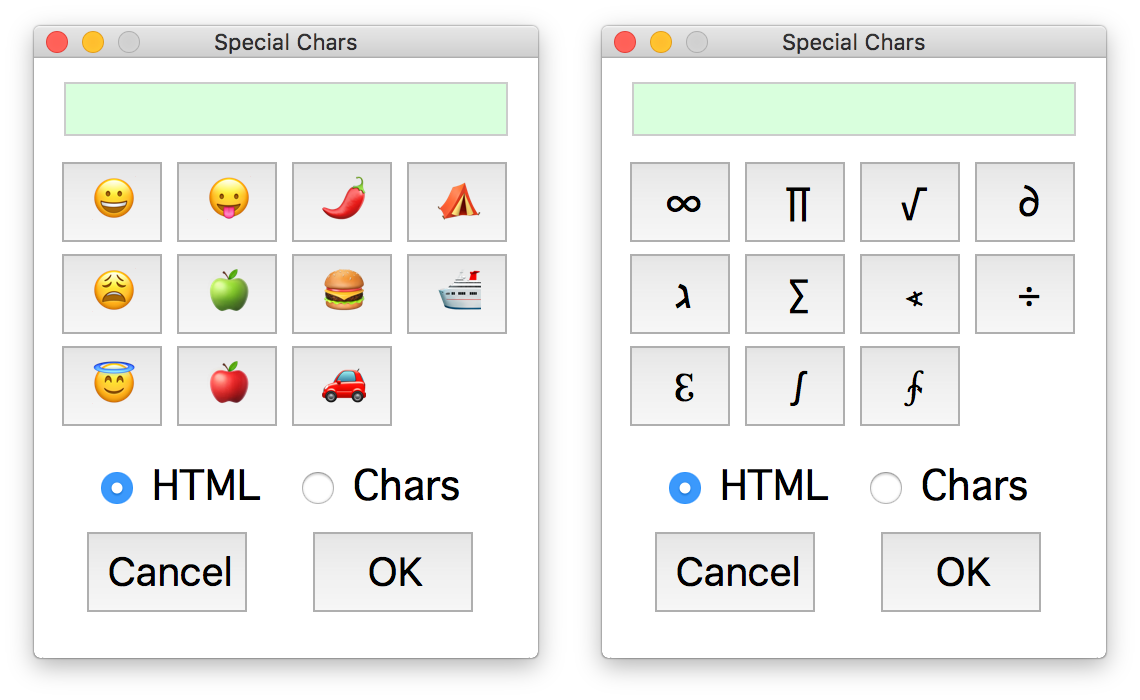
I set out to fix all of these issues, thinking I could use Keyboard Maestro's Custom HTML Prompt action, as I did for my iTunes song info window. And, in the end, that's what I used for the new-and-improved character palette:
This doesn't have to be used just for Mac special characters, of course. You could make yourself a customized pop-up for emoji, math symbols, whatever…
Read on for the how-to and download, if you'd like to put this to use…
To follow along, download the macro and open it in Keyboard Maestro. Before you use it, though, make sure you read the Don't use my code! section below, which explains how to replace my code with code that's much easier to customize.
The macro itself looks like this:
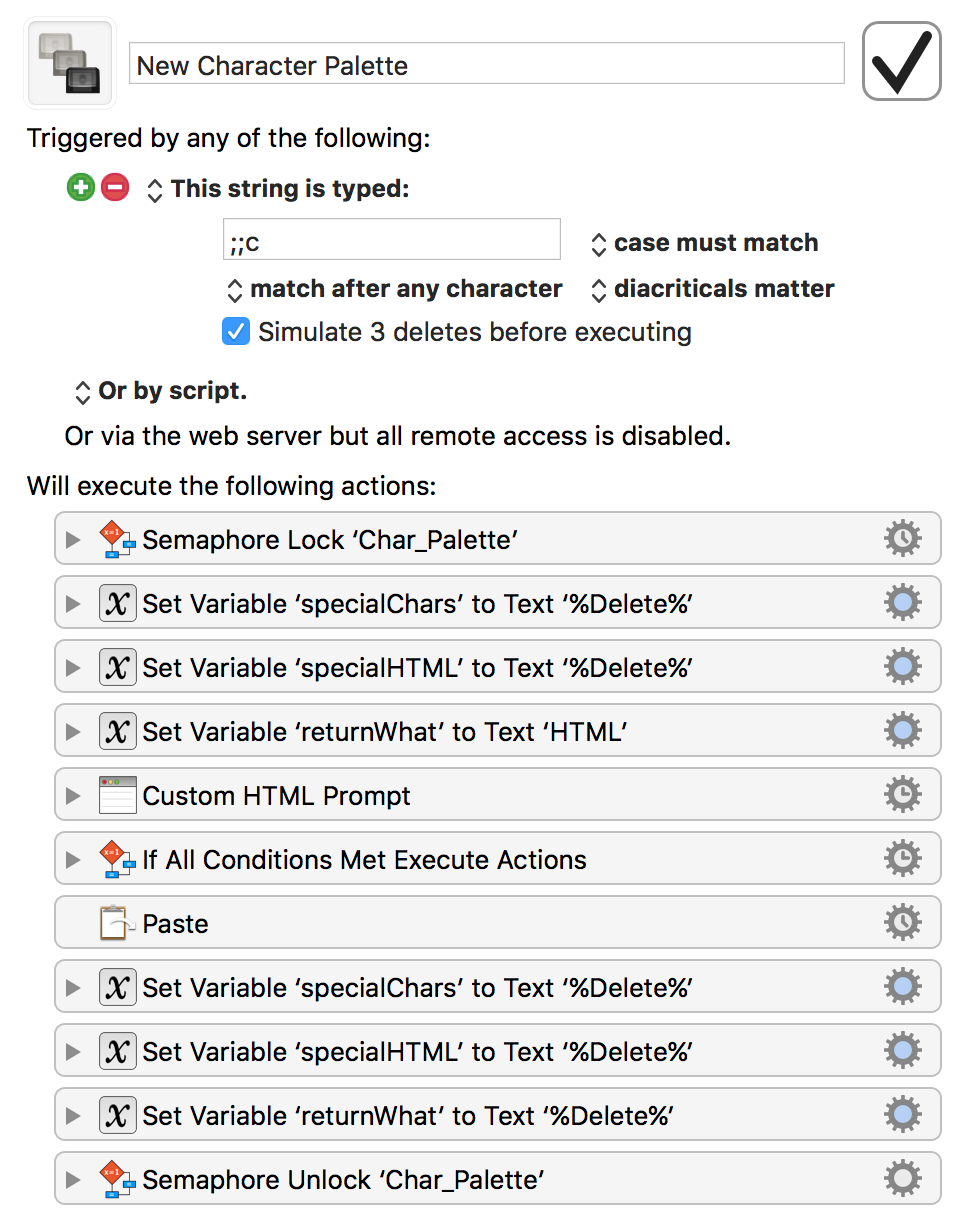
The first step—the semaphore lock—is there to prevent more than one palette from being activated at the same time. It's opposite, semaphore unlock, is the last step of the macro. The next two steps empty the variables that hold the HTML and characters, so the pop-up always appears blank. Step three sets the default return mode to HTML, because that's what I use most often—change it to Chars to change the default, or set it to %Delete% to not have a default.
Step five is the actual Custom HTML Prompt code, which I'll cover shortly. Step six is a conditional that loads the clipboard with either the HTML codes or the characters, depending on the chosen mode. After that, the clipboard is pasted, and the variables are cleared. I've been using this for a week or so, and it works really well.
Now, about the code…as with most of my coding projects, this one was a trial and error exercise, with multiple errors per trial. I had to learn a lot about trapping keystrokes in Javascript, and array variables, and other such details. But I did eventually get it working.
The first working version was particularly horrid, using tables for the button layout, which made updating the keys a major hassle. The second version, reproduced below and included with the downloaded macro, is better: Adding buttons no longer requires updating a table-based layout, but you still do have to tweak two sections of the code.
Which leads me to the next section, and my advice to please delete my code. (In the section on modifying the palette, the instructions assume you have, in fact, replaced my code.)
Even though my code is reproduced below, and included in the downloaded macro, I recommend you do not use it. There's nothing wrong with it functionally—it works perfectly well. But my friend James took a look at my script, and did a little bit of work on it to make it much better. And by "did a little bit of work on it," I mean that he replaced 95% of my code.
The end result is a very easily-modified script that requires adding or changing only one line of code for each key you'd like to add or modify. So instead of using my macro as downloaded, you should download my macro, open it, then replace the contents of the Custom HTML Prompt step with James' code: [download better Custom HTML Prompt code]
So if James' code is better in every way, why did I include mine? Because if you're new to Javascript, my version (as I'm also new to Javascript) may be easier to follow as you learn. Once you master the basics (I'm not there yet), then you can move on to try to fully understand James' code (I'm definitely not there). So basically, my code is for learning what not do do, then you can look at James' code to see what to do.
With that out of the way, here's the code in my version. This is included in the downloaded macro, and you don't need to read any further unless you're curious about how I made this work. (I'm writing this section primarily for my own use, so I'll understand what I did when I look back at it in the future.)
1 2 3 4 5 6 7 8 9 10 11 12 13 14 15 16 17 18 19 20 21 22 23 24 25 26 27 28 29 30 31 32 33 34 35 36 37 38 39 40 41 42 43 44 45 46 47 48 49 50 51 52 53 54 55 56 57 58 59 60 61 62 63 64 65 66 67 68 69 70 71 72 73 74 75 76 77 78 79 80 81 82 83 84 85 86 87 88 89 90 91 92 93 94 95 96 97 98 99 100 101 102 103 104 105 106 107 108 109 110 111 112 113 114 115 116 117 118 119 120 121 122 123 124 125 126 127 128 129 130 131 132 133 134 135 136 137 138 139 140 141 142 143 144 145 146 147 148 149 150 151 152 153 154 155 156 157 158 159 160 161 162 163 164 165 166 167 168 169 170 171 172 173 174 175 176 177 178 179 180 181 182 183 184 185 186 187 188 189 190 191 192 193 194 195 196 197 198 199 200 201 202 203 204 205 206 207 208 209 210 211 212 213 214 215 216 217 218 219 220 221 222 223 224 225 226 227 228 229 230 | <!DOCTYPE html> <html> <head> <title>Special Chars</title> <meta charset="utf-8"/> <style> body { width: 230px; margin-top: 15px; font-family: "Geneva"; font-size: 20px; padding-right: 5px; } #theButtons { column-count: 4; column-gap: 0; width:250px; display:block; } button { font-size: 20px; width:50px; height:40px; text-indent:5px; margin-bottom:6px; position: relative; } ul { list-style-type:none; padding:0px; margin:0px; } input { font-size: 20px; } #sHtml { display: none; margin-bottom: 15px; } #sCars { width:100%; margin-left: 5px; margin-bottom: 15px; background-color: #D9FFDD; } form { padding-top:10px; } .bLabel { font-size:10px; position: absolute; top: -1px; left: -2px; color:red; display: none; } .cMode { font-size:10px; position:absolute; top:-3px; color:red; display:none; } #rButtons { position:relative; } .bFinal { display: inline; width: 80px; text-indent: 3px; } #theHelp:hover .bLabel, #theHelp:hover .cMode { display:inline; } </style> <script language="javascript"> var my_keys=new Array() // actual key values, not chars // A = 65, M = 77, Z = 90, 0 = 48 my_keys[13]="OKb"; // Return to finish my_keys[27]="Cb"; // Escape to cancel my_keys[39]="RtArrow"; // The arrow keys my_keys[37]="LtArrow"; my_keys[38]="UpArrow"; my_keys[40]="DownArrow"; my_keys[65]="AppleKey"; // A my_keys[67]="CmdKey"; // C my_keys[75]="CtrlKey"; // K my_keys[79]="OptKey"; // O my_keys[82]="RtnKey"; // R my_keys[83]="ShiftKey"; // S my_keys[84]="TabKey"; // T my_keys[49]="rH"; // 1 - set HTML my_keys[50]="rC"; // 2 - set Chars window.addEventListener('keydown', checkKey); function checkKey(e) { event.preventDefault(); if (typeof my_keys[e.keyCode] !== 'undefined') { document.getElementById(my_keys[e.keyCode]).click(); } } function pasteVals(theChar, theHTML) { document.forms['myForm'].specialChars.value += theChar; document.forms['myForm'].specialHTML.value += theHTML; } </script> </head> <body data-kmwindow="MOUSEX(),MOUSEY(),260,320"> <div id="theHelp" align="center"> <div id="theButtons"> <ul> <li> <button id="ShiftKey" onclick="pasteVals('?','⇧');"> ?<span class="bLabel">S</span> </button> </li> <li> <button id="LtArrow" onclick="pasteVals('?','←');"> ? </button> </li> <li> <button id="TabKey" onclick="pasteVals('?','⇥');"> ?<span class="bLabel">T</span> </button> </li> <li> <button id="CtrlKey" onclick="pasteVals('?','⌃');"> ?<span class="bLabel">K</span> </button> </li> <li> <button id="RtArrow" onclick="pasteVals('?','→');"> ? </button> </li> <li> <button id="RtnKey" onclick="pasteVals('?','⏎');"> ?<span class="bLabel">R</span> </button> </li> <li> <button id="OptKey" onclick="pasteVals('?','⌥');"> ?<span class="bLabel">O</span> </button> </li> <li> <button id="UpArrow" onclick="pasteVals('?','↑');"> ? </button> </li> <li> <button id="AppleKey" onclick="pasteVals('?','');"> ?<span class="bLabel">A</span> </button> </li> <li> <button id="CmdKey" onclick="pasteVals('?','⌘');"> ?<span class="bLabel">C</span> </button> </li> <li> <button id="DownArrow" onclick="pasteVals('?','↓');"> ? </button> </li> </ul> </div> <form action="#" method="post" name="myForm"> <div id="rButtons"> <input id="rH" type="radio" name="returnWhat" value="HTML" checked> HTML <span class="cMode">1</span> <input id="rC" type="radio" name="returnWhat" value="chars" style="margin-bottom:7px"> Chars <span class="cMode"> 2</span> </div> <input disabled name="specialChars" class="input" type="text" id="sCars"/> <input name="specialHTML" class="input" type="text" id="sHtml"/> <br> <button class="bFinal" id="Cb" name="Cancel" type="button" onclick="window.KeyboardMaestro.Cancel('Cancel')"> Cancel<span class="bLabel">Esc</span> </button> <button class="bFinal"id="OKb" name="OK" type="button" onclick="window.KeyboardMaestro.Submit('OK')"> OK<span class="bLabel">Ret</span> </button> </form> </div> </body> </html> |
The CSS
Like Javascript, I know just enough CSS to be dangerous to myself; I'm certain my structure could be much cleaner than it is. Here are some of the bits that I'll be likely to forget if I don't document…
The shortcut keys that appear on mouseover
Each shortcut key is in a span tag, which defines the size, color, and position—absolutely positioned within each relatively-positioned button object, and set not to display by default:
button span {
font-size:10px;
position: absolute;
top: -1px;
left: -2px;
color:red;
display: none; }
To make them visible on mouseover, the body gains a hover behavior, but only for items in span tags—and the only thing on the form in span tags are the shortcut keys:
body:hover span { display:inline; }
The input fields
In order to handle both the HTML codes for the special characters and the special characters themselves, there are two input boxes on the form: The green visible box at the top, which displays the characters as you type, and an invisible box that holds the HTML code for each character.
<input disabled name="specialChars" class="input" type="text" id="sChars"/>
<input disabld name="specialHTML" class="input" type="text" id="sHtml"/>
Both input boxes are set to disabled, as they're not designed for user interaction. The hiding of the HTML field is handled by a very simple bit of CSS:
#sHtml { display: none; }
The remainder of the CSS is pretty basic stuff, just positioning the buttons and text.
The Javascript and HTML
The Javascript code traps keystrokes and then passes a click action to the button associated with a particular keystroke.
The my_keys array holds all the keyboard shortcuts; you can change these as you wish (though I'd suggest leaving Return and Escape alone). The values are the ASCII representations of each letter, and in ASCII, the "A" is character 65:
...
my_keys[67]="CmdKey"; // C
my_keys[75]="CtrlKey"; // K
my_keys[79]="OptKey"; // O
...
So if you wanted to use K for Command and C for control, you'd just swap the two values (67, 75) and that'd be that. (The double-slashes are comment markers, and I added the keys that are represented by the values; it's much easier to remember that way.)
window.addEventListener('keydown', checkKey);
This is the keyboard trap; it listens for key presses (not releases), and then runs a routine named checkKey to process the keys. That function is quite short (though it was much longer the first time I wrote this):
function checkKey(e) {
event.preventDefault();
if (typeof my_keys[e.keyCode] !== 'undefined') {
document.getElementById(my_keys[e.keyCode]).click();
}
}
The first line prevents the default action of the form. I honestly have no idea what that action is, but I know that if I don't do that, the form will beep every time you touch a key.
The second line checks the value of the trapped keystroke, and as long as it's defined in the array of my_keys, it proceeds to the document.getElement…. This step is the key to the code: document.getElementbyId() returns the element on the page identified by whatever's within the parentheses.
In this case, what's in the parentheses is the value associated with the matching key code from the my_keys array. In the case of the "C" key as shown above, that's "CmdKey." Once this command retrieves this element, it sends it a mouse click (the .click() bit at the end).
The code for the button (CmdKey in this example) looks like this:
<button id="CmdKey" onclick="pasteVals('?','⌘');">
⌘<span>C</span>
</button>
The onclick bit is an HTML trigger that tells the button what to do when it gets a mouse click event. And what it does is call a Javascript function called pasteVals, passing it to the fields for the HTML representation of the character and the character itself:
function pasteVals(theChar, theHTML) {
document.forms['myForm'].specialChars.value += theChar;
document.forms['myForm'].specialHTML.value += theHTML;
}
These two lines are what populate the character and HTML fields, the += is a shorthand way of saying "This field = This field's existing contents + this new content," which is how the string of characters grows each time you "press" a button.
And that's really all there is to the code.
If you'd like to modify the palette, the first step is to make sure you're using James' much improved version. Seriously—modifying my code is feasible, but it's a fair bit of work if you're going to modify many of the buttons.
Assuming you've installed James' code, here's all you need to do customize it:
- If you're going to be adding another row (or two or three) of icons, you'll need to make the palette longer. In the CSS section of the code, modify this line:
<body data-kmwindow="MOUSEX(),MOUSEY(),230,320">
The last number (320) is the height of the window in pixels. Experiment to find a value that works for you.
- All of the symbols, their shortcut assignments, and their HTML and character representations are done in one line per symbol:
['83', ['⇧', '⇧', 'S']],
The first number is the ASCII character code, where 65 is A. There are many sites that will display the codes as you type, if you don't want to do the math; here's one I've used.
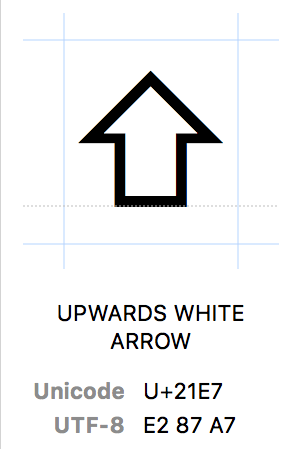 The next thing to modify is the symbol (⇧ in this example), and the third is the Unicode representation of that character (⇧).
You can find this using the Emoji & Symbols viewer in macOS—the value appears below the character on the right side of the window, as seen at right. (If you don't care about the HTML values, you can just replace this bit with ''.)
Finally, the last value is the shortcut key that you'll use to insert the symbol into the output area. This character must match the ASCII value you entered earlier—in this example, the "S" key has an ASCII value of 83.
 The next thing to modify is the symbol (⇧ in this example), and the third is the Unicode representation of that character (⇧).
To add more buttons, just copy and paste an existing row and edit as necessary. Buttons are added horizontally first, then vertically, based on the order they're listed in the script. And that's really all there is to it. Compared to editing my code, this is miles easier! So thanks, James, for the greatly-improved code!
As always, let me know if you have any questions.
Uh-oh... the link to James' much-improved version (in the 'Modifying the Palette' section) is broken :)
It's working fine here—I wonder if you managed to load a version of the article that I edited, and Safari is showing the cached version. Can you empty the cache and reload?
-rob.
Confirmed, the link doesn't lead to a zip archive but a page with "Nothing found"
Does this link work for you? http://robservatory.com/dlfiles/james_code.js.zip.
If so, things are *very* strange, because that's the link that's in the article. Can you hover over the download link and see if it matches what's shown above?
thanks;
-rob.
My bad! It was linked in two spots; the second one was wrong. I've fixed it now.
Sorry about that!
-rob.
Sorry for my late answer. As you already said it's working now. Finally also thanks for this and the latest (great) posts.
Giving up the ability to cancel the palette using the escape key is the only way to add "?" to the button list, right?
Did you mean the actual question mark, as shown? Or did you mean the Escape key itself? If so, then right.
-rob.
(WordPress didn't accept my pasted Escape symbol.)
?
Here's the AppleScript I've been using. You can select one using down arrow, and more than one by adding shift if they're consecutive. If not, you have to use the command key and the mouse or trackpad.
tell application "System Events"
set frontApp to name of first process whose frontmost is true
end tell
set theCommand to «data utxt2318» as Unicode text
set theControl to «data utxt2303» as Unicode text
set theOption to «data utxt2325» as Unicode text
set theShift to «data utxt21E7» as Unicode text
set theEscape to «data utxt238B» as Unicode text
set theTab to «data utxt21E5» as Unicode text
set theReturn to «data utxt21A9» as Unicode text
set theEnter to «data utxt2324» as Unicode text
set ForwardDelete to «data utxt2326» as Unicode text
set BackSpaceDelete to «data utxt232B» as Unicode text
set doubleTab to tab & tab
tell application frontApp
choose from list {theShift & doubleTab & "Shift", theControl & doubleTab & "Control", theOption & doubleTab & "Option", theCommand & doubleTab & "Command", theOption & theCommand & doubleTab & "Option+Command", theEscape & doubleTab & "Escape", theTab & doubleTab & "Tab", theReturn & doubleTab & "Return", theEnter & doubleTab & "Enter", ForwardDelete & doubleTab & "Forward Delete", BackSpaceDelete & doubleTab & "BackSpace"} with prompt "Pick the symbols you want:" OK button name "Insert" with multiple selections allowed
end tell
if result is not equal to false then
set pickedSymbols to result as string
set displaySymbols to ""
if pickedSymbols contains "Shift" then
set displaySymbols to displaySymbols & theShift
end if
if pickedSymbols contains "Control" then
set displaySymbols to displaySymbols & theControl
end if
if pickedSymbols contains "Option" then
set displaySymbols to displaySymbols & theOption
end if
if pickedSymbols contains "Command" then
set displaySymbols to displaySymbols & theCommand
end if
if pickedSymbols contains "Escape" then
set displaySymbols to displaySymbols & theEscape
end if
if pickedSymbols contains "Tab" then
set displaySymbols to displaySymbols & theTab
end if
if pickedSymbols contains "Return" then
set displaySymbols to displaySymbols & theReturn
end if
if pickedSymbols contains "Enter" then
set displaySymbols to displaySymbols & theEnter
end if
if pickedSymbols contains "Forward Delete" then
set displaySymbols to displaySymbols & ForwardDelete
end if
if pickedSymbols contains "BackSpace" then
set displaySymbols to displaySymbols & BackSpaceDelete
end if
tell application "System Events"
tell process frontApp
set the clipboard to displaySymbols
keystroke "v" using {command down}
end tell
end tell
end if
oops, WordPress smartens those quotes...
Comments are closed.