We recently started parking our truck in the shorter of our garage bays—it's short due to shelves at the front that can't be moved any further forward (as they'd then block access to another portion of the garage).
The amount of wiggle room available is quite small—about two inches of leeway, at the most. So parking in the same spot every time is quite important. (The frontmost item on the truck is the bracket that holds the license plate, so that's the part that needs to be watched.)
While there are many ways to solve this issue, here's how I chose to do it:
Sure, I could have hung a tennis ball from the ceiling (I did that first, actually), or put a block on the ground in front of the tire. But I had issues with both of those methods, and I like semi-geeky do-it-yourself solutions. Read on, if you wish, for the details on the project…
Boring Background Info
As noted, I first tried hanging a tennis ball from a string, such that it hit the windshield when the truck reached the ideal spot. While this worked, there were two issues with it. First, I had to get the truck's left/right position just perfect, too, because otherwise the tennis ball would hit a different spot on the curved windshield, which meant I might run into the shelving. Second, it was really hard to tell when the tennis ball was going to just touch the windshield, and I didn't have enough room to have it hit solidly then back up—so I wound up creeping in, inch by inch, until contact was made.
The second option I considered was some sort of stop-point indicator on the floor, like the custom pads you can buy in many auto parts stores. Alternatively, I could just secure a block to the floor at the front of a tire. However, our garage gets a fair bit of use for various projects, and as a play zone for the kids on rainy days, so I didn't want something stuck in the middle of the floor.
 That left electronic parking sensor systems, like the one pictured at right. After buying one, though, I discovered it lacked the sensitivity needed for my confined space—the one I bought wouldn't work for distances under about two feet. (I tried aiming the sensor at parts of the truck that were further away, but the sensor wasn't consistent enough to insure that I stopped at the same distance every time.)
After returning my purchase, and researching other systems available online, the best I found claimed it would work at about a foot, with some variability. Clearly that wouldn't do the trick, given the limited clearance I had to work with.
I also considered an Arduino solution, but that seemed both complex (as I know zip about programming them) and expensive. I did find this project, but I wasn't sure if the sensitivity would meet my needs, and didn't want to risk the cost and effort just to find out it wouldn't work.
At this point, I was about to give up when I discovered I had an old LCD panel lying around—it was the second screen from one of those cheap portable two-screen DVD players designed for in-car use. (The iPad has become our kids' in-car entertainment system.) It had a video input port, so I reasoned I could just buy a cheap security camera, find somewhere to mount it and the display, and then visually watch the truck approaching the shelving, making it easy to stop just where I needed to. Here's how I got it all working…
Step One: Find a screen
I was able to skip this step, as I already had one, but small LCD panels are plentiful and reasonably cheap—this one at NewEgg, for instance, is $54. The only requirement is that it have some sort of video input port, and a power supply (unless you want to tackle that project yourself).
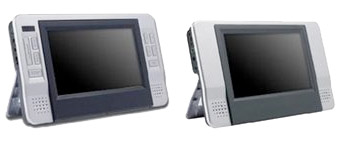 The actual screen I had lying around was the second screen (the rightmost one in the image) from this Panasonic player.
I used it just as it appears (the stand folds flat against the back), though I briefly contemplated making a new case for it. Then I remembered that I have limited "maker" skills, and quickly tabled that idea.
Step Two: Find a camera
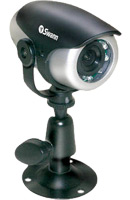 I had exactly two criteria for the camera: small and cheap. I wound up buying a Swann PNP-50 at Fry's for $40. As an added bonus, it includes infrared LEDs, providing (supposedly) a grayscale image at night, up to 16 feet away.
I considered using automotive backup cameras, which are even smaller and cheaper, but I was worried that their wide field of view would distort the view too much for my needs (getting close to a vertical surface).
With camera in hand, I tested it with the LCD panel, and it worked perfectly. I wouldn't say it reminded me of 1080p HD video, but it was more than adequate for my needs.
(You could buy a security camera and remote viewing screen bundle, but such systems were priced much higher than I was willing to spend for a garage project.)
Step Three: Solve the power problem
I only wanted the screen and camera powered on while I was actively parking the truck. I contemplated all sorts of complex sonar-based solutions to trigger the power when the truck started getting close to the shelving, but then remembered a very effective—and decidely low-tech—alternative.
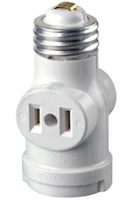 Most garage door openers have lights, and those lights turn on when the door starts moving, and typically turn off a minute or two after the door stops moving. I didn't want to lose the light socket, but this socket adapter from Home Depot (which cost all of $2.52) let me add a plug to the existing light/socket. As expected, the plug only has power when the light has power, which is only during and shortly after the garage door opens or closes.
While this isn't perfect—there's no need to use the camera system while backing out—for $2.50ish, it was more than good enough for me. I then ran an extension cord from the new plug, up along the ceiling, and over to the shelving, so I could plug in the camera and screen. A quick test (pressing the door's Light button on the wall switch) showed that the system worked as expected.
Step Four: Position the camera
I thought this would be the simple part of the process, but it was actually the most time consuming. Because there's so little room available, I couldn't work in front of the truck while it was parked, so I had to temporarily attach the camera (duct tape!), move the truck in, check the picture, move the truck out, and repeat until it was right.
The camera had to be mounted somewhere where there was enough clearance from the truck, and yet provide a clear view of the front of the truck and the shelving. At first, I tried mounting it above the height of the hood, pointing down, but that didn't work well. I then tried it down lower, pointing to the right, but I had to mount it so far to the side (to clear the truck) that the image wasn't clear enough.
 It was at that point that I stripped the camera of its anti-glare hood and tilt/swivel mounting bracket (as seen in the camera image above), which great reduced the necessary clearance.
I had a couple of L-brackets lying around, and amazingly, the screw hole for the camera's hood lined up perfectly with one of the holes in the L-bracket. I attached the camera to the L-bracket, and tried a low location (still via duct tape), in line with the license plate bracket. (I used a lump of Professional Grade Duct Tape™ to make sure the camera didn't tip while I was placing it; eventually I'll replace that with some modeling clay or something.)
This worked exactly as I hoped: the edge of the license plate bracket comes into the camera's view as I approach, and the shelving is visible at the same time. Parking is a simple matter of stopping when the license plate bracket is very close to, but not touching, the shelving.
Step Five: Clean up the installation
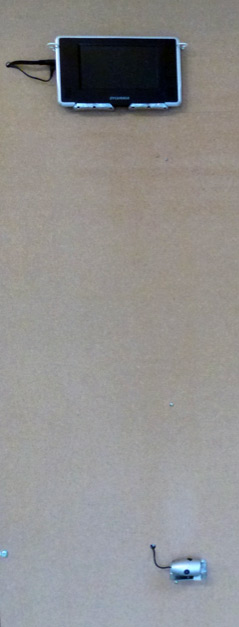
I then bent a couple other L-brackets to serve as lower mounts for the LCD screen, and screwed them in at roughly eye height for someone seated in the truck. To make the screen easily removable, I held the top in with simple screw-in hooks; a half-twist on each, and I can remove the screen if/when it fails.
One more hole for the screen's mess of cabling, some behind-the-shelving connections, and a couple of plugs into the extension cord, and it was done! (Click the image at right for a larger version.)
So how well does it work, in actual use? Wonderfully well, as seen in the video. I simply drive in until I see the bumper, then slow down as the plate bracket appears. With an onscreen view, it's really easy to stop within the required two inches, every time.
Was this project strictly necessary? Not at all; a brick on the ground would've been much cheaper, faster, and about as effective. But it wouldn't have been nearly as much fun.
You never fail to amaze with your ingenuity - you must not have enough real work to do!
I did not read all the "boring" info, but I love the above the fold part! It is the perfect organized-geek solution. My dad will love this!!
Great idea! Thanks for the inspiration! Much better that the sonar ranging idea.
Comments are closed.