If you use a column-view Finder window, and prefer to use keyboard navigation, here's a trick you may not be aware of—even though this dates back to the original release of Mac OS X. If I hadn't started the Mac OS X Hints site, I doubt I would've known this…
To drill down into Finder folders via the keyboard, you use the Right (down) and Left (up) Arrow keys-don't worry, that's not the tip, because that's totally completely obvious. The tip is this: After navigating into a given subfolder (and optionally selecting an item in that folder), the Shift-Tab key combo will navigate back up, but leave your "path" to the subfolder visible. Think of this like a "breadcrumb" trail that shows your navigation. (By comparison, if you use the Left Arrow, Finder "closes" each folder as you exit it, leaving you with nothing selected once you reach the top.)
One you've used Shift-Tab to navigate all the way back out, pressing Tab will navigate back down the highlighted path. Alternatively, pressing the Right Arrow key will jump immediately to the rightmost-selected item.
Update
As of Mojave (or maybe High Sierra), Apple changed the behavior of the Right Arrow after you back navigate with Shift Tab: It no longer jumps back to the end of the trail, instead it just works like a usual Right Arrow and selects the first item in the next column over.
I did some experimenting though, and found that Control-Tab will jump to the end of the breadcrumb trail.
Here's how that all looks in action—first is the normal arrow key navigation, then navigation using Shift-Tab and Tab.
You may not need/want the breadcrumb path all the time, but when you do, just remember to Shift-Tab your way out of the current folder. Using the arrow keys and the Tab/Shift-Tab keys together provides two complementary methods to navigate your column-view Finder windows.
One of the most-useful tools in macOS is also one of the most useless: The Services menu. In theory (and occasionally actually true), the Services menu lets you quickly take action on something—a selected file or folder, or a chunk of text. In reality, the Services menu is a vaste wasteland of unused functionality, and a place where pre-assigned keyboard shortcuts go to hide from your attempts to use them elsewhere.
If you install a fair number of apps on your Mac, you may be surprised by the amount of stuff in your Services menu. Here's a look at my iMac, after I reset the Services panel (System Preferences → Keyboard → Shortcuts → Services) to its defaults:
If you're good at counting, you spotted 123 separate services flowing past. Not all are active, of course—"only" 58 are. Of those 58, you'll see some subset based on whatever you've selected…but even that subset can present itself as a huge list:
That's really not very helpful when you want to quickly apply some action to your selection. To make the Services menu useful again—and to potentially free up some keyboard shortcuts—you'll need to actively manage your Services.
However, on my iMac and rMBP running macOS 10.12.3—and on others' Macs, as my report was based on similarfindings by Michael Tsai and Kirk McElhearn—the Option key no longer worked; it was the Shift key. But on a third Mac here, running the 10.12.4 beta, the shortcut was back to the Option key.
To further add to the confusion, a comment on the original article—as well as replies to the others' tweets—states that the user's Mac is still using the Option key in 10.12.3. So I thought I'd create a new user account, and see if I could figure out what was going on.
After some experimentation, I was able to discover why the shortcut key changes, and how to change it between Shift and Option at any time. This clearly isn't a feature, so I guess it's a bug, but it's a weird bug.
Update: See this article for the cause of the shortcut key change. It's a bug, not a feature…I think.
Via Michael Tsai and Kirk McElhearn, today I learned that I've been giving bad advice to our users ever since macOS Sierra 10.12.3 shipped.
It used to be that holding Option in Finder and then clicking the Go menu would reveal an entry for the normally-hidden Library folder. In macOS 10.12.3, for reasons unknown, Apple has changed this: The only thing the Option key does now is change Go > Enclosing Folder into Go > Enclosing Folder in New Window. To see the Library folder entry, hold down the Shift key instead.
So that's the bad news: They changed an undocumented shortcut that many users have been told to use when troubleshooting. The good news is they added a better, easier, and faster way to get to the Library folder: Just press ⇧⌘L in Finder. This matches all the other shortcuts—⇧⌘O for Documents, ⇧⌘D for Desktop, etc. (Downloads is the odd one out, as it uses ⌘⌥L.)
Note: This may be a short-lived change, perhaps even a bug—it seems to be gone in the 10.12.4 beta release. Either that, or the 10.12.4 build is a bug, and it's supposed to be how it is now in 10.12.3. Hey Apple, I have some advice on how to fix this whole messy situation: Stop hiding the Library folder by default! (Note that you can unhide it by showing View Options (⌘J) on your home folder and checking Show Library Folder.)
A tweet I sent last night triggered my memory of this very-useful tip that I've gotten worse about remembering to implement over the years. First, the tweet…
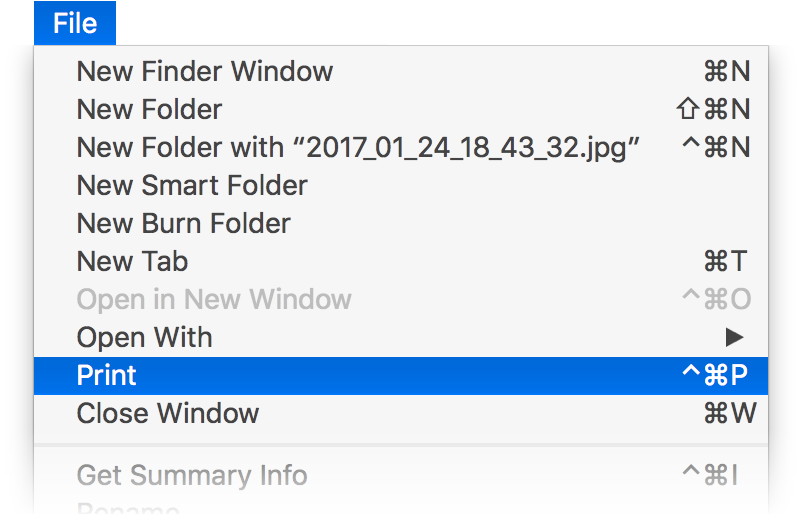
Just think, the root of thousands of "oh crud I printed instead of opened" errors lay in the 1874 QWERTY design decision to put O next to P.
The issue, of course, is the macOS ships with ⌘O (Open) and ⌘P (Print) as pre-assigned keyboard shortcuts in Finder. Select a bunch of files to open, reach for the O and miss by just a touch, and you've started a dozen print jobs. Whoops!
Years ago on macosxhints.com, there was one of those "duh!" tips with an easy solution to this (and other similar) issues: Reassign the stock keyboard shortcuts. Here's a "fixed" Print shortcut in Finder, for example:
And with that simple change, no more accidental print jobs.
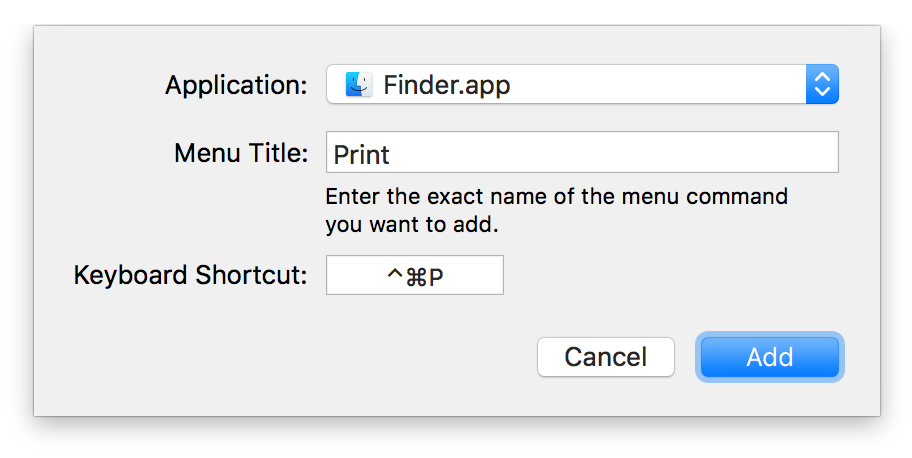
Changing the shortcuts is easy; start by opening System Preferences > Keyboard, then going to the Shortcuts tab. Scroll to the bottom of the left-hand pane, select App Shortcuts, then click the plus sign. You can then select an app—or all apps—from the first pop-up menu, enter the menu item to change/assign in the first input box, and type the shortcut to use in the third:
You can do this for as many of the stock shortcuts as you wish…and obviously, you can add some that you feel Apple left out. Read on to see what I change in the Shortcuts section—not just for applications, but in all of the sections (Launchpad & Dock, Mission Control, etc.)
For those who aren't aware, defaults write is a Terminal command that can be used to modify applications' settings. While you can use these commands to modify settings that are present in an app's Preferences panel, the more-common use of this command is to set non-visible (hidden) prefs that you won't find in the GUI.
Here are three of my favorites—three that not only perceptually but actually increase the speed of your interactions with your Mac. I still, to this day, execute these commands on any new Mac I set up.
Sheets are the attached windows that roll down from (and up into) the title bar of windows, such as the Save dialog in most macOS applications. The animation of these sheets, while visually appealing, does take some time.
Using this tip, you can basically eliminate the animation, greatly speeding the appearance and disappearance of sheets. Given how pervasive sheets are, this tip can save a lot of time each day. While the other tips offer actual speed improvements, they're nothing like the change you get by changing the sheet animation speed.
As a test, I opened and closed a Save sheet in TextEdit five times, both before and after applying this tip:
If you're scoring at home, that's a 47% reduction in the time required for just five cycles of a Save sheet.
Once a month, I download roughly 25 gzipped (.gz) files from Apple—these are our Mac App Store sales reports, with one file for each App Store region. I could have Safari expand these files (via the "Open 'safe' files after downloading' item in its preferences), but I prefer to leave that option unchecked. (Why? I often download archives that I want to leave archived, and I like to keep originals of many of the things I download).
If you work with lots of compressed files, you're probably familiar with what happens in Finder (see note) when you go to expand any semi-large number of files: The infamous Dancing Dialog™. It looks something like this…
[Note: Technically, this isn't Finder, it's Archive Utility doing the expansion. But this is the service that Apple provides to expand compressed files, and it's what 99% of macOS users will use. It can be changed via the Get Info dialog, but very few people will take that step. So to most users, it seems it's Finder handling the expansion. For ease of reference, I'm going to say it's Finder doing the expansion.]
Not only is this randomly-resizing dialog box visually annoying, it turns what should be a super-fast process into one that takes a ridiculous amount of time. The end result is that users think they have a slow machine—"it took over 12 seconds to expand 25 tiny little archives!"—when what they really have is a horrendously slow GUI interface to a super fast task.
Just how fast is the task, if the GUI doesn't get in the way? Thanks to the Unix core of macOS, we can answer that question using Terminal, the geeky front-end to the Unix core. The Unix command to expand .gz archives is gzip; so to expand all the .gz files in a folder (and keep the originals), you'd use this command in Terminal:
gzip -d -k *.gz
If you try this, you'll find out it's nearly instantaneous—press Return, and the files are expanded. Unix actually gives us a way to see exactly how fast it is, via the time command:
$ time gzip -d -k *.gz

real	0m0.013s
user	0m0.002s
sys	0m0.005s
This was for a set of 24 .gz archive files (on a solid state drive), and the real line in the output shows exactly how long it took to expand them all: 0.013 seconds. By comparison, I made a screen recording (with an onscreen stopwatch for timing) of Finder expanding the same 24 files; it took 12.8 seconds for all the dialog dancing to end. Think about that…
Expand 24 .gz files
Finder: 12.8 seconds
Terminal: .013 seconds
Terminal is 984.6x faster than Finder
To put those results another way, if expansion time is linear, gzip could expand 23,631 files in the time Finder takes to expand 24 files. That's nuts!
(You can watch this video for a visual comparison of expanding the same set of files in Finder and Terminal.)
So it's not the computer that's slow, it's the GUI interface to the computer that (in this particular use case) is incredibly, horrendously slow. And there's no need for it—the separate individual progress bars, appearing and vanishing in under a second each, provide no useful feedback to the user. They just slow down the task.
Finder (née Archive Utility) should just execute the task without any visual feedback (though it should pop up a window if there are exceptions). If visual feedback is really required, a window with a single progress bar for the entire task would be OK, but would still slow operations down.
This is a great example of how an everyday task can make you think you have a slow computer, when what you really have is a fast computer with a slow interface element. Given how often we all deal with compressed files, it'd be nice to see Apple clean up this mess. Until they do, however, you can harness the power of Unix—even while in Finder—to speed up the task. Here's one way to do just that.
Over the weekend, I wrote myself a little AppleScript program that makes it much easier to create license files for our customers. (Given my lack of knowledge on AppleScript, I'm quite happy with the result.)
To make it easy to use on all my Macs, I stored the finished result in Dropbox. I tested it using my MacBook Pro, assigning it a global keyboard shortcut using Butler. It worked great; as soon as I typed the shortcut, I'd see my "Which program?" onscreen dialog, and all was good.
When I got back to my iMac, I used Butler to point to the same script on Drobpox, and tested it. I was very surprised to see that, instead of launching my app, OS X presented this dialog box:
Confused, I pulled out the MacBook Pro, and tested again…and again, it worked fine, launching without any confirmation dialog.
After many minutes of hair pulling, I figured out the problem: On the MacBook Pro, I had assigned the shortcut as Shift-Option-M; on the iMac, I decided that it'd be easier to type Shift-Control-M, so that's what I used (intending to change the MacBook Pro to the same shortcut). As soon as I removed the Control key from the shortcut, my application loaded without the confirmation dialog.
I've been unable to figure out why this happens, but if you're launching AppleScript apps via global shortcuts, avoid using the Control key in those shortcuts (unless you like needless confirmation dialogs, that is).