Skip to content

Cool Hardware

Idiot proofing my PC’s power switch

Although I'm a Mac person, I've almost always had a Windows PC in the house—partly to stay current on the competing OS, but mostly because I enjoy many PC games that never make it to the Mac. I tend to keep these machines much longer than I do my Macs, though—my 2008 PC lasted until the 2017 Frankenmac, and that one lasted until a few months ago, when I decided it was finally time to replace it (as it couldn't run Windows 11).

Long story short, I bought an assemblage of parts and built a new PC, which I love except for one niggling issue that was bugging me. The new machine has very quiet water cooling, a higher-end video card, super-fast SSD, and (most importantly for me) a nearly-silent case. But it's that case that was causing the niggling issue: The power button design was absolutely horrid, leading me to accidentally turn the machine on and off more than once.

[continue reading…]


An anywhere switch to control HomeKit devices

I recently assembled an IKEA cabinet and shelving in the corner of a room. It's a darker corner, so I added lighting to the cabinet and the shelves, all of which is then plugged into a HomeKit-compatible power plug. I can now easily turn the lights on and off with Siri, but I wanted to have a more-traditional wall switch, too.
As the wall outlet isn't switched, the "real" solution would have involved hiring an electrician to cut holes in the wall and run a new line to a new switch, followed up by a fair bit of drywall repair, texture, and painting. I didn't want to go that route.

Instead, I found Belkin's Wemo Stage Scene Controller1Apple sells this on their site, too, but at a much higher price., which promised an install-anywhere switch for any HomeKit connected devices.

(Note: I don't know if this thing works outside the USA or not; I found a note on their site indicating it may not work in the UK, but that's all I was able to find.)

I bought one to test, and after the first day, I was preparing to return it and write a very scathing review…
[continue reading…]


A mini review of a mini arcade cabinet game

Being a person of a certain vintage, I have a soft spot in my heart for the arcade video games of the 1980s—Asteroids, Pac-Man, Missile Command, etc. I've long wanted to get an original game in its full-sized cabinet, but they're large, increasingly expensive, and complicated to maintain.

So I use MAME to run such games on my Mac, but it's just not the same as a physical machine. I've considered building my own cabinet, but then remembered that I have essentially no carpentry skills (or tools!). Enter Arcade1Up, who offer smaller (yet still substantial) cabinets with fully licensed versions of many classic arcade games.

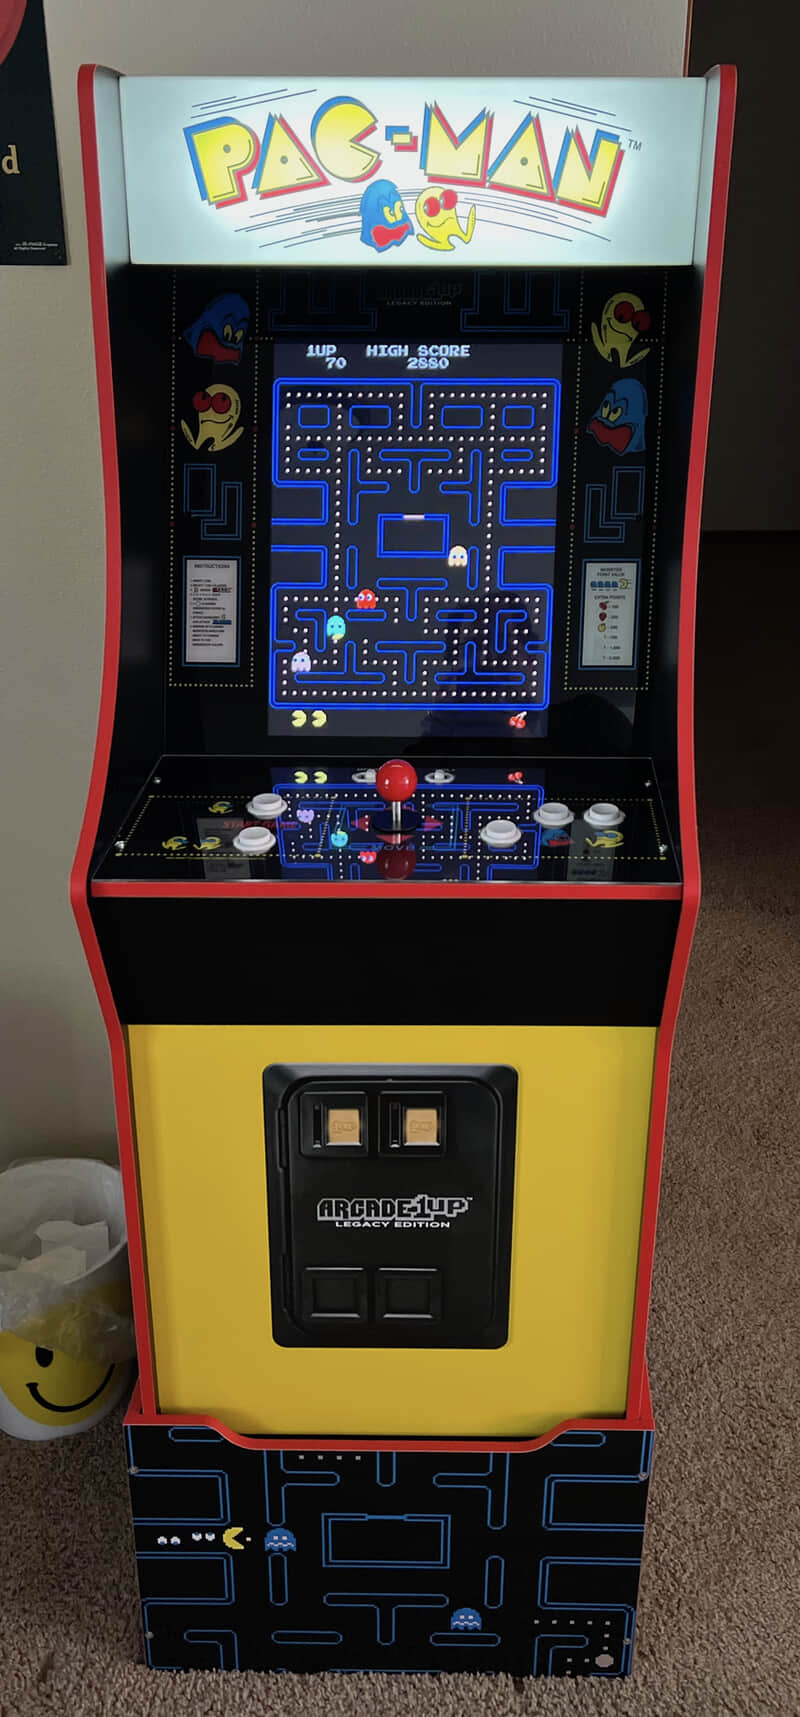
After watching for sales for a while, I saw a deal on the BANDAI NAMCO Entertainment Legacy Edition Arcade Machine (wow, what a name). This cabinet includes 12 games, though only three—Pac-Man, Galaxian, and Galaga—were of much interest to me. The kit also included the riser, making it playable while standing up.

The kit retails for $449, but I caught it on sale at Walmart (via slickdeals, a site that either saves or costs you a small fortune, depending on how you view it) for under $300. I wasn't quite sure what the quality of the kit would be, as even at $449, it seems relatively inexpensive.

I had the kit sitting here for a bit before I had time to put it together, but now, as you can see by the image at right, it's done. If anyone else is in the market for one of these, I thought I'd share my thoughts on the kit and using the finished product.

[continue reading…]


We have (semi) new robotic vacuum overlords

In late 2019, I wrote about how we were using two Deebot robotic vacuums to help keep our floors clean. And while these vacuums worked well, they had two issues that became more annoying as time passed:

  • They clean using a random path method
  • There's no way to map out obstacles they should avoid

The Deebots are basically non-intelligent robot vacuums. They have the ability to avoid bumping into things, and they won't fall off drop-offs, but that's about where their intelligence ends. They clean using a random path, which works but seems very inefficient. Much worse, though, is that there's no ability to mark areas you don't want them to clean.

For me, that meant I had to close the door to our laundry room so it wouldn't try to clean and get stuck in there. And block off access paths to other areas where it could get stuck. And put one shelf on risers, as the Deebot seemed to be able to get under it, but not back out!? And I had to do this any time I wanted to run the vacuums. That gets old pretty quick.

I wanted to find a vacuum that would clean in a more orderly fashion (using some sort of room map), and to electronically block off areas where they shouldn't clean. The problem was most vacuums that offered these features were (at the time) $350 or more, while the Deebots had cost us only $170 or so. So I kept searching and waiting.

tl;dr version: We bought two Wyze Vacuums with LIDAR and restricted area capabilities, and love them. Ours cost $225 each, but the price today is $267 each. Read on for a much more detailed review, if you wish.

[continue reading…]


Remember, kids, RAID is not a backup!

Major update: The QNAP box failed tonight (Aug 3) after running flawlessly for three days straight. I went out to grab some dinner (I shouldn't leave, ever, apparently), and came back to the RAID offline with just a power light, no USB or drive lights.

I moved the drive from a USB hub on a long cable to directly into my Mac on a short cable. Same problem. I then pulled the drives from the array and dropped each into my drive dock, and they were both fine. (All my data was gone, though—thankfully I had literally cloned the drive just before I went out.)

Needless to say, the QNAP box is going back. I've ordered a different unit, with a different chipset in it, but it won't be here for about a week. In the interim, I've put my new drives in external enclosures, and I'll just use Carbon Copy Cloner to mirror them every 30 minutes or so. I've edited the post to reflect my experience.

I'll edit and repost this once the new box is here and (hopefully) working, though I might wait more than three days after it arrives, just to be sure!

On my iMac, I have a fair amount of data—somewhere around eight terabytes or so spread across 15TB of drive space. Until last week, I had it split between the internal SSD (work and personal files I access a lot), an external 6TB USB drive (archive stuff I want to keep but not regularly access), and an external 8TB RAID box (a whole bunch of music, movies, home videos, work videos, etc.)

Being paranoid, I also had relatively good—but not bulletproof, as I discovered–backup strategies for all of these things. And it's a good thing I did, as last week, my external RAID box died in spectacular fashion. While I was out of town, no less. And that's why they say, "RAID is not a backup!"1Many RAID levels duplicate your data, but if something happens to the RAID box itself, the data is toast.

So what happened, how'd I recover, and what's my new plan going forward?

[continue reading…]


My impressions of the M1 MacBook Pro

I recently received my Apple M1-powered 13" MacBook Pro, which is primarily going to be used for testing our apps on Apple silicon, and supporting customers using these machines. But that doesn't mean this is a work machine; it's a personal purchase as I'll use it for my own needs as well. (Thankfully, it only had a net cost of $33 after I sold my 16" MacBook Pro.)

By now, you've probably read a slew of stuff about both the MacBook Pro and its slightly-lighter MacBook Air cousin. Between unboxing videos, extensive benchmark suites, and multi-thousand-word reviews, there is no lack of coverage of these machines. (However, I will add that I did make a video of my MacBook Pro—with its 16GB of RAM—opening 75 apps in just over a minute. Not bad for an entry-level machine!)

I'm not going to try to replicate those reviews, because they do an excellent job of covering the new M1-powered Macs in a level of detail that I just don't have time to get into. Instead, here's what I'll be discussing…

  1. Why I chose the 13" MacBook Pro
  2. A few benchmark results of interest
  3. Rosetta and non-native apps
  4. Using iOS apps on macOS
  5. General discussion on performance
  6. The future of Apple silicon Macs

So why a MacBook Pro and not an Air?

[continue reading…]


Give your iMac a lift

I have a 2019 27" iMac, which replaced a Late 2014 27" iMac. Both of these are/were placed directly on their stands on my desk. I've always felt that the screen was just a bit too low to be ideal, but I was too lazy to deal with solving it—especially as I knew it meant I'd also have to deal with the mess of cables on the desk behind the iMac.

Then last week, I saw MacRumor's review of the Twelve South Curve Riser iMac Stand, and thought it might solve my problem. But at over four inches (10cm) in height, I thought it would be too high for me—with the height of my desk and chair, I'd wind up looking up at the screen. And, at $80 for just a bent piece of metal, it seemed expensive for what it delivers.

However, MacRumors also linked to their review of the Satechi Type-C Stand for iMac (view on Amazon), which rises a more-reasonable 1.63" (4.1cm) from the desk. But what really intrigued me was that for $90—just $10 more than the Twelve South riser—the Type-C Stand includes two card reader ports (at up to 104MB/s), three USB-A ports (5GB/s), a USB-C port (5GB/s), and a headphone jack.

The ports on the front were the deal sealer for me: My Logitech keyboard and mouse both charge over USB-C, and I'd been using my MacBook Pro to do that as I only have a USB-C to USB-C cable. I also do a fair bit with memory cards—my drone uses microSD and my camera uses a regular SD card. I'd been using a regular card reader that requires the fiddly task of putting the microSD card into a SD-sized card holder; the Satechi stand has two separate slots, so that fiddly work is gone.

As for the brand, I have a Satechi Wireless Smart Keypad that's been working flawlessly for five years, so I felt pretty safe making the purchase decision. It arrived on Sunday, and after getting everything set up, I wish I would have done this years ago.

[continue reading…]


Review: Logitech MX Keys for Mac

In April of 2019, I reviewed the Logitech MX master 2S mouse, which I really liked. Earlier this year, Logitech came out with the Logitech MX Keys for Mac keyboard, so I thought I'd give it a try. (I also upgraded to the MX Master 3 mouse at the same time.)

Executive summary: I love this keyboard. I was on a road trip recently, gone for 12 days straight with nothing but a MacBook Air (of the 'broken butterfly' generation). As soon as I got home and switched back to my iMac, I was reminded of just how much better this keyboard is than the one built into my Air…and the one that came with my iMac.

(Note: The "Mac" in the name simply means that you're getting a keyboard with Mac-specific symbols on the Command and Option keys; I'm pretty sure the Windows version would work just as well, but without the Mac-specific look.)

This review won't be quite as thorough as that of my mouse, mainly because there aren't as many nifty features—it is "just" a keyboard, after all.

[continue reading…]


My iPad case of choice—twice over

When I bought my prior 9.7" iPad Pro back in 2018, I wanted to find a case that met my criteria:

  • Full coverage - front, back, and sides
  • Storage for Apple Pencil
  • Auto-sleep on cover open/close
  • Apple Keyboard support was not important to me
  • Relatively inexpensive

I wound up ordering a few from Amazon, tested each of them, kept one, and sent the others back. The one I kept back then is the same general model as the one I've put on my new iPad Air: The JUQITECH iPad Case with Pencil Holder:

This case cost all of $11, and for that, you get a full-coverage case with room not only for the pencil, but the small USB adapter the pencil uses to connect to regular Lightning cables. And when the charging cap is off, it fits in the small hole above the pencil.

[continue reading…]


Taking it back to the matte

Many many years ago, Apple made glorious laptops with matte screens. Sadly (for me, at least), these gave way to brighter, shinier, and much more reflective glossy displays. These same glossy screens are found on iOS devices as well, including my new iPad Air.

But on iOS devices, glossy screens are even more annoying than they are on laptops, because of fingerprints. It sometimes seems I spend almost as much time cleaning my iPad as I do using my iPad. But what if there were a product that could solve both the glossy issue and the fingerprint issue?

A friend of mine clued me in to just such a thing…the Moshi iVisor iPad screen protector. (The full line, including iVisor for iPhones, is also available via Amazon.) While I don't have two iPads for comparison sake, here's how my iPad now looks against an uncovered iPad mini:

Obviously, there's a lot less glare on the covered iPad, which I love—it's still not ideal with bright overhead lights, but it's a whole lot more usable.

But what about installation, use with the pencil, fingerprints, and the brightness of the screen under the cover?

[continue reading…]